
Diy Car Speaker Installation

Upgrading your car audio system doesn’t have to mean expensive installations or professional help. With the right tools and a bit of know-how, DIY car speaker installation is a rewarding project that enhances your driving experience. Replacing factory speakers can dramatically improve sound quality, delivering richer bass, clearer highs, and a more immersive audio environment.
This guide walks you through the essential steps—from choosing compatible speakers and gathering tools to removing door panels and connecting wiring. Whether you're a seasoned hobbyist or a first-time installer, the process is accessible and cost-effective. Discover how a few hours of effort can transform your car’s sound system and give you the audio performance you’ve been missing.
How to Successfully Perform a DIY Car Speaker Installation
Installing new speakers in your car can significantly enhance your audio experience, and with the right tools and guidance, a DIY car speaker installation is a manageable project for most enthusiasts.
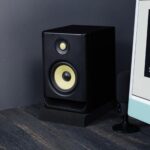
 Presonus Eris 3.5 Studio Monitors Review
Modern factory speakers often lack the power and clarity of aftermarket options, making an upgrade worthwhile. The process involves removing door panels, disconnecting old speakers, wiring in new ones, and ensuring a secure fit.
While it may seem intimidating at first, most vehicles follow a similar pattern, and online resources often provide model-specific instructions. With careful attention to speaker compatibility, wiring polarity, and sound staging, you can achieve professional-level audio quality without paying for labor.
Choosing the Right Speakers for Your Vehicle
Selecting the appropriate speakers is the first and most crucial step in a successful DIY car speaker installation. Not all speakers fit every car, so checking the size compatibility—such as 6.5-inch or coaxial versus component sets—is essential.
Research your vehicle’s make, model, and year to determine which speakers are designed for your factory locations. Additionally, consider sensitivity ratings (measured in dB), power handling (RMS), and whether you want speakers with built-in crossovers.
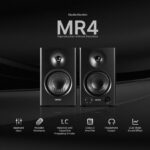
 Pro Audio Studio Monitor
Higher sensitivity speakers require less power to produce loud sound, making them ideal if you’re not adding an external amplifier. Paying attention to these factors ensures you get the best sound quality and a hassle-free installation.
Essential Tools and Materials for Installation
Having the correct tools makes a DIY car speaker installation much smoother and prevents damage to your vehicle’s interior. At a minimum, you’ll need a panel removal tool, screwdrivers, wire strippers, and crimp connectors or soldering equipment for secure wiring connections. A multimeter helps verify polarity, and butyl tape or foam gaskets can prevent vibrations and rattles.
Some cars require wire harness adapters to connect new speakers without cutting factory wiring. Keeping everything organized and labeled avoids confusion—especially when dealing with multiple speaker channels. Preparation with the right tools not only speeds up the process but also ensures a safe and durable installation.
Wiring and Connecting Your New Speakers
Proper wiring is critical to both sound quality and speaker longevity during a DIY car speaker installation. Each speaker has a positive and negative terminal, and connecting them incorrectly (reverse polarity) can cause phase issues, reducing bass and creating a poor soundstage. Use color-coded wires or a multimeter to match factory wiring to your new speakers.
 Rokit Krk Studio Monitors
If splicing wires, use crimp connectors or solder joints covered with heat-shrink tubing for a secure, reliable connection. For cars without external amplifiers, ensure the new speakers are rated to work efficiently with your head unit’s output. Taking time to wire correctly prevents electrical issues and maximizes the performance of your upgraded audio system.
| Component | Importance | Key Considerations |
|---|---|---|
| Speaker Size | Ensures a proper physical fit | Verify dimensions match factory openings (e.g., 6x9, 6.5-inch) |
| Power Handling (RMS) | Prevents speaker damage from overpowering | Match RMS rating with head unit or amplifier output |
| Wiring Polarity | Maintains correct audio phase and sound quality | Positive to positive, negative to negative; use color codes |
| Sealing and Mounting | Improves bass response and reduces distortion | Use gaskets or foam to create an airtight back enclosure |
| Wire Gauge | Efficient power delivery, especially with amplifiers | Use 16–18 AWG for speakers; thicker for high-power setups |
Frequently Asked Questions
What tools do I need for DIY car speaker installation?
You’ll need basic tools like a screwdriver, trim removal tool, wire stripper, and crimping tool. Depending on your vehicle, you might also require a socket wrench or nut driver. Wire connectors and electrical tape are essential for secure connections.
A multimeter can help verify power and ground connections. Always consult your car’s manual and speaker instructions to ensure compatibility and proper installation techniques for a safe and successful upgrade.
How long does it take to install car speakers myself?
DIY car speaker installation typically takes 1 to 3 hours, depending on your vehicle’s complexity and experience level. Simple installations in common car models may take less than an hour per pair.
 Sound Addicted Studio Monitor Isolation Pads Reviews
Factors like accessing speakers behind panels, running new wiring, or integrating an amplifier can extend the time. With proper preparation and tools, most enthusiasts complete front and rear speaker replacements in under two hours without professional help.
Can I install new speakers without replacing the factory wiring?
Yes, in most cases you can use the factory wiring for new speakers. Factory wires usually support aftermarket speakers as long as power levels are within limits. Use compatible adapter harnesses or splice wires securely with proper connectors.
Inspect the wiring for damage and ensure polarity is correct. Avoid high-power systems without upgrading wiring to prevent overheating or signal loss. Always disconnect the battery before starting to avoid electrical issues.
Do I need an amplifier for better sound with new car speakers?
An amplifier is not required but greatly improves sound quality. Factory stereos often lack the power to drive high-performance speakers fully.
 Speaker Studio Monitors
An amp delivers cleaner, louder audio and better dynamic range. If you want rich bass and higher volume, adding an amplifier is recommended. However, quality aftermarket speakers can still offer noticeable improvement when powered by a stock head unit. Match your speaker sensitivity and impedance with the amplifier for optimal performance.
Leave a Reply