
How To Connect Ceiling Speakers To Amplifier

Connecting ceiling speakers to an amplifier correctly ensures optimal sound quality and system performance. Whether setting up a home theater, background music, or multi-room audio, understanding the wiring and compatibility between components is essential.
Ceiling speakers require proper impedance matching and cable routing to function efficiently with an amplifier. This guide walks you through the step-by-step process, from selecting the right gauge wire to making secure connections.
Safety precautions, polarity alignment, and testing procedures are also covered to help avoid common mistakes. With clear instructions and practical tips, this article simplifies the installation process for both beginners and experienced users aiming for a seamless audio experience.
 How To Connect A Receiver To Speakers
How To Connect Ceiling Speakers To Amplifier: A Step-by-Step Guide
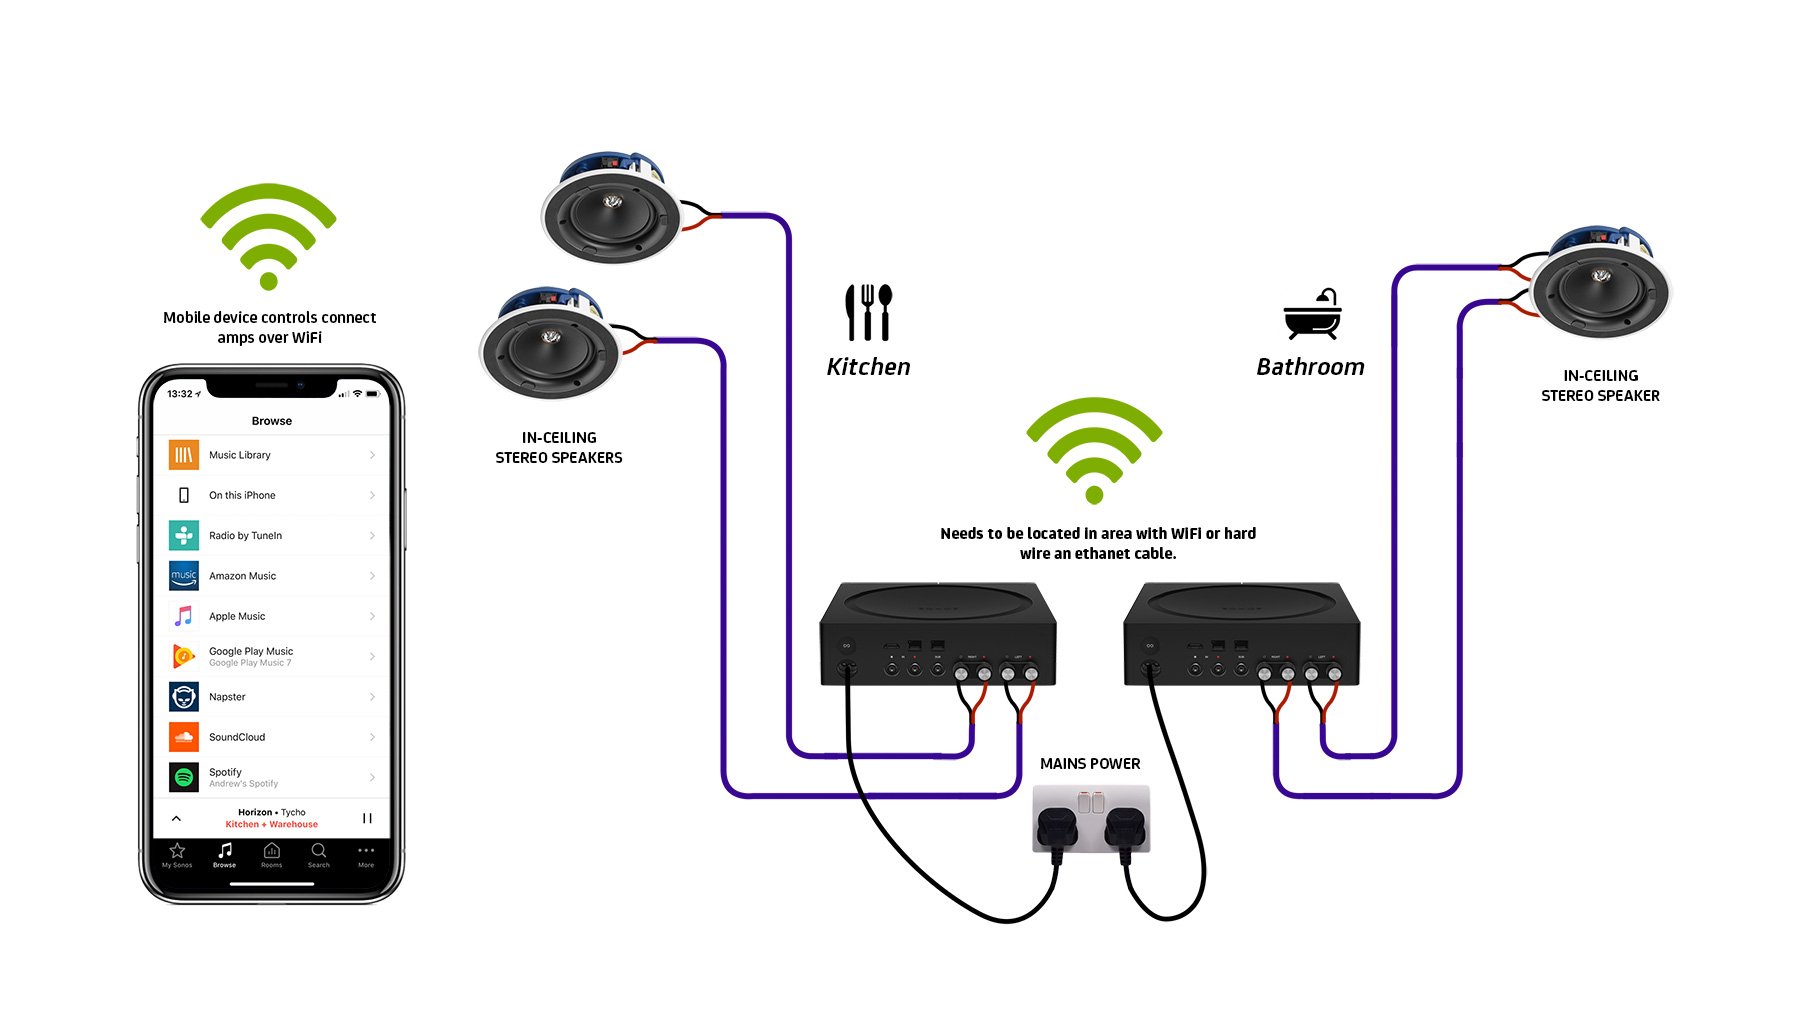
Connecting ceiling speakers to an amplifier properly ensures high-quality sound distribution throughout your space, whether it's a home theater, living room, or commercial environment. The process involves selecting compatible speakers and amplifier, running speaker wire from the amp to the ceiling locations, and making secure connections that prevent signal loss or interference.
It’s crucial to match the impedance (measured in ohms) of your ceiling speakers with your amplifier’s output specifications to avoid damage. Using proper gauge wiring—typically 14 or 16 AWG depending on the length and power—is essential for maintaining audio fidelity.
Additionally, observing polarity when connecting wires (positive to positive, negative to negative) ensures correct phase alignment and balanced sound. Once wired, test the system thoroughly before final installation to confirm proper function.
Choosing the Right Amplifier for Ceiling Speakers
Selecting the appropriate amplifier is vital for optimal performance of your ceiling speakers. The amplifier must support the total impedance load of all connected speakers and deliver sufficient wattage without overheating.
 How To Connect A Record Player To Bluetooth Speakers
For multi-room setups, consider a multi-zone amplifier that allows independent volume control per room. Ensure the amplifier’s output per channel matches the power handling capacity (RMS) of your ceiling speakers—typically between 50 to 100 watts per channel is sufficient for most residential installations.
Amplifiers with built-in crossovers or high-pass filters are beneficial if you’re not using subwoofers, as they prevent low-frequency signals from damaging smaller ceiling speakers. Additionally, look for models with auto-formats detection or impedance protection features to safeguard against short circuits or overloaded outputs.
Running and Labeling Speaker Wire Correctly
Proper cable management begins with choosing the correct type of speaker wire—CL2 or CL3 rated for in-wall and in-ceiling use to meet fire safety standards.
Measure the distance from your amplifier to each speaker location and add extra length for routing and connections. Run wires through walls or ceilings carefully, using fish tapes or rods to guide them without damaging insulation. Always label both ends of each wire run (e.g., “Front Left,” “Kitchen”) before connecting to avoid confusion during installation.
 How To Connect A Subwoofer To Speakers
Avoid running speaker wire parallel to electrical wiring to minimize electromagnetic interference; instead, cross electrical lines at 90-degree angles when necessary. Securing wires with staples (not too tight) or clips keeps them organized and prevents sagging or damage over time.
Matching Speaker Impedance and Wiring Configurations
Impedance compatibility between your ceiling speakers and amplifier is critical to prevent equipment damage and ensure consistent sound quality. Most ceiling speakers are rated at 8 ohms, but when connecting multiple speakers, the total impedance changes depending on whether they are wired in series or parallel.
Wiring in parallel reduces total impedance (e.g., two 8-ohm speakers in parallel = 4 ohms), which may overload some amplifiers not rated for low impedance. In contrast, series wiring increases impedance but can reduce overall volume and efficiency.
For large installations, consider using a speaker selector switch with impedance protection to manage multiple speakers safely. Always consult your amplifier’s manual to determine its minimum supported impedance and maximum number of speakers per channel.
 How To Connect A TV To Bluetooth Speakers
| Factor | Recommended Specification | Notes |
|---|---|---|
| Speaker Wire Gauge | 14 AWG (up to 80 ft), 16 AWG (up to 50 ft) | Thicker wire minimizes signal loss over long runs |
| Impedance Match | Match amplifier’s min/max ohm rating | Avoid loading amplifier below its rated impedance |
| Power Handling (RMS) | 50–100 watts per speaker | Ensure amplifier delivers within speaker’s power range |
| Cable Rating | CL2 or CL3 for in-wall/ceiling use | Required by building codes for safety and compliance |
| Connection Polarity | Positive (+) to positive, Negative (–) to negative | Maintains correct phase and stereo imaging |
Step-by-Step Guide to Connecting Ceiling Speakers to an Amplifier
How do you properly wire ceiling speakers to an amplifier for optimal audio performance?

Choosing the Right Gauge Speaker Wire
- Selecting the appropriate wire gauge is crucial for maintaining signal integrity and minimizing power loss over distance. For most ceiling speaker installations up to 50 feet (15 meters) from the amplifier, 16-gauge wire is sufficient and commonly used.
- If your speakers are located farther from the amplifier or if you're using higher-powered systems, upgrading to 14-gauge wire is recommended to reduce resistance and ensure efficient power transfer.
- Always use stranded copper wire rather than solid core, as it is more flexible and better suited for running through walls and ceilings. Ensure the wire is CL2 or CL3 rated for in-wall installation to meet fire safety codes.
Matching Impedance Between Speakers and Amplifier
- Check the impedance rating of your ceiling speakers, typically 4, 6, or 8 ohms, and ensure your amplifier can handle the total load when multiple speakers are connected. Wiring speakers in parallel reduces the overall impedance, so two 8-ohm speakers in parallel present a 4-ohm load.
- To avoid overloading the amplifier, make sure the total impedance of each speaker zone falls within the amplifier’s specified range (usually 4–8 ohms). Consider using impedance-matching volume controls or series wiring in multi-speaker setups to maintain a safe load.
- If wiring multiple speakers per channel, calculate the combined impedance using proper formulas or online calculators, and avoid configurations that drop below the amplifier’s minimum impedance rating to prevent overheating or damage.
Proper Wiring Techniques and Polarity
- Run the speaker wire from the amplifier location to each ceiling speaker, taking care to avoid sharp bends, nails, or areas with high electromagnetic interference such as electrical conduits or HVAC ducts.
- Strip about 1/2 inch (12 mm) of insulation from each end of the wire and securely connect the positive (usually marked with a stripe or copper color) to the corresponding terminal on both the amplifier and speaker. Maintain consistent polarity across all speakers to ensure sound waves are in phase.
- Use spring clamp or binding post connectors on the speakers and tighten connections properly to prevent loose wires that can cause crackling or loss of sound. Label each wire at both ends during installation to simplify troubleshooting and future maintenance.
Can ceiling speakers be connected directly to an amplifier without additional equipment?
Yes, ceiling speakers can be connected directly to an amplifier without additional equipment, provided that the amplifier is compatible with the speakers in terms of impedance, power output, and configuration.
Most traditional ceiling speakers are passive, meaning they do not have a built-in amplifier and require an external amplifier or receiver to function. If the amplifier can handle the speakers' impedance (typically 4 to 8 ohms) and offers sufficient wattage per channel, the connection can be made directly using speaker wire.
 How To Connect Altec Lansing Speakers
However, it's essential to match the amplifier's capabilities to the speakers' specifications to avoid damage and ensure optimal sound quality. Active ceiling speakers, on the other hand, include a built-in amplifier and may require a different setup, often involving preamp outputs or line-level signals.
Impedance and Power Matching Between Amplifier and Ceiling Speakers
- Impedance compatibility is one of the most critical factors when connecting ceiling speakers directly to an amplifier. Most ceiling speakers have an impedance rating of either 4, 6, or 8 ohms, and the amplifier must be capable of safely driving speakers at that level. Connecting speakers with too low impedance can overload the amplifier, causing overheating or failure.
- Power rating alignment is equally important—ensure the amplifier's output wattage per channel matches the power handling capacity (RMS) of the ceiling speakers. For example, if a ceiling speaker has an RMS rating of 50 watts, the amplifier should deliver a similar range, avoiding excessive power that could lead to distortion or speaker damage.
- Many amplifiers are rated for both 4-ohm and 8-ohm loads, providing flexibility. When wiring multiple ceiling speakers, consider whether they will be connected in series or parallel, as this affects the total impedance seen by the amplifier and influences overall performance.
Types of Ceiling Speakers and Amplifier Compatibility
- Passive ceiling speakers are designed to be powered directly by an external amplifier and are the most common type used in residential and commercial audio installations. These speakers lack internal electronics and rely entirely on the connected amplifier for signal amplification and can be wired directly using standard speaker cables.
- Active or powered ceiling speakers come with built-in amplifiers and require a line-level signal rather than high-level speaker outputs. These cannot be connected directly to a standard amplifier's speaker terminals and instead need a preamp output or an AV receiver with variable line-level outputs, often requiring additional signal management equipment.
- Some modern ceiling speakers include built-in transformers for use in 70-volt or 100-volt distributed audio systems, commonly used in commercial settings. These require a compatible amplifier with a 70V output and are designed to allow long cable runs and multiple speakers on a single amplifier channel without complex impedance calculations.
Wiring and Installation Considerations for Direct Connection
- Use appropriate gauge speaker wire based on the distance between the amplifier and the ceiling speakers. For short runs under 50 feet, 16-gauge wire is typically sufficient, but longer runs may require 14-gauge or 12-gauge wire to minimize resistance and power loss, ensuring efficient signal transmission.
- Verify the polarity when connecting speaker wires—matching positive (+) and negative (-) terminals on both the amplifier and the speaker prevents phase cancellation, which can degrade sound quality and reduce bass response across the listening area.
- When installing multiple ceiling speakers, map out the wiring layout to determine if a series or parallel connection is best. Parallel wiring reduces total impedance and is common in multi-speaker setups, but care must be taken not to drop below the amplifier’s minimum impedance rating to prevent strain on the output circuitry.
How are ceiling speakers powered when connected to an amplifier?
Ceiling speakers are powered by receiving amplified audio signals from an amplifier. When connected properly, the amplifier takes a low-level audio signal from a source—such as a stereo receiver, AV receiver, or audio processor—and boosts it to a higher power level capable of driving the speaker's drivers (like the woofer and tweeter).
The speaker wires transmit this amplified electrical signal from the amplifier's output terminals to the ceiling speakers. Once the signal reaches the speaker, the voice coil in the driver converts the electrical energy into mechanical motion, causing the speaker cone to move and create sound waves.
 How To Connect Amp To Car Speakers
The power delivered depends on the amplifier's output capacity (measured in watts per channel) and the speaker's impedance (typically 4 to 8 ohms), which must be compatible to prevent damage and ensure optimal performance.
How Amplifiers Deliver Power to Ceiling Speakers
- The amplifier generates an alternating current (AC) audio signal that mirrors the original sound input but at a much higher power level, allowing it to drive the speaker’s diaphragm.
- This amplified signal travels through speaker cables connected from the amplifier’s output terminals to the ceiling speaker’s input terminals, usually via spring clips or screw terminals.
- The electrical signal passes through the speaker’s crossover network (if present) which separates frequencies and routes them to the appropriate driver, such as high frequencies to the tweeter and low frequencies to the woofer.
Impedance and Power Matching Considerations
- Ceiling speakers typically have a nominal impedance of 4, 6, or 8 ohms, and the amplifier must be capable of handling the total load when multiple speakers are connected in parallel or series.
- If too many speakers are wired to a single amplifier channel, the total impedance may drop below the amplifier’s minimum rating, potentially causing overheating or failure.
- Proper pairing ensures efficient power transfer, minimizes distortion, and protects both the amplifier and speakers from damage due to overloading or impedance mismatch.
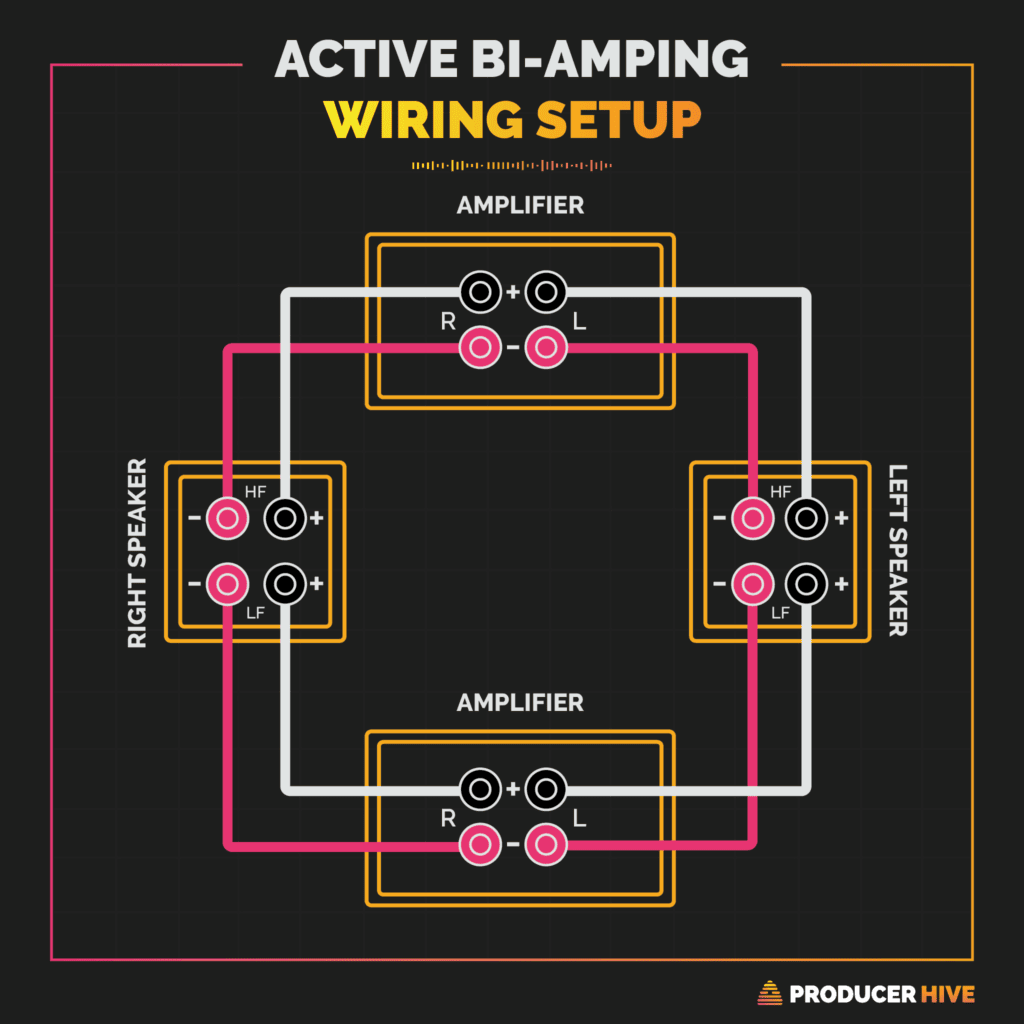
Wiring Configurations for Multiple Ceiling Speakers
- In a series configuration, speakers are wired end-to-end, increasing total impedance, which reduces the load on the amplifier but also decreases overall volume and power delivery per speaker.
- In a parallel configuration, each speaker connects directly across the amplifier’s output, reducing total impedance and increasing power demand, which requires an amplifier stable at lower ohm loads.
- For larger installations, distributed audio systems using 70V or 100V line amplifiers and transformers on each speaker allow long cable runs and many speakers without impedance issues, common in commercial settings.
Frequently Asked Questions
How do I connect ceiling speakers to an amplifier?
Connect ceiling speakers to an amplifier by running speaker wire from the amp’s output terminals to each speaker. Match the positive and negative wires correctly to avoid phase issues. Use wire connectors or binding posts for secure connections. Ensure your amplifier supports the speaker impedance (usually 4-8 ohms). Power off all equipment during installation. Test connections before mounting speakers to confirm proper function and sound quality.
What type of wire should I use for ceiling speakers?
Use 16-gauge or 14-gauge stranded speaker wire for ceiling speakers. 16-gauge is suitable for runs up to 50 feet, while 14-gauge is better for longer distances. Ensure the wire is CL2 or CL3 rated for in-wall installation, indicating safety for indoor use. Stranded wire offers better flexibility for routing through walls and ceilings. Always match the wire polarity to the amplifier and speaker terminals for optimal performance.
Can I connect multiple ceiling speakers to one amplifier?
Yes, you can connect multiple ceiling speakers to one amplifier if the total impedance stays within the amplifier’s range. Wiring speakers in parallel lowers impedance, while series wiring increases it. Avoid overloading the amplifier by calculating the total load. For larger setups, consider using an amplifier with multiple zones or a speaker selector switch to manage impedance and volume per zone safely.
 How To Connect Audio-Technica To Speakers
Do ceiling speakers need a special amplifier?
Ceiling speakers do not require a special amplifier but work best with amplifiers that match their impedance and power needs. A standard AV receiver or dedicated stereo amplifier is often sufficient for home use. For distributed audio systems with many speakers, consider a multi-zone amplifier or impedance-matching volume controls. Ensure the amp can handle the total speaker load and offers consistent performance across all connected speakers.
Leave a Reply