
Speaker Wire Installation Guide
Proper speaker wire installation is essential for achieving optimal audio performance in any sound system. Whether setting up a home theater, stereo system, or outdoor speakers, understanding the right techniques ensures clear, distortion-free sound.
This guide walks you through each step—from choosing the correct gauge and type of wire to routing, stripping, and connecting it securely to your speakers and amplifier. Safety precautions, common mistakes to avoid, and tips for concealing wires neatly are also covered. With the right tools and attention to detail, anyone can install speaker wire efficiently and effectively, enhancing both sound quality and system reliability.
How to Install Speaker Wire: A Step-by-Step Guide
Installing speaker wire correctly is essential for achieving optimal audio performance in any sound system, whether for a home theater, stereo setup, or professional audio environment. This guide walks you through the entire process—from planning your layout and selecting the right gauge of wire to running the cables and making secure connections.
 Surface Studio As External Monitor
Proper installation not only enhances sound quality but also ensures safety and reduces the risk of signal interference or wire damage over time. By following best practices and using the right tools, you can create a clean, reliable speaker wiring setup that supports high-fidelity audio transmission with minimal loss.
Selecting the Right Speaker Wire Gauge and Type
Choosing the correct speaker wire gauge—measured in AWG (American Wire Gauge)—is crucial for maintaining signal integrity and preventing power loss, especially over long distances. For most home audio setups within 50 feet, a 16-gauge wire is sufficient, but for longer runs or high-power systems, 14- or 12-gauge wires are recommended to reduce resistance and maintain speaker efficiency.
In addition to gauge, consider the wire type: oxygen-free copper (OFC) offers better conductivity, while insulated stranded wire provides flexibility and durability. Avoid using standard electrical wire not rated for audio, as it may introduce noise or degrade audio quality.
Planning Your Speaker Wire Route and Placement
Proper route planning minimizes visibility, reduces tripping hazards, and prevents interference from power cables or other electronic sources. Measure the distance from your amplifier or receiver to each speaker and plan a path that avoids sharp bends, high-traffic areas, and proximity to AC wiring to avoid electromagnetic interference (EMI).
 Geek Squad Car Speaker Installation
Use wall plates, baseboard channels, or in-wall wiring kits when running cables through walls or floors, ensuring compliance with local building codes. Label both ends of each wire during installation to simplify connections and future troubleshooting, making the system easier to manage.
Stripping, Connecting, and Securing Speaker Wires
Once the wires are run to each speaker, carefully strip about 1/2 inch of insulation from both ends using a wire stripper—avoid nicking the copper strands, as this can impair conductivity. Depending on your speaker and amplifier terminals, you can use bare wire, pin connectors, spades, or banana plugs for connections.
Always ensure a secure connection by tightening terminal screws or inserting connectors fully to prevent signal dropouts. Use cable ties or clips to organize and fasten wires along baseboards or inside equipment racks, which helps protect the cables and maintains a neat, professional appearance.
| Wire Gauge (AWG) | Recommended Use | Max Distance (for 8-ohm speakers) |
|---|---|---|
| 18-gauge | Short runs, low-power speakers | Up to 25 feet |
| 16-gauge | Standard home audio | Up to 50 feet |
| 14-gauge | Longer runs, higher power systems | Up to 80 feet |
| 12-gauge | Professional setups, subwoofers | Over 80 feet |
Comprehensive Guide to Speaker Wire Installation: Step-by-Step Instructions for Optimal Audio Performance
What Color Corresponds to Each Speaker Wire Terminal?
Speaker wire terminals are typically color-coded to help users properly match the wires to the correct audio channels and ensure correct polarity. While speaker wires themselves are often not color-coded along their entire length, the terminals on amplifiers, receivers, and speakers use standardized colors to indicate positive and negative connections.
 Geek Squad Speaker Installation Price
Understanding these color codes is essential for optimal sound performance and avoiding phase issues. The most common standard uses red to indicate the positive terminal and black for the negative. These color associations apply to most stereo and home theater systems, helping maintain consistency across manufacturers.
Standard Color Codes for Speaker Terminals
- Red is universally recognized as the positive terminal (+) on both the amplifier/receiver and the speaker. Matching the positive wire from the source to the red terminal ensures that the speaker cone moves outward in sync with the audio signal, preserving sound clarity.
- Black designates the negative terminal (-) and should be connected to the corresponding negative wire. Maintaining this polarity across all speakers prevents phase cancellation, which can degrade audio quality.
- These color codes apply consistently to front left, front right, center, surround, and rear speakers in a multi-channel setup. Adhering to the red-positive and black-negative rule ensures uniform performance across the entire sound system.
Color Variations in Speaker Wire Insulation
- Speaker wires often feature dual-conductor cables with one side having a ridge or stripe (usually on the positive) and the other being smooth (negative). Some brands use a red stripe to indicate the positive conductor and a black or copper-colored insulation for the negative wire.
- In cases where the wire lacks visual indicators, users can test polarity using a 9-volt battery and observe the cone movement when touching the terminals: an outward movement indicates correct polarity when the positive wire connects to the positive terminal.
- High-end or custom installations may use cables with distinct color pairings such as red and black, blue and gray, or white and black. In these cases, consistency in matching one color to all positive terminals is more important than the specific shade used.
Color Coding in Multi-Channel and Home Theater Systems
- In surround sound systems, each speaker channel (front left, front right, center, surround left, surround right, etc.) follows the same red-positive and black-negative standard. This consistency allows for easier setup and troubleshooting across multiple devices.
- Some AV receivers have labeled binding posts with small color indicators next to each channel, and speaker terminals are evenly aligned so that red is always on the right or marked with a '+' symbol. This helps prevent mismatched connections during system configuration.
- For in-wall or hidden installations, using color-coded wires and labeling both ends ensures that the correct polarity is maintained even after long cable runs, reducing the risk of reversed connections that impact surround imaging and soundstage accuracy.
Should you crimp or solder when installing speaker wires?
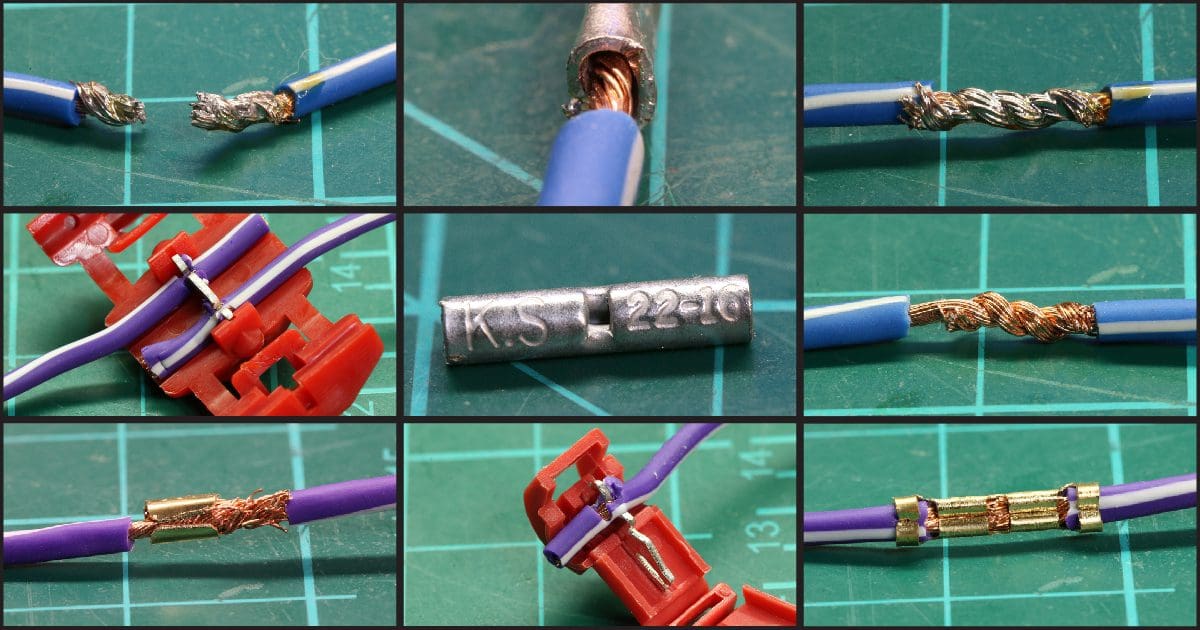
Understanding Crimping for Speaker Wire Connections
- Crimping involves using a specialized tool to compress a metal connector (usually a spade, banana plug, or pin connector) around the stripped end of a speaker wire, creating a mechanical bond that holds the wire in place.
- This method is popular among installers because it’s fast, repeatable, and doesn’t require heat or additional materials like solder, making it ideal for field installations or environments where open flames are prohibited.
- When done correctly with high-quality crimp connectors and a proper ratcheting crimp tool, crimping can provide a reliable, gas-tight connection that resists vibration and maintains electrical conductivity over time.
Advantages and Considerations of Soldering Speaker Wires
- Soldering uses a molten metal alloy (typically tin-lead or lead-free solder) to create a permanent electrical and mechanical bond between the wire and terminal, resulting in a connection with excellent conductivity and minimal resistance.
- One of the primary benefits of soldering is that it prevents corrosion and oxidation at the joint by sealing the copper strands, which helps maintain signal integrity, especially in humid or temperature-variable environments.
- However, soldering requires more skill, time, and tools (soldering iron, solder, heat source, sometimes flux), and improper technique—such as overheating the wire—can degrade the insulation or create brittle joints that may break under stress.
Comparing Long-Term Reliability and Application Context
- In home audio systems where connections remain static and environmental stress is minimal, both crimped and soldered connections can deliver excellent long-term performance when properly executed.
- For mobile applications such as car audio or portable sound systems, where vibration and movement are common, soldered joints may be more durable over time, provided strain relief is used to prevent fatigue at the connection point.
- Ultimately, the choice between crimping and soldering often comes down to installer preference, available tools, and the specific use case, with both methods capable of achieving high-quality electrical connections if applied with care and attention to detail.
Frequently Asked Questions
What tools do I need for speaker wire installation?
You’ll need basic tools like wire strippers, a measuring tape, a drill (if drilling walls), wire connectors, and possibly a stud finder. A fish tape helps when running wires through walls. Use a voltage tester to ensure safety near electrical lines. Having the right gauge wire and speaker terminals completes the setup. Always double-check connections and follow local building codes to ensure a safe, efficient installation process.
How do I choose the right gauge for speaker wire?
Choose speaker wire gauge based on distance and speaker impedance. For runs under 50 feet and standard 8-ohm speakers, 16-gauge wire works well. For longer runs or 4-ohm speakers, use 14-gauge or 12-gauge wire to reduce resistance. Thicker wire maintains signal quality and prevents power loss. Always match wire capacity to your system’s power output and setup needs to ensure optimal audio performance throughout your speaker installation.
 Golf Cart Speaker Install
Can I run speaker wires behind walls safely?
Yes, you can run speaker wires behind walls safely if you follow proper guidelines. Use CL2 or CL3-rated in-wall speaker wire, designed for fire resistance and safety within walls. Avoid sharing stud bays with electrical wires to reduce interference. Drill through center studs, not near plates, and use wall plates at connection points. Always verify no electrical wires are nearby with a stud finder and voltage detector before drilling.
How do I connect speaker wire to speakers and receivers?
Strip about ½ inch of insulation from each wire end. Connect the positive (+) wire (often red or marked) to the positive terminal on both the speaker and receiver, and the negative (-) wire to the negative terminal. Use banana plugs, spade connectors, or bare wire, depending on your equipment. Ensure tight, secure connections to prevent signal loss or short circuits, and double-check polarity for proper sound performance.
Leave a Reply