
Studio Monitor Placement Diagram

Proper studio monitor placement is essential for achieving accurate sound reproduction in any audio production environment. A well-designed studio monitor placement diagram serves as a critical guide to positioning speakers for optimal acoustic performance.
The ideal setup minimizes phase issues, reduces reflections, and ensures a balanced stereo image. Key factors such as distance from walls, speaker angle, and ear-level alignment play significant roles in shaping the listening experience.
Whether in a professional studio or a home setup, following a precise placement diagram helps engineers and producers make reliable mixing and mastering decisions based on true sound representation.
 Active pa speakers used
Optimal Studio Monitor Placement for Accurate Sound Reproduction
Achieving precise audio mixing and mastering begins with proper studio monitor placement, which plays a crucial role in sound clarity, stereo imaging, and frequency response accuracy.
An effective studio monitor placement diagram guides users in positioning their speakers to minimize acoustic interference from walls, corners, and reflective surfaces. The ideal setup typically forms an equilateral triangle between the listening position and the two speakers, with the monitors at ear level and aimed directly at the engineer's head.
This configuration helps ensure a balanced stereo field and reduces phase cancellation issues. Room symmetry, wall distance, and the use of acoustic treatment also influence the effectiveness of the placement, making it essential to follow a proven diagram tailored to your room's dimensions and acoustic properties.
Understanding the Equilateral Triangle Rule
The equilateral triangle rule is a fundamental principle in a studio monitor placement diagram, ensuring that the distance between the left and right speakers is the same as the distance from each speaker to the listener’s head.
 Active pa monitor speakers
This arrangement promotes a focused stereo image, allowing for accurate panning and spatial perception in music production. Ideally, the tweeters should be positioned at ear level, and the monitors should be aimed directly toward the listening position to minimize off-axis listening effects.
Deviating from this geometry can lead to imbalances in frequency response and poor stereo separation, particularly in the midrange where most critical mixing decisions are made. Following this rule helps create a consistent and reliable sweet spot for monitoring.
Managing Distance from Walls and Room Boundaries
Proper distance between studio monitors and room boundaries—especially the front and side walls—is essential to avoid low-frequency buildup caused by boundary reinforcement.
Placing monitors too close to a wall can exaggerate bass frequencies, leading to mixes that sound boomy when played on other systems. A common recommendation is to keep monitors at least 3 to 4 feet away from the front wall to reduce bass reflection and improve low-end accuracy.
 Passive pa speakers
Additionally, avoiding placement near room corners prevents excessive low-frequency energy accumulation. Using a studio monitor placement diagram helps visualize these spatial relationships, ensuring speakers are located in positions that promote a more neutral frequency response and minimize standing waves within the room.
Integrating Acoustic Treatment with Speaker Positioning
Even with the most accurate studio monitor placement diagram, untreated room acoustics can compromise sound quality.
Reflections from nearby surfaces—such as desks, consoles, and walls—can cause phase interference and coloration, especially in the mid and high frequencies. Placing acoustic panels at primary reflection points (where sound bounces from the monitors to the listening position) greatly improves clarity.
Bass traps in room corners help manage low-frequency resonances that can distort perception. Correctly positioning speakers in conjunction with acoustic treatment ensures that what you hear is as close as possible to the original signal. A well-designed placement plan should therefore incorporate both speaker location and strategic placement of absorptive and diffusive materials.
 12 passive pa speakers
| Factor | Recommended Setup | Impact on Audio Quality |
|---|---|---|
| Speaker-to-Listener Triangle | Equilateral triangle: 60° angle at listening position | Improves stereo imaging and center focus |
| Distance from Front Wall | At least 3–4 feet (0.9–1.2 meters) | Reduces bass buildup and comb filtering |
| Monitor Height | Tweeters aligned with ear level | Ensures accurate high-frequency response |
| Room Symmetry | Speakers equidistant from side walls | Maintains balanced soundstage |
| Acoustic Treatment | Reflection panels at first reflection points, bass traps in corners | Minimizes echo and frequency distortion |
Optimal Studio Monitor Placement Guide for Accurate Sound Reproduction
How should I position studio monitors for optimal sound based on placement guidelines?
Monitor Placement Relative to the Listening Position
Achieving optimal sound begins with forming an equilateral triangle between the two studio monitors and your listening position. This configuration ensures that sound arrives at your ears symmetrically and with balanced timing. Position the monitors so that the distance from each speaker to your head is the same as the distance between the two speakers.
- Place the monitors at ear level, ensuring that the tweeters align with your ears when seated. This helps maintain accurate high-frequency response and stereo imaging.
- Sit approximately 3 to 5 feet away from each monitor, depending on the room size and speaker size. This range allows for proper soundstage development without overwhelming proximity effects.
- Angle the monitors inward so they point directly at your head, typically at 30 degrees from the front wall. This toe-in adjustment improves stereo focus and minimizes early reflections from the side walls.
Distance from Room Boundaries and Acoustic Interactions
The proximity of studio monitors to walls, corners, and other boundaries significantly affects bass response and frequency neutrality. Placing speakers too close to walls or corners can exaggerate low frequencies due to boundary reinforcement, leading to inaccurate monitoring.
- Maintain a minimum distance of 2 to 3 feet from the front wall to reduce bass buildup caused by early reflections and standing waves. This helps produce a more balanced low-end response.
- Avoid placing monitors in room corners, as this intensifies bass resonance and creates uneven frequency distribution. Corner placement often leads to boomy, inaccurate monitoring conditions.
- Elevate monitors on isolation pads or stands to decouple them from desks or surfaces, preventing vibrations from transferring into resonant materials that color the sound.
Minimizing Reflections and Optimizing Room Symmetry
A symmetrical setup and controlled room reflections are essential for accurate stereo perception and transparency in monitoring. Asymmetric conditions or reflective surfaces near the monitors can skew imaging and degrade sound clarity.
- Ensure that the left and right sides of the room are acoustically balanced by placing similar materials, furniture, or treatment on both sides to maintain stereo coherence.
- Install acoustic panels at the first reflection points on the side walls, ceiling, and behind the listening position to reduce early reflections that interfere with direct sound from the monitors.
- Keep the area directly behind and between the monitors free of large objects or clutter that could diffract sound waves and distort the stereo image.
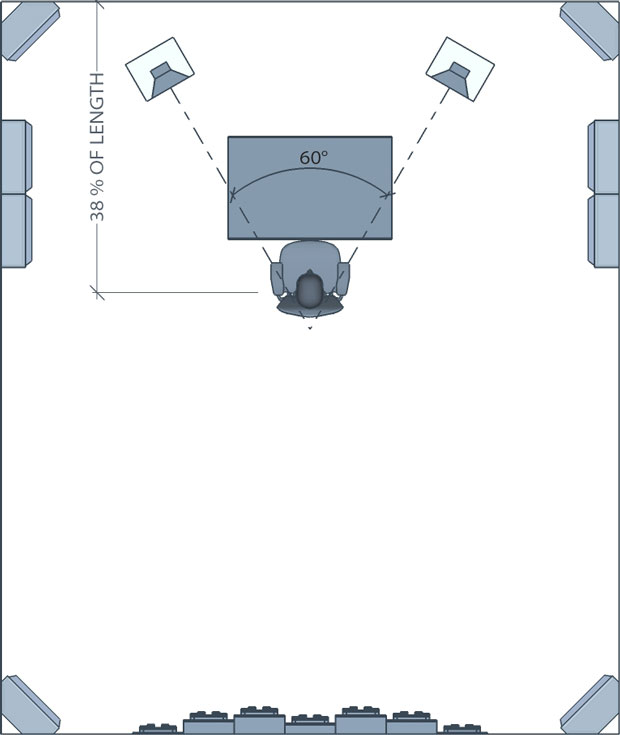
What is the 38 Rule in Studio Monitor Placement and How Does It Optimize Speaker Positioning?
The 38 Rule in studio monitor placement is a guideline used to optimize the positioning of studio monitors in a control room to achieve the most accurate stereo imaging and minimize low-frequency issues caused by room acoustics. According to this rule, the front of the studio monitors should be placed at a distance equal to 38% of the room's length measured from the wall behind the listening position.
 12 powered pa speakers
This strategic placement helps in reducing the impact of room modes—especially axial modes—by avoiding symmetrical alignment that can cause standing waves. The 38% point often situates the listening position in a region where pressure distribution across the room is more balanced, especially in the lower frequencies, resulting in a flatter bass response.
When combined with forming an equilateral triangle between the two monitors and the listener, proper toe-in, and correct baffle alignment, the 38 Rule serves as a foundational principle for achieving a neutral and transparent listening environment suitable for precise audio mixing and mastering.
Understanding the Science Behind the 38% Measurement
- The 38% rule originates from acoustic research highlighting that placing the listening position at approximately 38% of the room's length from the front wall helps avoid high and low-pressure zones created by standing waves, particularly at bass frequencies.
- Sound waves reflect off room boundaries and interact with direct waves, potentially reinforcing or canceling certain frequencies. By avoiding positions at 25% or 50% room length—common pressure nodes—the 38% location reduces the amplitude of the first axial room mode.
- This positioning takes advantage of the wave behavior in rectangular rooms where low-frequency resonances are more predictable, allowing engineers to find a ‘sweet spot’ with improved frequency balance and more accurate monitoring.
Practical Steps to Apply the 38 Rule in Your Studio
- Measure the total length of your room from the front wall (where monitors face) to the back wall (behind the listener), then calculate 38% of that distance to determine how far the listening position should be from the front wall.
- Position your chair or listening spot so that your ears align with this 38% mark, ensuring that the monitors are placed to form an equilateral triangle with your head, with each side being equal in length.
- Level the monitors so that the tweeters are at ear height, angle them slightly inward (toe-in) toward the listening position, and ensure there are no large reflective surfaces directly to the sides or between the monitors.
How the 38 Rule Enhances Stereo Imaging and Frequency Response
- By reducing the influence of early reflections and modal resonances, the 38 Rule helps in achieving a more consistent bass response, which is critical for making accurate mixing decisions.
- Precise speaker placement at this ratio supports a wider and more stable stereo image, allowing for better localization of instruments and spatial depth in stereo recordings.
- Combined with proper acoustic treatment like bass traps and diffusion, this rule maximizes the performance of even modest monitoring systems by ensuring the room contributes less to sonic coloration.
What is the 1/3/1/5 rule in studio monitor placement and how does it optimize acoustic performance?
The 1/3/1/5 rule in studio monitor placement is a recommended guideline used to optimize speaker positioning in small to medium-sized control rooms to improve stereo imaging and reduce the negative effects of room acoustics, particularly standing waves and bass buildup.
 12 vs 15 inch pa speakers
Based on room dimensions, the rule suggests placing the listening position (the engineer's chair) at one-third the length of the room from the front wall, positioning the monitors one-third the width of the room apart from each other, and ensuring that the distance from each monitor to the nearest side wall is at least one-fifth of the room's width.
This arrangement aims to minimize the impact of acoustic reflections and resonances, leading to a more accurate and balanced monitoring environment. By avoiding common symmetry-related room modes and reflection points, engineers can achieve a flatter frequency response, especially in the low-mid and bass ranges.
Understanding the Components of the 1/3/1/5 Rule
- The first 1/3 refers to the location of the listening position along the room's length—positioned one-third of the way back from the front wall. This placement helps reduce the impact of axial standing waves, which typically create peaks and nulls in bass response at certain points in rectangular rooms. By avoiding the center and quarter points where these resonances are strongest, the 1/3 position offers a more balanced low-frequency response.
- The 1 stands for the distance between the two studio monitors, which should ideally be equal to the distance from the listener to each monitor, forming an equilateral triangle. However, within the 1/3/1/5 framework, it implies that the stereo separation should be proportionate to the room’s width—specifically, the monitors should be placed one-third of the room's width apart. This spacing reduces phase issues and provides consistent stereo imaging across the listening area.
- The final 1/5 indicates the minimum distance from each monitor to the nearest sidewall—recommended to be at least one-fifth of the room's width. This spacing helps mitigate early side-wall reflections and prevents boundary interference that can color the sound, especially in the midrange. Keeping adequate space between monitors and side walls contributes to clearer, more accurate stereo separation and reduces comb filtering.
Acoustic Benefits of Following the 1/3/1/5 Rule
- One of the primary advantages of the 1/3/1/5 rule is its ability to reduce the influence of axial room modes, particularly those that affect the bass frequencies. By situating the listening position away from common modal convergence points (like the center or halfway marks), the rule minimizes problematic bass buildup and cancellation, resulting in a more neutral low-end response.
- The rule also promotes improved stereo imaging and soundstage coherence. By carefully spacing the monitors and aligning them with the listener in a geometrically favorable configuration, it ensures that the left and right channels reach the ears with consistent timing and level, enhancing localization and depth perception in the mix.
- Furthermore, this placement strategy reduces the amplitude and timing of early reflections from side walls. When monitors are too close to boundaries, sound waves reflect quickly and interfere with the direct sound, causing phase interference. The 1/5 distance helps delay and weaken these reflections, making acoustic treatment more effective and improving overall clarity.
Practical Considerations and Room Variability
- While the 1/3/1/5 rule provides a strong starting point, real-world room dimensions, speaker design, and furniture layout may require minor deviations. For instance, rooms with non-ideal proportions might not allow precise adherence to the thirds and fifths, necessitating measurement with a calibrated microphone and room analyzer to fine-tune the setup.
- Room treatment still plays a critical role even when the 1/3/1/5 rule is followed. Bass traps, absorption panels, and diffusers are necessary to manage residual reflections and modal issues that the placement alone cannot resolve. The rule complements acoustic treatment but does not replace it.
- Listening position height, monitor toe-in angle, and the presence of reflective surfaces behind or above the listener also impact acoustic performance. Engineers should combine the 1/3/1/5 guidelines with iterative testing—such as the speaker crawl technique or frequency sweeps—to validate and adjust the setup for optimal accuracy.
Frequently Asked Questions
Why is proper studio monitor placement important?
Proper studio monitor placement ensures accurate sound reproduction, allowing you to make reliable mixing and mastering decisions. Incorrect positioning can cause acoustic issues like reflections, phase cancellation, and uneven frequency response.
A well-placed monitor setup minimizes room interference and creates an optimal stereo image, leading to mixes that translate better across different playback systems. Following a studio monitor placement diagram helps achieve balanced sound and improves overall audio production quality.
What is the ideal distance between studio monitors and the listener?
The ideal distance between studio monitors and the listener forms an equilateral triangle, with the listener and the two monitors at each point. Typically, monitors should be 3 to 5 feet apart and the same distance from your listening position.
This setup ensures balanced stereo imaging and minimizes phase issues. Adjust based on room size and monitor type, but always aim for a centered, symmetrical arrangement that aligns with the studio monitor placement diagram for best results.
Should studio monitors be at ear level?
Yes, studio monitors should be positioned so that the tweeters are at ear level when you're seated. This ensures that high frequencies reach your ears directly, without reflections or obstructions, providing a more accurate representation of the audio.
Use monitor stands or isolation pads to adjust height as needed. Proper vertical alignment is a key part of any studio monitor placement diagram and helps maintain clarity and detail in your monitoring experience.
How do I avoid bass buildup with studio monitor placement?
To avoid bass buildup, place studio monitors away from room corners and walls, which can amplify low frequencies. Follow the recommended placement in a studio monitor placement diagram, typically at least 1–2 feet from walls.
Use acoustic treatment like bass traps and consider room calibration tools. Positioning monitors at the correct distance and angle reduces standing waves and early reflections, creating a more balanced low-end response and improving overall sound accuracy in your listening environment.
Leave a Reply