
Windows 11 5.1 Speaker Configuration

Configuring a 5.1 surround sound system on Windows 11 can significantly enhance the audio experience for movies, gaming, and multimedia content. With its refined audio architecture and improved spatial sound technologies, Windows 11 supports multi-channel speaker setups, allowing users to achieve immersive, theater-like sound at home.
Properly setting up a 5.1 configuration involves connecting the front, center, rear, and subwoofer channels correctly, then configuring the system through the Sound settings or audio driver control panel. This article guides you through the step-by-step process of optimizing Windows 11 for 5.1 speaker output, troubleshooting common issues, and ensuring compatibility with your hardware for the best possible audio performance.
How to Set Up and Optimize 5.1 Speaker Configuration in Windows 11
Configuring a 5.1 surround sound system in Windows 11 allows users to enjoy immersive audio for movies, games, and multimedia content by distributing sound across six discrete channels: front left, front right, center, subwoofer, rear left, and rear right.
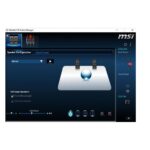 Realtek Hd Audio Manager 2.1 Speaker Configuration
Windows 11 provides native support for multi-channel audio setups through its Sound settings and Windows Audio service, making it relatively straightforward to configure a 5.1 speaker system whether using onboard audio, a dedicated sound card, or an external audio interface. To begin, users must access the Sound control panel, identify the correct output device, and select the 5.1 surround sound option.
The system will then guide the user through speaker testing and calibration to ensure optimal placement and performance. Properly configuring the 5.1 setup also requires compatible audio drivers and, in some cases, manufacturer-specific software such as Realtek Audio Console or third-party audio control suites to unlock advanced settings like equalization, speaker delay, and bass management.
Understanding 5.1 Surround Sound Channels and Their Roles
In a 5.1 speaker configuration, each channel plays a distinct role in creating an enveloping audio experience. The front left and front right speakers deliver the majority of directional audio, music, and sound effects, anchoring the stereo field.
The center channel is crucial for reproducing dialogue and on-screen audio, ensuring clarity and alignment with visual content, especially in films. The subwoofer handles low-frequency effects (LFE), providing deep bass that enhances action scenes and music.
 Realtek Hd Audio Manager 5.1 Speaker Configuration
Finally, the rear left and rear right (or surround) speakers add ambient sounds and environmental cues, such as rain, crowd noise, or passing vehicles, which heighten immersion. Windows 11 supports this multi-channel layout by allowing users to assign and test each speaker individually, ensuring precise audio placement and a balanced soundstage.
Step-by-Step Guide to Configuring 5.1 Audio in Windows 11 Settings
To set up a 5.1 speaker system in Windows 11, begin by connecting all speakers to the appropriate audio outputs on your PC, typically color-coded on sound cards or motherboards.
Next, right-click the volume icon in the taskbar and select Sounds or navigate to Settings > System > Sound > Advanced sound options > More sound settings. In the Playback tab, choose your default audio device, click Properties, and go to the Spatial sound tab. Here, disable any spatial sound formats like Windows Sonic or Dolby Atmos, as they can interfere with native 5.1 playback.
Then, switch to the Advanced tab, and under Default Format, select a 5.1-compatible sample rate and bit depth, such as 24-bit, 48000 Hz. Return to the Speaker Setup section and click Configure to launch the speaker setup wizard. Follow the prompts to test each channel and verify correct speaker placement using built-in audio cues.
 Realtek Hd Audio Manager Speaker Configuration
Ensuring Proper Audio Drivers and Software for Optimal 5.1 Performance
Achieving reliable 5.1 audio output in Windows 11 depends heavily on having up-to-date and compatible audio drivers. Most modern motherboards use Realtek HD Audio, which includes the Realtek Audio Console—a dedicated application that offers enhanced control over multi-channel setups.
Users should ensure they download the latest driver version from the PC or motherboard manufacturer’s website rather than relying solely on Windows Update, which may provide generic drivers lacking full functionality.
Third-party sound cards from brands like Creative or ASUS often come with proprietary software such as Creative Audio Control Panel or ASUS Sonic Studio, enabling advanced calibration, virtualization, and speaker management. The table below outlines common audio interfaces and their associated software tools for managing 5.1 configurations.
| Audio Interface | Driver/Software | Key 5.1 Configuration Features |
|---|---|---|
| Onboard Realtek HD Audio | Realtek Audio Console | Speaker configuration wizard, equalizer, jack detection, and 5.1 surround test |
| Creative Sound Blaster Series | Creative Audio Control | Advanced speaker calibration, bass management, and environmental audio effects |
| ASUS Xonar or Motherboard Audio | ASUS Sonic Studio | Multi-out support, speaker delay adjustment, and noise cancellation |
Windows 11 5.1 Speaker Setup and Configuration Guide
How to Configure 5.1 Surround Sound on Speakers in Windows 11

 Sonos Playbar Speaker Configuration
Check System and Speaker Compatibility
- Ensure your computer has a sound card or motherboard audio interface that supports 5.1 surround sound. Most modern motherboards with high-definition audio support multi-channel audio, but confirming specifications on the manufacturer's website is recommended.
- Verify that your speaker system is a true 5.1 setup, consisting of five satellite speakers (front left, front right, center, rear left, rear right) and one subwoofer. The speakers must be labeled as 5.1 surround sound capable.
- Inspect the required cables and connections. A 5.1 setup typically uses three 3.5mm audio cables (color-coded green, black, and orange) to connect the front, rear, and center/subwoofer channels to the appropriate audio jacks on your PC. Some systems may use a single USB or HDMI connection if they are powered by an external amplifier or soundbar.
Configure Audio Settings in Windows 11
- Right-click the speaker icon in the taskbar and select Sound settings. Alternatively, navigate to Settings > System > Sound to access audio controls.
- Under Output, choose your speaker system from the list if it appears. Then click on More sound settings to open the legacy Sound control panel.
- In the Playback tab, double-click your default speakers to open the Properties window. Go to the Advanced tab, and under Default Format, select a 24-bit, 48000 Hz (Studio Quality) option if available. Then click on the Spatial sound tab and set it to Off to avoid conflicts with 5.1 passthrough.
- Go back to the Speaker Setup section by clicking the Configure button in the Properties window. Select 5.1 Surround and follow the on-screen setup wizard to assign each speaker, allowing Windows to test each channel individually with test tones.
Test and Optimize Surround Sound Output
- After configuration, use the built-in test feature in the Speaker Setup window to play audio through each speaker in sequence. Ensure sound is coming from the correct speaker and adjust speaker positions if needed for optimal spatial experience.
- Adjust speaker levels manually if one channel sounds louder than others. In the same Speaker Setup window, you can modify individual volume levels for front, center, rear, and subwoofer channels.
- Play a movie or music file known for surround sound usage (e.g., a Blu-ray film or a 5.1 audio track) to evaluate real-world performance. Applications like VLC Media Player or Windows Media Player support multi-channel audio playback and can help verify correct channel mapping during content playback.
How to Set Up 5.1 Surround Sound Speakers on Windows 11

Connecting Your 5.1 Surround Sound System to Your PC
- Begin by identifying the speaker connections on your PC. Most modern motherboards provide multiple 3.5mm audio jacks on the back panel, typically color-coded: lime green for front speakers, black for surround speakers, and orange for the subwoofer/center channel. Some systems may also have a rear center jack (gray) depending on the audio codec.
- Connect each speaker to the correct audio jack based on its role. The front left and right speakers plug into the lime green jack, the surround left and right speakers go into the black jack, and the center channel and subwoofer connect to the orange jack. If your audio interface requires a single 3.5mm TRS connector with multiple channels (common with sound cards), use the appropriate breakout cable that matches your 5.1 setup.
- If your PC lacks multiple audio outputs or you are using HDMI or optical audio, connect your speaker system through an AV receiver or soundbar that supports 5.1 decoding. Use an HDMI or optical cable from your PC’s corresponding output to the receiver, ensuring the receiver handles the speaker distribution. Verify all speaker wires are correctly attached to the amplifier or receiver terminals, matching polarity (positive to positive, negative to negative).
Configuring Audio Settings in Windows 11
- Right-click the speaker icon in the taskbar and select “Sound settings.” Scroll down and click on “More sound settings” to open the Sound Control Panel. Navigate to the “Playback” tab and select your default audio device (e.g., “Speakers” or “Digital Output”) then click “Configure.”
- In the Speaker Setup window, choose “5.1 Surround” and click “Next.” Windows will begin a test tone sequence for each speaker. Make sure all speakers are powered on and volume is set to a moderate level. Follow the on-screen instructions to verify each speaker’s output by listening for the corresponding tone.
- After configuration, click “Finish.” Go back to the Sound Control Panel, select your playback device, and click “Properties.” In the Advanced tab, ensure the default format supports 5.1 audio, such as “24-bit, 48000 Hz (Studio Quality).” Enabling this setting ensures Windows can output multichannel audio correctly when supported by applications.
Testing and Optimizing 5.1 Audio Performance
- Play a test video or audio file specifically designed for 5.1 surround sound, such as those found on YouTube or Blu-ray sample discs. Ensure the media player supports multichannel audio output — players like VLC or Kodi allow you to manually select audio tracks and output modes in their settings.
- Use the built-in Windows test tones again if needed by going back to the “Configure” option in the Sound settings. This time, listen carefully to confirm each speaker is active and positioned correctly in the soundstage — front, center, surround, and subwoofer.
- Adjust speaker levels manually through your AV receiver or Windows' balance settings under the “Levels” tab in the speaker properties. Position the speakers correctly in the room: front speakers at ear level forming a 30-degree angle with the listener, center channel directly above or below the display, surround speakers slightly behind the listening position, and the subwoofer placed near the front for balanced bass response.
How to configure 5.1 surround sound with Dolby Audio in Windows 11?

Verify Hardware Compatibility and Connections
- Ensure your audio source device supports 5.1 surround sound output. Most modern PCs with HDMI or dedicated sound cards are capable, but integrated onboard audio may have limitations depending on the chipset.
- Check that your speakers are properly connected and arranged according to the 5.1 configuration: front left and right, center, surround left and right, and a subwoofer. For digital connections (HDMI or optical), confirm the cable is securely attached to both the PC and the receiver or soundbar.
- Confirm that your audio playback device, such as a home theater receiver or soundbar, explicitly supports Dolby Audio and 5.1 decoding. Consult the device’s manual or settings menu to verify this capability before proceeding with Windows configuration.
Enable and Configure Dolby Audio in Windows 11
- Navigate to Settings > System > Sound > More sound settings. This opens the classic Sound control panel where you can access advanced audio properties.
- Select your playback device (e.g., speakers or headphones), click Properties, and go to the Spatial sound tab. From the dropdown menu, choose Dolby Atmos for home theater if available. If that option is not present, ensure the Dolby Access app is installed from the Microsoft Store.
- After selecting Dolby Atmos for home theater, Windows may prompt you to activate a trial or subscription through the Dolby Access app. Follow the on-screen instructions to enable full Dolby Audio functionality, which is required for proper 5.1 signal processing.
Set Default Audio Format to 5.1
- In the same audio device Properties window, switch to the Advanced tab. Here, locate the default format section where Windows lists available bit depths and sample rates.
- Select a format that supports multi-channel audio, such as 24-bit, 48000 Hz (Studio Quality) or equivalent. Avoid formats labeled stereo or 2-channel, as these disable surround output.
- Ensure the option Enable audio in all modes or Use this device as default is checked, then apply the settings. Test playback using a 5.1 audio file or video to confirm all channels are active and properly routed through the Dolby Audio processing pipeline.
Frequently Asked Questions
What is Windows 11 5.1 speaker configuration?
Windows 11 5.1 speaker configuration refers to a surround sound setup with six audio channels: front left, front right, center, rear left, rear right, and a subwoofer. This setup enhances audio quality for movies, games, and music by delivering immersive, spatial sound. Windows 11 supports 5.1 audio through proper drivers and playback software, allowing users to enjoy richer, theater-like audio experiences on compatible systems.
How do I set up 5.1 speakers on Windows 11?
To set up 5.1 speakers on Windows 11, connect all speakers and the subwoofer to the correct audio jacks on your PC. Go to Settings > System > Sound > More sound settings, then select the Playback tab. Choose your 5.1 device, click Configure, and follow the on-screen instructions to test and assign each speaker. Ensure your audio drivers are updated for full 5.1 support and optimal performance during playback.
 Sonos Speaker Not Configured
Why is my 5.1 audio not working in Windows 11?
Your 5.1 audio may not work in Windows 11 due to outdated drivers, incorrect sound settings, or incompatible hardware. Verify that your audio driver supports 5.1 and is updated. Check the speaker configuration in Sound settings and ensure the correct playback device is selected. Also, confirm that your media player and content support 5.1 audio, as some files or apps may only output stereo sound.
Can I use HDMI for 5.1 audio output in Windows 11?
Yes, you can use HDMI for 5.1 audio output in Windows 11 if your GPU and display or receiver support it. Connect your PC to the compatible device using an HDMI cable. Then, go to Settings > System > Sound, select the HDMI output device, and ensure the audio format supports 5.1 through Sound Control Panel > Advanced settings. This allows uncompressed or encoded surround sound through a single cable.
 Speaker Configuration Mono Or Stereo Valorant
Leave a Reply