
Car Audio Amplifier Installation Kit
Installing a car audio amplifier can dramatically enhance your vehicle’s sound quality, delivering powerful, crisp, and immersive audio performance.
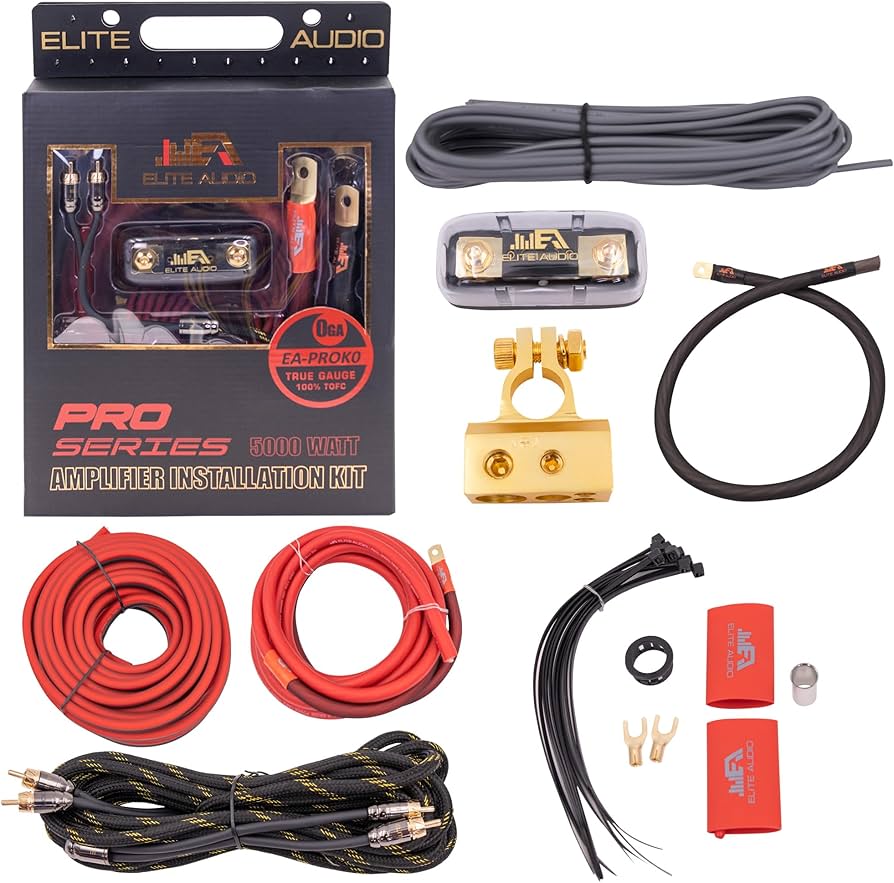
To ensure a seamless setup, a comprehensive car audio amplifier installation kit is essential. These kits typically include all the necessary components—such as power and ground wires, RCA cables, fuse holders, connectors, and distribution blocks—designed to simplify the installation process.
With the right kit, even DIY enthusiasts can achieve professional-grade results. Proper installation not only maximizes amplifier efficiency but also protects your audio system and vehicle’s electrical integrity. Choosing a high-quality kit tailored to your amplifier’s power requirements ensures safety, reliability, and outstanding sound reproduction on every drive.
 Best Buy Free Speaker Installation
Essential Components of a Car Audio Amplifier Installation Kit
A car audio amplifier installation kit is a comprehensive package designed to simplify the process of adding an amplifier to your vehicle’s sound system. These kits typically bundle all the necessary hardware and wiring that would otherwise need to be purchased separately, ensuring compatibility and optimal performance.
Whether you're enhancing bass output with a subwoofer or aiming for clearer, more dynamic sound across all speakers, a quality installation kit provides the foundation for a seamless setup. Most kits include a power wire, ground wire, remote turn-on wire, RCA audio cables, inline fuse holder, distribution block, and often acoustic insulation and mounting hardware.
Choosing the right kit based on your amplifier’s power requirements—measured in watts and amperage—is crucial to avoid voltage drops, overheating, or damage to your vehicle’s electrical system. When installed correctly, a complete amplifier kit not only improves audio fidelity but also protects both your amplifier and car electronics.
Power and Ground Wiring in Amplifier Kits
The power and ground wires are among the most critical components of any car audio amplifier installation kit. The power wire connects the amplifier directly to the car battery, typically via the positive terminal, and must be of sufficient gauge (thickness) to handle the current draw without overheating.
 Best Buy Geek Squad Car Speaker Installation
Thicker wires, such as 4-gauge or 0-gauge, are ideal for high-wattage amplifiers, especially those powering subwoofers. The ground wire should be as short as possible and connected directly to a clean, unpainted metal point on the car’s chassis to ensure a stable electrical return path and minimize noise.
Poor grounding can lead to ground loops, which manifest as hums or buzzing in the audio output. High-quality kits use CAB (Copper-clad Aluminum) or pure copper wiring for optimal conductivity, and often come with insulated eyelet terminals for secure connections.
Signal and Control Wiring for Optimal Performance
Beyond power delivery, a reliable car audio installation depends heavily on proper signal and control wiring.
The RCA cables in an installation kit transmit the audio signal from the head unit (stereo) to the amplifier, and high-quality shielded cables help prevent electromagnetic interference (EMI) that can degrade sound quality. Low-level signals are sensitive, so routing these cables away from power wires is essential to avoid audio noise.
 Best Buy Geek Squad Speaker Installation
The remote turn-on wire (usually blue) sends a signal from the stereo to the amp, allowing it to power on automatically when the car’s ignition is switched on. This eliminates the need for manual power toggling. Some kits also include fuse holders and distribution blocks to safely manage power flow to multiple amplifiers, enhancing both safety and system scalability.
Selecting the Right Installation Kit for Your Amplifier
Choosing the appropriate installation kit depends on several factors, including your amplifier’s wattage, the number of channels, and whether you’re powering subwoofers or full-range speakers. Kits are commonly labeled for specific power ranges—such as 1000W, 2000W, or 3000W—indicating their maximum recommended output.
These ratings correlate with the wire gauge, where lower gauge numbers represent thicker wires capable of carrying more current. For example, a 4-gauge kit suits amplifiers up to 1000 watts, while 0-gauge kits are better for systems exceeding 2000 watts.
Additionally, consider kits that include noise-reduction features like ferrite cores on RCA cables or wire looms for neat, protected routing. A well-matched installation kit ensures efficient power delivery, reduces installation time, and contributes to the longevity and performance of your car audio system.
 Best Buy Home Speaker Installation
| Component | Purpose | Key Features to Look For |
|---|---|---|
| Power Wire | Delivers current from the battery to the amplifier | Pure copper or CAB, correct gauge (e.g., 4-AWG for 1000W) |
| Ground Wire | Completes the electrical circuit for the amplifier | Short length, insulated eyelet, direct chassis connection |
| RCA Cables | Transfers audio signal from head unit to amplifier | Shielded construction, ferrite filters, low interference |
| Remote Turn-On Wire | Signals the amplifier to power on with the stereo | Insulated, color-coded (usually blue), compatible voltage |
| In-Line Fuse Holder | Protects against short circuits and overloads | Proper amperage rating, durable housing, easy access |
Complete Guide to Car Audio Amplifier Installation Kits
How much does Best Buy charge for amplifier installation with a car audio installation kit?
Best Buy Amplifier Installation Pricing Overview
- Best Buy typically charges between $79.99 and $149.99 for professional amplifier installation, depending on the vehicle type, complexity of wiring, and amplifier setup.
- The price usually includes basic labor for mounting the amplifier, connecting power and ground wires, and integrating the amp with your factory or aftermarket stereo system.
- Additional service fees may apply if your vehicle requires specialty tools, extensive routing through trim panels, or if your electrical system needs upgrades such as a high-output alternator or capacitor.
Cost Factors for Amplifier Installation with Audio Kit
- The total cost is influenced by whether you purchase a complete car audio installation kit from Best Buy, which may bundle wiring, connectors, fuses, and other accessories; these kits range from $25 to $75 depending on quality and gauge.
- Installation complexity varies—vehicles with tight dashboards, integrated factory systems, or hybrid/electric platforms may require more labor, leading to higher pricing.
- Geographic location and individual Geek Squad availability also play a role, as prices can slightly differ between stores in urban versus rural areas.
Inclusions and Add-On Services
- The standard installation covers amplifier placement (usually in the trunk or under a seat), secure mounting, and connection to the head unit and speakers or subwoofers.
- Optional upgrades like noise shielding, premium RCA cables, or dual battery systems are not included and can add $50–$150+ to the total cost.
- Best Buy often offers extended service plans and installation warranties, commonly covering labor for up to 1 year or for as long as you own the vehicle, depending on promotions.
What tools and components are required to install a car audio amplifier using an installation kit?
Essential Tools for Amplifier Installation
To successfully install a car audio amplifier using an installation kit, you need a set of basic hand tools and diagnostic equipment. Having the right tools ensures a safe and efficient installation process. A detailed toolkit allows you to work cleanly and securely without damaging vehicle components or audio equipment.
- Wire cutters and strippers – used to trim and expose the ends of power, ground, and RCA cables for proper connections
- Screwdrivers (flathead and Phillips) – necessary for removing dash panels, mounting the amplifier, and connecting terminals
- Socket wrench and ratchet set – helpful for securing the amplifier to metal surfaces using bolts, especially in tight spaces
- Crimping tool – essential for attaching connectors to wires, ensuring strong and reliable electrical joints
- Drill with metal drill bits – required if you need to create new holes for grounding or mounting the amplifier
- Multimeter – used to test voltage on power wires and verify the quality of the ground connection
- Heat gun or lighter – for shrinking heat shrink tubing to insulate and protect spliced wires
Core Components Included in a Standard Installation Kit
Most car audio amplifier installation kits come with a variety of components designed to simplify the setup. These components are selected to match common amplifier power requirements and ensure compatibility with factory wiring. Using a complete kit reduces the need to purchase individual parts separately and helps maintain system integrity.
- Power cable (typically 4-gauge or 8-gauge depending on amplifier wattage) – delivers current from the car battery to the amplifier
- Ground cable – connects the amplifier to the vehicle’s chassis to complete the electrical circuit and minimize noise
- RCA audio cables – transmit stereo signals from the head unit to the amplifier inputs
- Remote turn-on wire – allows the amplifier to power on automatically when the stereo is turned on
- Inline fuse holder and fuse – installed near the battery to protect the power wire from short circuits and potential fire hazards
- Wire connectors and ring terminals – used to securely attach cables to battery terminals and amplifier inputs
- Adhesive padding or foam – placed beneath the amplifier to reduce vibration and prevent damage to mounting surfaces
Additional Materials and Accessories for Optimal Performance
Beyond the tools and kit components, certain supplementary materials can enhance the amplifier's performance, safety, and longevity. These items may not always be included in basic kits but are highly recommended for professional-quality results. Attention to detail during installation minimizes electrical noise, voltage drops, and mechanical failure.
- Cable ties or Velcro straps – organize and secure loose wiring along the vehicle’s interior to prevent interference and maintain a clean setup
- Conduit or wire loom – protects power and signal cables from abrasion, heat, and movement when routed under carpets or along frame rails
- Dielectric grease – applied to electrical connections to prevent corrosion and improve conductivity, especially on ground and battery terminals
- Insulated mounting screws – used to attach the amplifier without creating unintended grounding paths through metal surfaces
- Noise suppression capacitors (optional) – reduce alternator whine and signal interference in high-power systems
- Signal isolation ground loop blocker – eliminates humming noises caused by voltage differences between the head unit and amplifier grounds
- High-density foam or rubber gaskets – provide additional damping between the amplifier and mounting location to reduce microphonics and vibration
What wire gauge is required for a 2000-watt car audio amplifier installation?
The appropriate wire gauge for a 2000-watt car audio amplifier installation depends primarily on the amplifier's voltage (typically 12-14 volts in a car) and the length of the power wire run from the battery to the amplifier. To determine the correct gauge, you need to calculate the maximum current (in amperes) the amplifier will draw. A general rule is to use the formula: Current (A) = Total Power (W) ÷ Voltage (V).
 Best Buy Radio And Speaker Installation
For a 2000-watt amplifier operating at 12 volts, this results in approximately 167 amps (2000 ÷ 12). Due to inefficiencies in class AB or D amplifiers, it's common to factor in an efficiency rate—around 50% for class AB and 75–80% for class D. Assuming a class D amplifier with 80% efficiency, the actual draw becomes about 208 amps (2000 ÷ 12 ÷ 0.8).
Based on this amperage and typical wire run lengths (up to 15 feet), a 0 gauge (0 AWG) or even 00 gauge (2/0 AWG) power wire is recommended. Shorter runs may allow for 1/0 AWG, but longer or high-demand systems benefit from 2/0 AWG to minimize voltage drop, overheating, and performance loss.
How to Calculate Current Draw for a 2000-Watt Amplifier
- Start by identifying the amplifier’s maximum power output, which in this case is 2000 watts. This value refers to the total RMS power, not peak power, and should be verified from the amplifier’s specifications.
- Divide the total power by the vehicle’s operating voltage—typically between 12 and 14 volts under load. Using 12 volts as a conservative estimate gives a theoretical current of 167 amps (2000 ÷ 12).
- Account for amplifier efficiency. Class D amplifiers, commonly used in high-power car audio, operate at about 75–80% efficiency. To adjust for this, divide the initial current value by the efficiency (e.g., 167 ÷ 0.8 = 208.75 amps). This corrected figure represents the actual current the electrical system must provide from the battery.
Selecting the Right Wire Gauge Based on Amperage and Distance
- Refer to automotive wire gauge charts, which correlate current carrying capacity with wire length. For currents exceeding 150 amps and runs longer than 10 feet, 1/0 AWG (00 AWG) or 2/0 AWG (0000 AWG) is necessary to prevent excessive voltage drop.
- For a 2000-watt amplifier drawing approximately 200 amps, a wire run of up to 10 feet can typically use 1/0 AWG, while runs between 10 and 17 feet should use 2/0 AWG to maintain safe voltage levels and prevent overheating.
- Always consider the entire power path, including grounding wire gauge, which should match the power wire. Using undersized wire can create resistance, reduce amplifier performance, damage components, or pose a fire hazard.
Additional Considerations for Safe and Efficient Installation
- Install an appropriate in-line fuse or circuit breaker near the battery, ideally within 18 inches of the positive terminal. For a 200-amp draw, a 200- to 250-amp fuse is recommended to protect the wiring and vehicle in case of a short circuit.
- Use copper wire of high quality with oxygen-free or multi-strand construction, designed specifically for car audio systems. Avoid aluminum wire, which has lower conductivity and higher resistance.
- Ensure all connections are clean, tight, and protected against corrosion. Use proper terminals (such as ring terminals), crimping tools, and heat shrink tubing to create secure, low-resistance connections at the battery, amplifier, and ground points.
What is the average cost of installing a car audio amplifier using an installation kit?
The average cost of installing a car audio amplifier using an installation kit typically ranges between $100 and $300. This price includes both the installation kit and the labor involved in connecting the amplifier to the vehicle’s existing audio system. The final cost varies based on several factors such as the complexity of the car’s electrical layout, the amplifier’s power rating, the number of audio channels, and the service provider’s hourly rate.
 Best Buy Speaker Install Price
Many car audio shops offer bundled deals that include the amplifier, wiring kit, and installation, which can provide overall savings. Some DIY enthusiasts reduce costs by purchasing a complete installation kit and performing the setup themselves, but professional installation ensures correct grounding, wiring protection, and avoids potential damage to the vehicle’s electrical system.
Factors Influencing Installation Cost
- The type and brand of the amplifier significantly impact the overall price; high-end amplifiers with more channels or higher wattage require more complex setups and may increase labor time and cost.
- Vehicles with intricate factory audio systems, such as those with amplified premium sound (like Bose or Harmon Kardon), might require additional time for integration, especially if signal processing or bypass modules are needed.
- Geographic location also plays a role—labor rates vary by region, with urban centers often charging higher hourly fees than rural areas.
What's Included in a Typical Installation Kit
- A standard amplifier installation kit includes essential wiring such as power, ground, and remote turn-on cables, along with a fuse holder and fuse to protect the electrical circuit.
- Signal cables like RCA connectors are provided to carry audio from the head unit to the amplifier, and some kits may include speaker wires for connecting to passive components.
- Mounting hardware, zip ties, and insulation materials are usually part of the kit to ensure secure installation, neat cable routing, and protection against interference or wear over time.
DIY vs. Professional Installation Trade-offs
- DIY installation can save on labor costs, which often range from $75 to $150 per hour at professional shops, but requires technical knowledge, proper tools, and time to complete safely and efficiently.
- Professional technicians not only speed up the process but also help avoid common mistakes like improper grounding, using undersized wires, or creating electrical noise that degrades sound quality.
- Many professional installations come with warranties on labor and often include testing and tuning services to optimize the amplifier’s performance within the vehicle’s acoustic environment.
Frequently Asked Questions
What is included in a car audio amplifier installation kit?
A car audio amplifier installation kit typically includes essential components such as a power wire, ground wire, remote turn-on wire, RCA audio cables, inline fuse holder, fuse, speaker wires, wiring connectors, and sometimes an installation manual. These kits provide everything needed to install an amplifier properly and safely, ensuring reliable power supply, clean audio signal transmission, and secure connections for high-performance sound.
Can I install a car amplifier using a generic installation kit?
Yes, most car audio amplifiers can be installed using a generic installation kit as long as the kit matches the amplifier's power requirements and your vehicle’s electrical system. Universal kits are designed to work with a wide range of amplifiers and vehicles. Ensure the wire gauge is appropriate for your amplifier's wattage to prevent overheating and guarantee optimal performance and safety during operation.
Do I need professional help to install an amplifier with the kit?
While many users successfully install amplifiers themselves using the kit, professional installation is recommended if you're unfamiliar with car electrical systems. A professional ensures correct wiring, avoids potential damage to your vehicle or audio components, and complies with safety standards. However, if you have basic electrical knowledge and follow the instructions carefully, a DIY installation can be safe and cost-effective.
Will an installation kit improve my audio system’s sound quality?
An installation kit itself doesn't directly enhance sound quality, but it enables proper and clean power delivery and signal transmission to the amplifier. Using high-quality components from a reliable kit reduces electrical resistance, prevents noise interference, and ensures stable performance. This results in clearer, more powerful audio output and protects your amplifier and speakers from potential damage due to poor connections or inadequate power supply.
Leave a Reply