
F150 Speaker Install
Upgrading the audio system in a Ford F-150 can significantly enhance the driving experience, especially for those who value crisp, powerful sound on the road.
Factory speakers often lack the clarity and depth desired by audiophiles and frequent travelers alike. Installing aftermarket speakers in an F-150 is a popular modification that improves sound quality without requiring extensive vehicle modifications.
With the right tools and components, most enthusiasts can complete the install themselves in a few hours. This guide covers the essentials of selecting, positioning, and installing speakers to maximize performance and compatibility with the F-150’s interior design and factory wiring.
 Sound Addicted Studio Monitor Isolation Pads Reviews
F150 Speaker Install: Upgrading Your Ford Truck’s Audio System
Installing new speakers in your Ford F-150 can dramatically improve sound quality, delivering richer bass, clearer highs, and a more immersive listening experience while driving.
Whether you’re replacing factory speakers that lack punch or preparing your truck for a full audio overhaul, a proper F-150 speaker install involves selecting compatible components, understanding your truck’s interior panel layout, and ensuring secure wiring connections.
Most F-150 models from recent years have similar door and interior configurations, making the upgrade process relatively straightforward for DIYers with basic tools. However, attention to speaker size, impedance, power handling, and placement is crucial to maximize performance without damaging your factory or aftermarket stereo system.
Choosing the Right Speakers for Your F-150
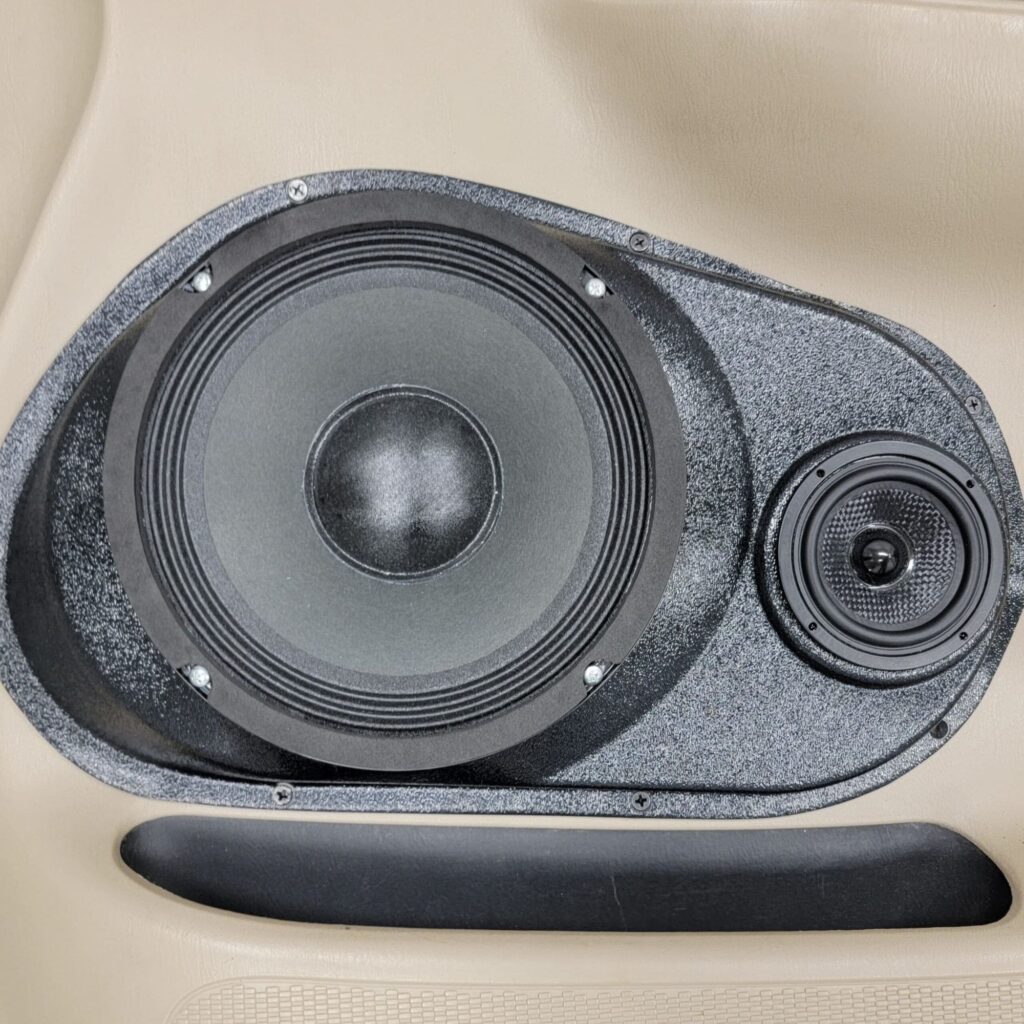
When planning an F-150 speaker install, selecting the correct speakers is essential to ensure compatibility and optimal sound quality. Most F-150 models use 6.5-inch speakers in the front doors and 6x8-inch or 6.5-inch speakers in the rear, though sizes can vary slightly depending on the model year and trim level.
 Speaker Studio Monitors
It's important to verify your factory speaker dimensions before purchasing replacements. Look for speakers with a compatible impedance (typically 4 ohms) and good sensitivity ratings (85 dB or higher) to work efficiently with your stock head unit or upgraded amplifier.
Component speaker kits, which include separate woofers and tweeters, provide superior sound staging and clarity compared to coaxial speakers, making them a preferred choice for audiophiles.
Tools and Preparation for a Successful Installation
A smooth F-150 speaker install starts with the proper tools and preparation. You’ll typically need a trim removal tool, screwdrivers, socket wrench, wire strippers, crimping tool, and electrical tape or heat shrink tubing.
Before beginning, disconnect the negative battery terminal to prevent electrical shorts. Remove interior door panels by gently prying off plastic clips using the trim tool, being careful not to crack the plastic.
 Sterling Mx3 Studio Monitors
Inspect the factory wiring harness and consider using harness adapters to simplify connections. Labeling wires and taking photos during disassembly can help avoid confusion later. Ensuring a clean workspace and organizing components ahead of time will make the upgrade process quicker and less error-prone.
Wiring and Mounting Techniques for Optimal Performance
Proper wiring and speaker mounting are critical for both sound quality and longevity. When connecting new speakers, match the positive and negative terminals correctly—reversed polarity can cause poor bass response and phase issues. Use butt connectors or soldering for secure, durable connections, and avoid relying solely on twist-and-tape methods.
If your new speakers require a larger cutout than the factory openings, use spacers or mounting rings to ensure a flush, vibration-free fit. Installing sound-dampening material like dynamat on the door panels reduces resonance and improves acoustic performance by minimizing vibrations. Finally, test each speaker before reassembling the door panels to confirm proper operation.
| SPEAKER LOCATION | TYPICAL SIZE | RECOMMENDED TYPE | POWER HANDLING (RMS) |
|---|---|---|---|
| Front Doors | 6.5-inch | Component or Coaxial | 50–100W RMS |
| Rear Deck/Cab | 6x8-inch or 6.5-inch | Coaxial | 40–80W RMS |
| Aftermarket Upgrade Tip | Add Tweeters | Pair with Crossovers | Match Head Unit/AMP Output |
Frequently Asked Questions
What tools are needed to install speakers in an F150?
To install speakers in an F150, you’ll typically need a trim removal tool, Phillips and flathead screwdrivers, wire strippers, crimping tool, electrical tape, and possibly a socket wrench for door panels. A drill may be necessary if making custom mounts. Having a multimeter helps verify wiring. Always disconnect the battery before starting. These tools ensure safe and efficient removal of panels and proper connection of new speakers without damaging your truck’s interior or electrical system.
 Best Studio Monitors Under $200
How do I remove the door panels on my F150 to access speakers?
To remove F150 door panels, start by disconnecting the negative battery terminal. Use a trim tool to gently pry off the plastic covers around the door handle and armrest, then remove the screws underneath. Slide the panel upward to release the clips securing it to the door frame. Disconnect any wiring harnesses for power windows or locks. Once free, carefully lay the panel aside. This gives full access to the factory speaker mounted behind it for replacement or upgrade.
Can I install aftermarket speakers without an amplifier in my F150?
Yes, you can install aftermarket speakers without an amplifier in your F150. Most aftermarket speakers are designed to work with factory stereos and operate efficiently at standard power outputs. While adding an amplifier improves sound quality and volume, it’s not required for basic installation. Ensure the new speakers match your system’s impedance and power handling. Passive component or coaxial speakers can directly replace stock units, offering better clarity and performance even without extra amplification.
Are factory F150 speakers the same size as aftermarket ones?
Most factory F150 speakers are standard sizes that match common aftermarket options. Front doors typically use 6.5-inch coaxial or component speakers, while rear seats often have 6x8-inch speakers. Always verify your model year’s specifications, as sizes can vary slightly across generations. Aftermarket speaker kits frequently include adapters or mounting rings for seamless installation. Checking fitment beforehand ensures compatibility and avoids modifications, making the upgrade process easier and more reliable across different F150 trims and years.
 Best Studio Monitors Under 2000
Leave a Reply