
350Z Door Speaker Install

Upgrading the audio system in a Nissan 350Z can dramatically enhance the driving experience, and installing new door speakers is one of the most effective first steps. Factory speakers often lack the clarity and power needed to deliver rich, dynamic sound. Replacing them with high-quality aftermarket units allows for improved volume, precision, and overall audio fidelity.
The 350Z’s front and rear door panels provide accessible mounting locations, making speaker installation a manageable DIY project for many enthusiasts. With the right tools and a careful approach, owners can preserve interior integrity while significantly upgrading their sound system. This guide covers the essential steps, tips, and considerations for a successful 350Z door speaker installation.
Essential Guide to 350Z Door Speaker Installation for Enhanced Audio Performance
Upgrading the audio system in a Nissan 350Z can significantly improve the in-cabin listening experience, and one of the most effective modifications is installing new door speakers. The factory audio system in the 350Z, while adequate for basic use, often lacks the clarity, depth, and volume that audiophiles and performance enthusiasts desire.
 Cheap Speaker Installation Near Me
Replacing the stock door speakers allows for better sound staging, increased sensitivity, and improved frequency response. The front and rear doors of the 350Z provide accessible mounting locations for 6.5-inch or component speaker setups, depending on personal preference and budget.
With the right tools and a methodical approach, most enthusiasts can complete this upgrade in a few hours without permanent modifications to the interior. Proper waterproofing, impedance matching, and wiring connections are essential to ensure both performance and longevity of the new speakers.
Tools and Materials Required for a Successful 350Z Door Speaker Install
To complete a 350Z door speaker installation efficiently, having the correct tools and materials on hand is crucial. You’ll need a trim removal tool to safely pry off door panels without damaging clips or paint, a socket wrench or ratchet set (usually 8mm and 10mm sockets) for removing speaker mounting bolts, and a wire stripper/crimper for making clean electrical connections.
Other essentials include butcher tape, heat shrink tubing, or butt connectors to protect spliced wires, and optionally, sound-deadening material such as Dynamat to reduce road noise and increase speaker efficiency.
 Commercial Speaker Installation Near Me
For the speakers themselves, most owners choose aftermarket 6.5-inch coaxial or component speakers that are compatible with factory impedance (typically 4 ohms). Don’t forget a multimeter to identify positive and negative speaker leads if using an aftermarket head unit or amplifier.
Step-by-Step Process for Removing Door Panels and Replacing Speakers
The first critical step in the 350Z door speaker installation is carefully removing the interior door panels. Begin by removing the small screw near the door latch and the screws behind the interior pull handle using the correct socket sizes. Gently pry the lower and side edges of the panel using a trim tool, working upward until all plastic clips pop free.
Once the panel is loose, disconnect the window switch harness, door handle cable, and any other electrical connectors. Set the panel aside safely. Next, remove the weather shielding—a plastic liner covering the inner door—being careful not to tear it, as it protects against moisture. Expose the factory speaker by removing its mounting screws (usually three or four Phillips-head screws).
Disconnect the factory wiring harness, then connect it to the new speaker using insulated crimp connectors or soldering. Mount the new speaker using the original screw holes, ensuring alignment with the factory gasket or using one provided with the speaker. Reattach the weather shield, reconnect all wiring, and snap the door panel back into place.
 Crutchfield Speaker Installation
Choosing the Right Speaker Size and Type for Your 350Z
Selecting the appropriate speaker type and size is vital for both performance and fitment. The 350Z’s front and rear doors are designed to accommodate 6.5-inch speakers as standard, with some models allowing for minor modifications to fit 6x9-inch units in the rear, although this is less common.
For most users, a high-quality coaxial speaker offers a balanced upgrade with improved highs and mids over stock units. However, for an audiophile-grade experience, component speaker systems—which include separate tweeters, woofers, and external crossovers—are recommended. These allow for optimal sound staging by positioning tweeters higher on the dash or A-pillars.
When selecting speakers, ensure they are 4-ohm compatible to work efficiently with the factory head unit or an aftermarket amplifier. Look for models with high sensitivity ratings (88dB or higher) and wide frequency response (50Hz–25,000Hz) to get clean sound across the audio spectrum.
| Component | Recommended Specification | Notes |
|---|---|---|
| Speaker Size | 6.5-inch | Fits front and rear doors without modification. |
| Impedance | 4 ohms | Matches factory head unit and amps. |
| Sensitivity | 88dB or higher | Ensures loud, clear output with minimal power. |
| Frequency Response | 50Hz – 25,000Hz | Ideal for full-range audio reproduction. |
| Installation Time (per door) | 30–45 minutes | Assumes basic tools and experience. |
Step-by-Step Guide to 350Z Door Speaker Installation
How to Install Speakers in a Nissan 350Z Door Panels – Step-by-Step Guide

 Custom Car Speaker Installation
Preparation and Tools Required
Before beginning the speaker installation in a Nissan 350Z door panel, it's essential to gather the necessary tools and prepare the workspace. Working with care ensures that both the car’s interior and electrical components remain undamaged. Start by turning off the vehicle and disconnecting the negative terminal of the battery to avoid any electrical shorts during the process.
This step is crucial for safety, especially when handling wiring near door panels. Make sure you have a clean, well-lit area to work in, and lay down a soft cloth or mat to place removed parts safely. Having the right tools at hand streamlines the installation and helps prevent frustration.
- Collection of tools: Include a trim removal tool, Phillips and flathead screwdrivers, a panel popper tool, wire connectors or crimping tools, and socket wrench if needed for retaining bolts.
- Speaker preparation: Verify the compatibility of the new speakers with the 350Z’s door cavity and wiring harness. Most aftermarket speakers fit directly, but checking dimensions and impedance ensures optimal performance.
- Organize small parts: Use a container or magnetic tray to store screws and clips removed from the door panel to prevent loss during reassembly.
Removing the Door Panel and Accessing the Speaker
Accessing the factory speaker requires removing the interior door panel carefully to avoid damaging clips or breaking connectors. Begin by removing the door handle bezel using a trim tool, then unscrew the Phillips screw located behind it.
Next, remove the screw near the armrest pull and the one hidden under the door lock mechanism cover. Once all visible screws are out, use a trim removal tool to gently pry around the edges of the door panel, releasing the plastic retaining clips.
 Custom Speaker Install
Work slowly to avoid cracking the panel. After the panel is loose, lift it upward slightly to disengage it from the window track, then disconnect the wiring harnesses for the power window switch and door lock.
- Locate and remove all fasteners: Check around the pull handle, speaker grille, and lower edge for hidden screws that secure the panel.
- Detach electrical connectors: Carefully unplug the wiring harnesses using the release tabs to avoid damaging the terminals.
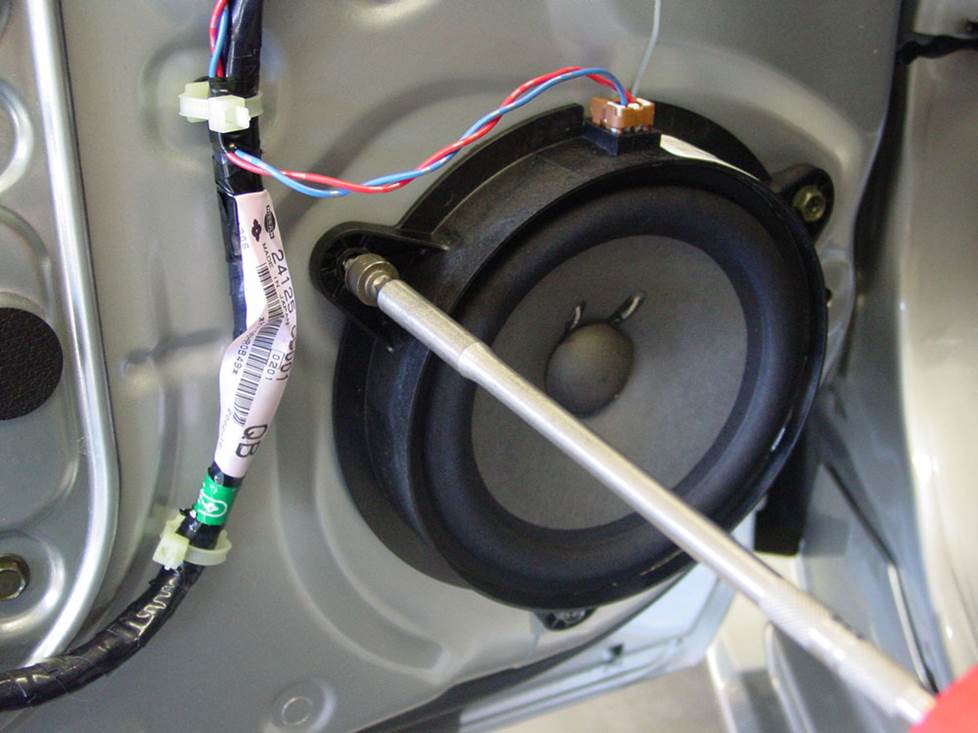
- Expose the speaker: With the door panel removed and set aside, the factory speaker will be clearly visible, mounted behind a metal or plastic shield with screws around its perimeter.
Wiring and Mounting the New Speaker
Once the factory speaker is exposed, disconnect its wiring harness by pressing the release tab and gently pulling it apart.
Remove the mounting screws securing the speaker to the door, then carefully extract it from the cavity. Before installing the new speaker, perform a fitment check to ensure it sits flush without obstructing the door’s internal mechanisms.
Using compatible speaker wire connectors or crimp terminals, attach the new speaker wires to the factory harness. Match the positive (+) and negative (-) terminals correctly to maintain proper audio phase. Secure the new speaker in place with the provided screws, ensuring it's tightly fastened but not over-tightened, which could damage the speaker frame.
 Custom Speaker Installation
- Match wiring polarity: Confirm that the wiring from the factory harness aligns with the new speaker’s positive and negative leads to ensure consistent sound output.
- Secure the speaker: Use the existing screw holes or adapter brackets if necessary, tightening screws evenly to avoid warping the mounting surface.
- Reassemble the door panel: Reconnect all electrical connectors, align the door panel's clips with the door frame, press firmly around the edges to snap all clips into place, then reinsert and tighten all screws removed earlier.
What tools and components are needed for a 350Z door speaker installation?
Essential Tools for 350Z Door Speaker Installation
To successfully install new speakers in the doors of a Nissan 350Z, you will need a specific set of tools to safely remove interior panels and access the speaker mounting locations. Working with the correct tools ensures a clean installation without damaging trim or electrical components. Having everything on hand beforehand will make the process smoother and reduce the risk of errors.
- Trim removal tool (plastic pry tool) – used to gently pry off door panels without scratching paint or damaging plastic clips.
- Socket wrench with 8mm and 10mm sockets – required to remove screws securing the door panel and speaker mounting bolts.
- Phillips-head screwdriver – helps remove screws around the door handle and speaker grille.
- Wire cutters/strippers – necessary for modifying or extending speaker wire if the factory harness doesn’t reach.
- Wire crimpers and crimp connectors (or soldering iron) – ensure secure connections between aftermarket speaker wires and factory harnesses.
- Panel popper tool or flathead screwdriver (used carefully) – helps release hidden clips securing the door trim.
- Electrical tape or heat shrink tubing – protects spliced connections from short circuits.
- Label maker or masking tape and pen – useful for labeling wires during disassembly to avoid confusion during reassembly.
Required Speaker Components and Upgrades
The success of a 350Z door speaker installation depends not only on tools but also on selecting the right components. Factory speakers are typically 5.25-inch coaxial units, but many upgrades are compatible with proper adapters or modifications. Ensuring compatibility between the new speakers, mounting depth, and factory wiring is crucial to avoid fitment issues.
- Aftermarket speakers (5.25-inch coaxial or component set) – provide better sound quality than stock units; component sets include separate woofers and tweeters for improved audio clarity.
- Speaker wire (16–18 gauge) – used to extend factory wiring if needed, especially for component tweeters mounted in A-pillars or dash.
- Speaker harness adapters – enable quick connection between factory wiring and aftermarket speakers without cutting factory wires.
- Mounting adapters or speaker baffles – may be necessary if the new speaker’s basket is larger than stock or if there’s a mismatch in screw placement.
- Sound-deadening material (dynamat or similar) – reduces road noise and vibration, improving sound clarity by preventing door flex.
- Grill or mesh covers (optional) – protect new speakers from debris and moisture within the door cavity.
- T-sequence connectors or butt splices – for reliable, low-resistance connections when extending speaker wire.
Electrical and Safety Components
Proper electrical management during a 350Z door speaker installation is critical to prevent short circuits, speaker damage, or vehicle electrical issues. Ensuring secure connections and protecting exposed wires safeguards both the audio system and the car's electronics. It’s also important to follow safety best practices when working around airbags and vehicle wiring.
 Custom Speaker Pods Installation
- Fuse puller and 10A fuse removal – removing the radio fuse (located in the driver’s side fuse box) disconnects power to the head unit, preventing accidental shorts.
- Dielectric grease – applied to electrical connectors to prevent corrosion, especially in the humid environment inside a door.
- Heat shrink tubing – provides a more durable insulation than electrical tape for wire splices.
- Zip ties or Velcro wire straps – keep wires organized and prevent them from interfering with window mechanisms or door lock linkages.
- Insulated gloves and eye protection – recommended when working near sharp metal edges or handling electrical components.
- Multimeter (optional) – helps verify correct polarity and voltage on speaker wires, avoiding phase issues.
- Anti-static wrist strap (optional) – prevents static discharge when handling sensitive aftermarket electronics.
What are the best speaker upgrades for a 350Z door installation?
Recommended Speakers for 350Z Door Installation
- The Focal P30F is a top-tier component speaker set highly regarded for 350Z door installations due to its titanium dome tweeters and fiberglass cone woofers, which deliver crisp highs and dynamic midrange response that complement the coupe's acoustic environment.
- Another excellent choice is the Morel Hybrid Virtus 602, known for its natural sound signature and wide frequency dispersion, making it ideal for fitting into factory door cavities without requiring extensive modifications.
- The Audison APBX 165 IV offers precise imaging and clarity, with silk dome tweeters that provide smooth high-frequency extension, ideal for listeners who prefer an audiophile-grade tone tailored to the stock door panel acoustics of the 350Z.
Key Factors When Choosing 350Z Door Speakers
- Size compatibility is crucial; the front doors of the 350Z accept 6.5-inch coaxial or component speakers, so verifying that the new drivers fit without major door modifications ensures a clean installation.
- Power handling should match your amplifier or head unit output—speakers with sensitivity ratings of 87 dB or higher respond well to factory or aftermarket receivers, while robust RMS ratings ensure they can handle upgraded systems.
- Door sealing and damping is often overlooked but essential; using materials like Dynamat or foam baffles minimizes panel resonance and improves the soundstage, allowing the upgraded speakers to perform to their full potential.
Installation Tips for Optimal Sound Quality
- Use foam speaker baffles or mounting adapters to decouple the speaker from the metal door, preventing sound distortion caused by vibrations and improving bass response within the enclosed space.
- Install tweeters high in the front doors or in the sail panels for better sound staging; angling them toward the driver enhances imaging and creates a more immersive listening experience.
- Ensure all wiring connections are secure and consider upgrading to 16- or 14-gauge speaker wire to reduce resistance and deliver cleaner audio signals, especially when using an external amplifier to power the door speakers.
Frequently Asked Questions
What tools are needed for a 350Z door speaker install?
For a 350Z door speaker installation, you’ll typically need a trim removal tool, a Phillips screwdriver, a socket wrench or ratchet set (usually 8mm and 10mm sockets), wire strippers, crimpers, and optionally a soldering iron. A panel removal tool helps safely detach door panels without damaging clips. Having electrical tape and zip ties on hand is useful for securing wires and ensuring a clean, safe installation.
Can I install aftermarket speakers in my 350Z without an amp?
Yes, you can install aftermarket speakers in your 350Z without an amplifier. Most aftermarket speakers are designed to work efficiently with factory head units. While adding an amplifier improves sound quality and volume, quality coaxial or component speakers will still offer a noticeable upgrade in clarity and bass response over stock units when powered by the factory stereo. Ensure impedance and sensitivity ratings are compatible with your head unit.
What speaker size fits in a 350Z door?
The front doors of a Nissan 350Z accept 6.5-inch speakers, while the rear hatch area uses 6x9-inch speakers. When replacing the front door speakers, you can directly install 6.5-inch aftermarket speakers with little to no modification. Some kits may include adapters or mounting rings. Always verify speaker depth and magnet clearance to ensure a proper fit within the door cavity without interfering with internal mechanisms.
How do I remove the 350Z door panel for speaker replacement?
To remove the 350Z door panel, start by removing the inner door handle cover and the screw behind it. Unscrew the panel’s lower screws and release the plastic clips using a trim tool. Carefully disconnect the wiring harness for the window and door lock switches. Once all fasteners are removed, gently lift the panel upward to disengage it from the window channel. Handle it carefully to avoid damaging any components or wires.
 Dell Monitor Speaker Bar Installation
Leave a Reply