
Banana Plug Speaker Wire Install

Installing speaker wire with banana plugs offers a clean, secure, and efficient connection between your audio equipment and speakers.
These small, cylindrical connectors eliminate the need for bare wire frays, reducing the risk of short circuits and ensuring consistent signal transfer. Ideal for both beginners and audiophiles, banana plugs simplify the setup process and allow for quick disconnections without damaging the wires.
This guide walks you through selecting the right gauge wire, stripping insulation, and properly attaching banana plugs for optimal performance. With the correct tools and technique, you can enhance your sound system’s reliability and aesthetics while maintaining high-fidelity audio transmission throughout your home theater or listening environment.
 Studio Monitor Vs Frfr
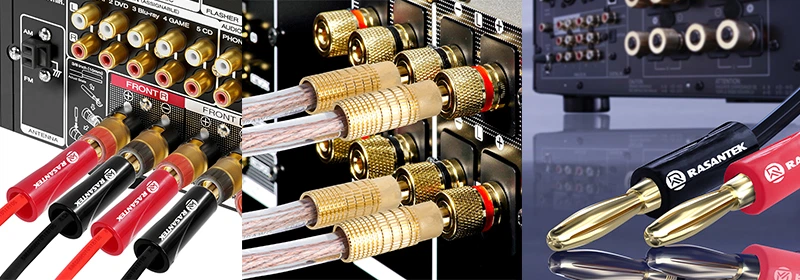
How to Install Banana Plug Speaker Wire for Optimal Audio Performance
Installing banana plug speaker wire is a straightforward and effective way to enhance both the reliability and appearance of your audio system connections. Banana plugs provide a secure, high-conductivity link between speaker wires and audio components like receivers or amplifiers, minimizing signal loss and reducing the risk of short circuits.
This method not only simplifies speaker setup and removal but also helps maintain consistent contact over time, especially when compared to bare wire connections. By following proper installation techniques, users can ensure clean, efficient connections that support high-fidelity sound transmission across their audio systems.
What Are Banana Plugs and Why Use Them?
Banana plugs are single-wire connectors designed to terminate the ends of speaker cables, making it easier to connect them to compatible binding posts on amplifiers, receivers, and speakers.
The name comes from their shape, which resembles a curved banana, and they typically feature a metal pin that inserts directly into a corresponding port. Using banana plugs improves connectivity, signal integrity, and system aesthetics by eliminating frayed or loosely inserted bare wires.
 Studio Monitors Active
They are especially beneficial in setups where speakers are frequently moved or disconnected, as they prevent wire damage and ensure repeatable, secure connections. Additionally, high-quality banana plugs made from oxygen-free copper or with gold plating further reduce resistance and corrosion, contributing to better long-term audio performance.
Step-by-Step Guide to Attaching Banana Plugs to Speaker Wire
To attach banana plugs to speaker wire, start by stripping approximately 1/2 inch (12–13 mm) of insulation from the end of each wire using a wire stripper. Next, separate the exposed strands and twist them slightly to prevent fraying.
Depending on the plug design, either insert the bare wire into the barrel of the banana plug and tighten the set screw using a small screwdriver, or feed the wire through the strain relief sleeve and into the terminal before securing it with a crimp or screw mechanism. It's crucial to ensure that no stray strands are exposed, as these can cause short circuits.
Once secured, check that the wire is firmly held and the banana pin moves freely (if designed to be spring-loaded). Repeat the process for each wire end, maintaining consistent polarity by using color-coded terminals—typically red for positive and black for negative.
 Adam Audio A7v Studio Monitor
Compatibility and Types of Banana Plugs for Speaker Installation
Not all banana plugs are the same, and selecting the right type is essential for compatibility with your audio equipment.
The most common types include single banana plugs, dual banana plugs (which combine positive and negative connectors on a single body), and stackable banana plugs, which allow multiple connections at one terminal. Some binding posts accept only standard 4mm banana plugs, while others accommodate larger variants, so checking manufacturer specifications is critical.
Additionally, consider whether you need insulated versus non-insulated versions—insulated plugs offer added safety by reducing the chance of accidental contact with nearby conductive surfaces. Spring-loaded models are ideal for frequent connections, providing consistent tension, while solderless designs offer ease of installation without requiring a soldering iron.
| Feature | Advantage | Consideration |
|---|---|---|
| Gold-Plated Contacts | Resists corrosion and improves signal conductivity | Slightly higher cost compared to nickel or brass |
| Solderless Design | Easy installation without soldering equipment | May be less durable than soldered connections under stress |
| Insulated Housing | Enhances electrical safety and prevents short circuits | Potentially bulkier, may not fit tight terminal spaces |
| Spring-Loaded Mechanism | Ensures tight, consistent fit in binding posts | More complex design, may wear over time |
| Dual-Banana Configuration | Simplifies connection with color-coded polarity | Less flexibility if only one channel needs replacement |
Step-by-Step Guide to Installing Banana Plug Speaker Wire
How to Install Speaker Wire into Banana Plugs for Optimal Audio Performance
Choosing the Right Banana Plugs and Speaker Wire
- Select banana plugs that match the gauge of your speaker wire; most home audio systems use 12 to 16 AWG wire, so ensure compatibility to avoid poor connections or difficulty inserting the plug into binding posts.
- Opt for banana plugs with gold-plated contacts, as gold resists corrosion and maintains a strong signal transfer over time, especially important for preserving high-frequency clarity and overall sound fidelity.
- Choose plugs with a sturdy, strain-relief design—such as those with a screw-on housing or rubber boot—that will securely hold the wire in place and reduce the risk of internal wire breakage from repeated handling.
Preparing and Stripping the Speaker Wire
- Use a precision wire stripper set to the correct gauge to remove approximately 1/2 inch (12–13 mm) of insulation from the end of each speaker wire strand, ensuring you do not nick or cut the internal copper conductors during the process.
- Twist the exposed copper strands gently with your fingers to keep them tightly bound, preventing stray wires from causing short circuits or making uneven contact within the banana plug terminal.
- Verify polarity by identifying the positive (+) and negative (–) wires—typically marked with a stripe, ridge, or different color insulation—and keep them separated to maintain correct phase alignment in your audio setup.
Inserting and Securing Wire into Banana Plugs
- Open the banana plug housing by unscrewing the outer casing or releasing the clamp mechanism, depending on the model, to expose the internal terminal where the wire will be connected.
- Insert the prepared wire into the banana plug, making sure the bare copper fully enters the metal crimp or screw terminal and that the insulation rests against the strain relief for added durability.
- Secure the connection by tightening the set screw with a small screwdriver or crimping the metal sleeve with pliers, then slide the outer cover back over the terminal and screw it tightly to protect the connection and enable smooth insertion into speaker or amplifier terminals.
Are banana plugs necessary for speaker wire installation?
What Are Banana Plugs and How Do They Work?
- Banana plugs are small connector devices designed to terminate the ends of speaker wires, making it easier to connect them to audio equipment such as receivers, amplifiers, or passive speakers. They are named for their shape, which resembles a banana, and typically have a metal pin that inserts into a corresponding binding post or input terminal.
- These connectors are commonly made from conductive metals like copper or gold-plated brass to ensure a reliable electrical connection. When a banana plug is inserted into a compatible socket, it creates a secure, low-resistance connection that helps maintain audio signal integrity.
- Banana plugs are especially useful when dealing with stranded or fine-gauge speaker wire. Instead of repeatedly stripping wire ends or dealing with frayed strands, users can connect and disconnect their speakers quickly and cleanly by plugging in the banana connectors each time.
Advantages of Using Banana Plugs in Speaker Setups
- One of the main benefits of banana plugs is convenience. They allow for quick and repeated connections without having to strip or twist speaker wire ends every time a connection is made. This is particularly helpful in environments where audio equipment is frequently reconfigured or tested.
- Banana plugs also improve safety by reducing the risk of stray wire strands causing short circuits, especially in tightly packed amplifier or receiver terminals. A properly attached plug encloses the wire, minimizing contact with other conductive surfaces.
- Aesthetically, banana plugs provide a cleaner and more professional appearance. The finished look of terminated wires is often preferred in home theater installations or high-end audio systems where organization and presentation matter.
When Are Banana Plugs Not Necessary?
- Banana plugs are not required if your amplifier or speaker uses alternative connection methods such as bare wire terminals, spade connectors, or pin connectors. Many entry-level systems work perfectly well with simple stripped wire ends inserted directly into binding posts.
- In cases where equipment does not have banana plug-compatible jack ports (such as spring clips or older binding posts without inserts), banana plugs cannot be used at all. Here, alternative termination methods or bare wire connections remain the only viable options.
- For permanent installations where the speaker wires will not be disconnected often, the added cost and effort of installing banana plugs might not justify the benefits. Direct wiring can be just as effective and more cost-efficient for stable, long-term setups.
Does using banana plugs affect audio quality during speaker wire installation?
 Audio Technica Studio Monitor Headphones
Signal Integrity and Electrical Contact
- Banana plugs are designed to maintain a consistent and secure connection between speaker wires and binding posts, which helps preserve signal integrity by reducing the chance of loose or intermittent contact that might occur with bare wire.
- Made from conductive materials such as copper or gold-plated brass, banana plugs offer reliable electrical conductivity, minimizing resistance at the connection point, which could otherwise introduce minor signal losses.
- Over time, oxidization may affect bare copper wires, leading to degraded audio performance. Banana plugs can protect the wire ends from exposure to air and moisture, reducing oxidation and preserving long-term audio fidelity.
Impact on Audio Fidelity and Sound Quality
- In typical home audio setups, the audible impact of using banana plugs is negligible. High-quality banana plugs do not introduce noticeable distortion, noise, or frequency loss under normal listening conditions.
- The improvement in sound quality is often more perceptible when upgrading from poorly attached bare wires to banana plugs, due to better contact stability rather than the plug itself enhancing the signal.
- Low-quality or poorly manufactured banana plugs may use inferior metals or have loose fits, potentially causing minor signal degradation or intermittent connection, which can result in audio dropouts or subtle distortion.
Installation Practicality and System Performance
- Banana plugs simplify the process of connecting and disconnecting speakers, especially useful when dealing with heavy equipment or tight spaces behind audio gear, without needing to strip and twist wire each time.
- Properly installed banana plugs reduce the risk of stray wire strands causing short circuits, especially in tightly packed binding post areas, contributing to safer and more reliable system operation.
- While they do not inherently improve the audio signal, the consistency and durability of connections made with banana plugs support optimal performance from high-end audio components by ensuring uninterrupted signal transfer.
Frequently Asked Questions
What tools do I need to install banana plug speaker wires?
You'll need banana plug connectors, a wire stripper, scissors or wire cutters, and possibly a small screwdriver. Some banana plugs require crimping, so a crimping tool may also be helpful.
Make sure your speaker and amplifier have banana plug-compatible binding posts. Always disconnect power before beginning installation for safety. With these tools, you can efficiently prepare and attach the wires without damaging equipment or compromising audio quality.
How do I prepare speaker wire for banana plugs?
Strip about 3/4 inch (19 mm) of insulation from the end of the speaker wire using a wire stripper. Twist the exposed copper strands gently to prevent fraying.
Insert the wire into the banana plug’s terminal, ensuring all strands are inside. Secure the wire by tightening the set screw or crimping, depending on the plug design. Double-check that no loose strands are exposed to avoid short circuits and ensure a solid electrical connection.
 Best Studio Monitors Electronic Music
Can banana plugs improve audio quality?
Banana plugs themselves don’t enhance audio quality but ensure a consistent, secure connection between your speaker wire and audio equipment. This stability minimizes signal loss and prevents loose wires that could cause crackling or interruptions.
High-quality banana plugs made from conductive materials like gold-plated brass can reduce corrosion and improve long-term performance. Proper installation contributes to reliable sound transmission, making them a worthwhile upgrade for organized, high-fidelity audio systems.
Are banana plugs compatible with all speakers and amplifiers?
Not all speakers and amplifiers support banana plugs. Check if your devices have binding posts with spring-loaded inserts or banana plug holes.
Many modern receivers and bookshelf speakers are compatible, but some high-end or older models may require bare wire or spade connectors. If not compatible, adapters can sometimes be used. Always verify manufacturer specifications before purchasing banana plugs to ensure proper fit and avoid potential damage to your audio equipment.
 Edifier Mr3 Studio Monitors
Leave a Reply