
Speakers In Ceiling How To Connect

Installing ceiling speakers can significantly enhance your home audio experience by saving space and delivering immersive sound. However, connecting them properly is crucial for optimal performance. This guide walks you through the essential steps of wiring ceiling speakers, from selecting the right cables and equipment to safely mounting the speakers and linking them to your audio source.
Whether you're setting up a single room or a whole-house audio system, understanding polarity, impedance, and amplifier compatibility is key. With clear instructions and safety tips, this article ensures you can confidently connect your ceiling speakers for clear, powerful sound throughout your space.
How to Connect Speakers in the Ceiling: A Step-by-Step Guide
Connecting ceiling speakers properly ensures high-quality audio distribution and long-term reliability. Whether you're installing speakers for background music, home theater, or commercial use, understanding the correct wiring, placement, and compatibility with your audio system is essential.
 How To Connect External Speakers To TV Without Aux
This guide walks you through the process—from selecting the right speaker type to connecting them to your amplifier or receiver—so you can achieve seamless sound integration in your space.
Choosing the Right Speaker and Wiring Type
Selecting the appropriate ceiling speakers and matching them with the correct wiring is fundamental to optimal performance. Most in-ceiling speakers operate at 8 ohms and are compatible with standard home audio receivers, but impedance and power handling must be considered to prevent amplifier overload.
For best results, use 16-gauge or 14-gauge stranded speaker wire, especially for longer runs over 50 feet, to minimize signal loss. CL2 or CL3-rated cable is recommended because it's fire-resistant and approved for in-wall and in-ceiling installations.
Ensure that your speakers support the room size and acoustics—for example, moisture-resistant models for bathrooms or outdoor areas. Always verify compatibility between your speakers and amplifier, particularly if using a multi-room audio setup.
 How To Connect Kove Commuter 2 Speakers Together
Positioning and Mounting Speakers Correctly
Proper placement directly affects sound quality and coverage. For stereo listening, position ceiling speakers in a left-right configuration at ear level when seated, typically forming an equilateral triangle with the primary listening area.
In larger rooms, consider using multiple pairs with proper spacing to avoid audio dead zones. Use a speaker template or measure carefully to mark cutout dimensions, avoiding joists and existing electrical wiring.
Most in-ceiling models come with dog-ear clamps or spring-loaded brackets that secure the speaker to the drywall once inserted. Make sure the ceiling can support the speaker’s weight and that the cutout is clean and precise to ensure a snug fit and reduce vibrations.
Connecting to an Amplifier or Receiver
Once the speakers are physically installed, connect them to your amplifier or AV receiver using the correct polarity and wiring path.
 How To Connect PC Speakers
Begin by running the speaker wire from each speaker location back to your audio source, leaving a few extra inches for connection. Strip about 1/2 inch of insulation from each wire end and attach them to the terminal: positive (+) to positive and negative (–) to negative—this maintains phase coherence and prevents sound cancellation.
If using a multi-zone amplifier, label each pair of wires to manage zones effectively. After connections are secure, use the receiver’s speaker setup or room calibration feature (like Audyssey or YPAO) to balance volume and tone across all speakers.
| Component | Recommended Option | Key Benefit |
|---|---|---|
| Speaker Wire Gauge | 14 or 16 AWG | Reduces resistance over long runs |
| Cable Rating | CL2 or CL3 | Safe for in-wall/ceiling use |
| Speaker Impedance | 8 ohms | Compatible with most receivers |
| Mounting System | Spring-loaded clamps | Secure and easy installation |
| Connection Type | Bare wire or banana plugs | Reliable signal transfer |
How to Connect In-Ceiling Speakers: A Step-by-Step Installation Guide
How to Connect Ceiling Speakers: What Devices Are Compatible?
Compatible Audio Sources for Ceiling Speakers
Ceiling speakers can be connected to a wide range of audio sources, provided the output matches the impedance and power requirements of the speakers.
 How To Connect PS5 To Bluetooth Speakers
Common compatible devices include AV receivers, stereo amplifiers, and home theater systems that support passive or active speaker setups. Many modern streaming devices such as Sonos Amp, Bluesound Node, or Chromecast Audio can also integrate with ceiling speakers when linked through an amplifier.
Additionally, smart home hubs like Alexa-enabled systems with audio output or Apple AirPort devices (if still in use) can feed audio signals to your ceiling speakers when appropriately configured. Ensuring your source device has speaker-level outputs or preamp outputs (for use with external amplification) is essential for seamless connectivity.
- AV receivers are among the most common sources, offering multiple channels and support for surround sound formats.
- Streaming audio players with optical, coaxial, or RCA outputs can be connected to a receiver or amplifier before linking to ceiling speakers.
- Smartphones and tablets can send audio to ceiling speakers via Bluetooth if the amplifier or receiver supports wireless input, or through a 3.5mm auxiliary connection.
Wiring and Connection Methods
Connecting ceiling speakers requires appropriate cabling and termination techniques to ensure clear sound and system safety.
Most ceiling speakers operate on low-voltage signals and are typically powered by an external amplifier using stranded copper speaker wire, commonly 14 or 16 gauge depending on the distance and power. The wiring process involves running cables from the amplifier or receiver to each speaker location, making sure polarity is consistent (positive to positive, negative to negative) to avoid phase issues.
 How To Connect Speakers To Roku TV
Connections are usually made via spring clips, screw terminals, or banana plugs on the speaker end, and binding posts or spring connectors on the amplifier side. In larger installations, a speaker selector is recommended to manage impedance when running multiple speakers on a single amplifier channel.
- Use CL2 or CL3-rated in-wall speaker wire to meet safety codes and reduce fire risk when running cables inside walls or ceilings.
- Label both ends of each speaker wire during installation to simplify connections and identify zones later on.
- Test each speaker with a 9-volt battery before final mounting to verify correct wiring polarity and functionality.
Integration with Smart Home and Multi-Room Audio Systems
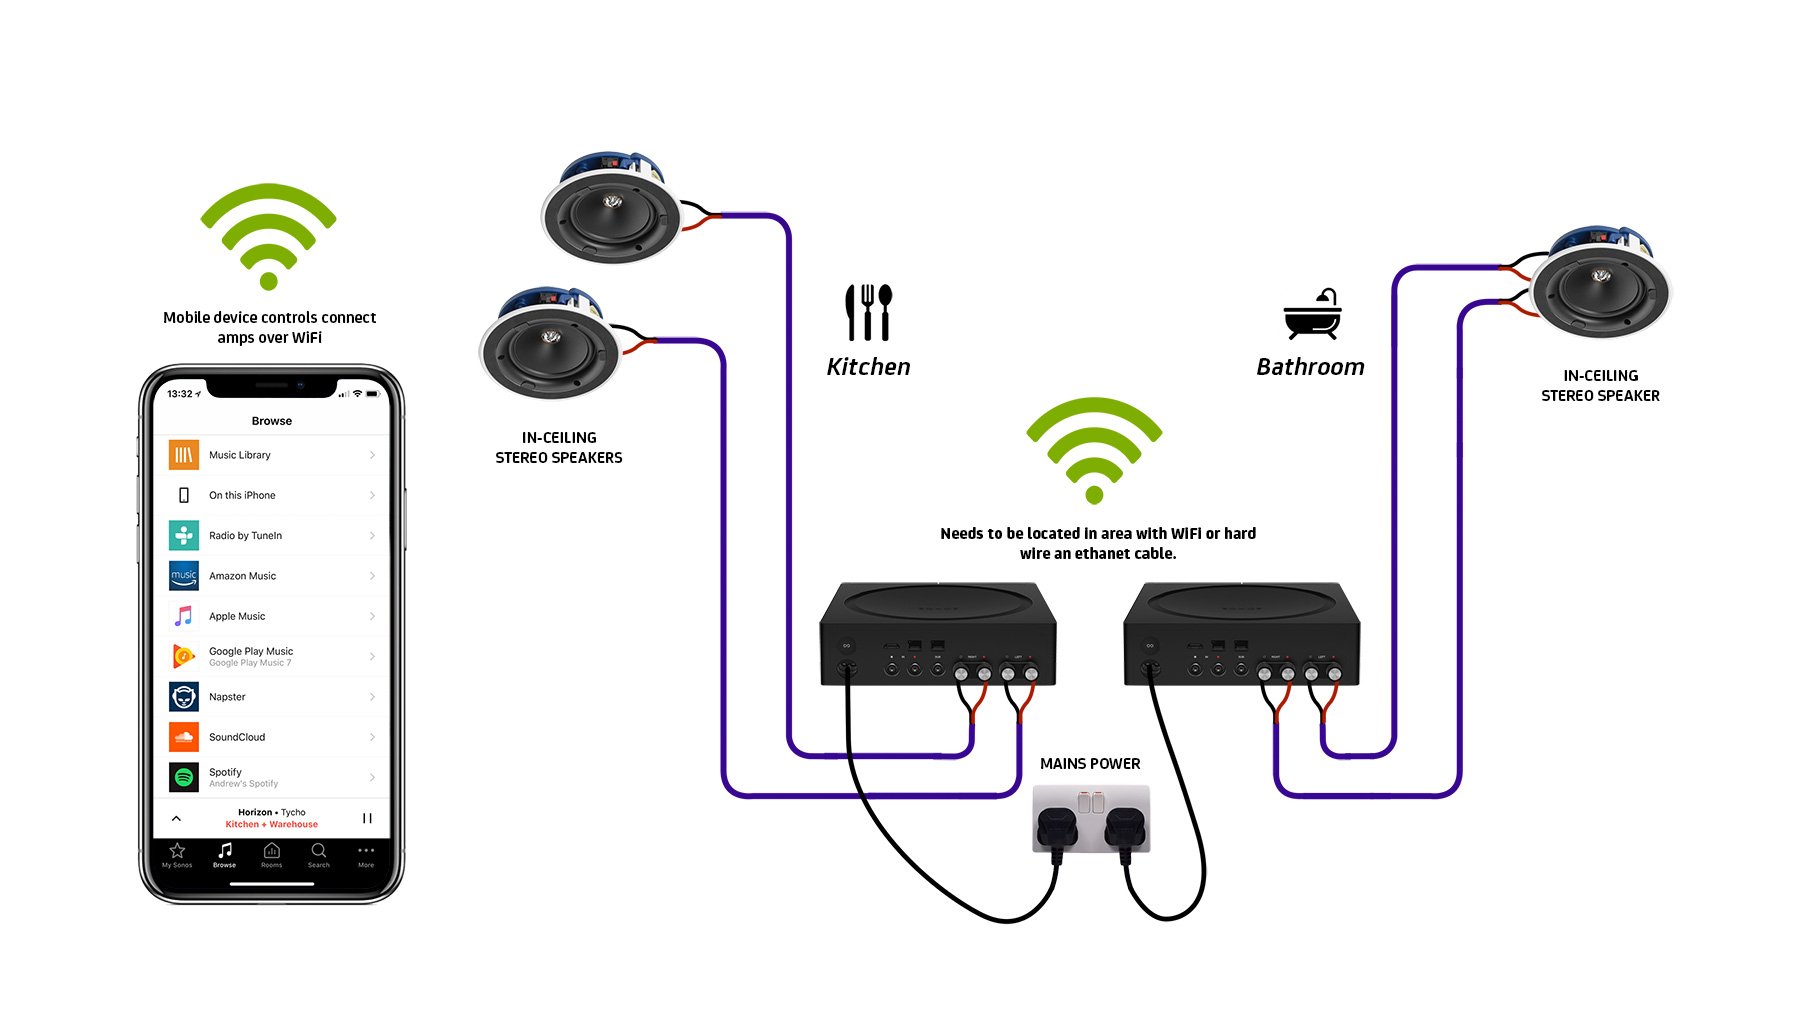
Modern ceiling speakers can be integrated into smart home ecosystems, enabling multi-room audio and voice control. Systems like Sonos, Bose SoundTouch, or Denon HEOS support whole-home audio by connecting amplifiers or powered speakers to a Wi-Fi network.
In such setups, ceiling speakers are wired to a compatible amplifier that receives audio streams over the network from a mobile app or voice assistant. For example, Sonos Amp allows up to two pairs of ceiling speakers to be controlled via Alexa, Google Assistant, or Apple AirPlay 2.
Additionally, legacy systems using IR or RS-232 control can be automated through universal remotes or home automation platforms like Control4 or Crestron. This integration allows precise control over volume, source selection, and room grouping.
 GTRacing Gaming Chair With Bluetooth Speakers How To Connect
- Choose amplifiers with built-in streaming support and Wi-Fi to eliminate the need for external streaming devices.
- Use apps provided by manufacturers to synchronize audio across rooms and assign ceiling speakers to specific zones.
- Integrate with voice assistants by linking your audio system account to platforms like Amazon Alexa or Google Home for hands-free control.
How to properly connect in-ceiling speakers for optimal sound performance

Choosing the Right Location for Installation
Selecting the optimal placement for in-ceiling speakers is crucial to achieving balanced and immersive sound coverage. Poor placement can lead to sound dead zones, weak stereo imaging, or excessive echo, especially in larger rooms.
To ensure even sound distribution, consider the room's dimensions, furniture layout, and primary listening area. Avoid installing speakers directly above seating locations, as sound may feel distant or muffled. Instead, angle them slightly toward the listening zone if possible. Additionally, maintain proper spacing between speakers based on the room's size and the speaker's dispersion pattern.
- Position front left and right speakers at a 22–30 degree angle from the primary seating area for optimal stereo separation.
- Space surround or rear speakers 90–110 degrees from the listener to enhance surround sound effects in home theater setups.
- For rooms with multiple seating rows, consider adding additional speakers or using models with wide dispersion to cover the entire audience.
Proper Wiring and Impedance Matching
Correct wiring techniques are essential to maintain audio quality and prevent amplifier damage. In-ceiling speakers must be connected using appropriate speaker wire gauge—typically 16 or 14 AWG for runs under 50 feet. Longer cable runs benefit from thicker 12 AWG wire to reduce resistance.
Always check the speaker's impedance (usually 4, 6, or 8 ohms) and ensure compatibility with your AV receiver or amplifier. Mixing different impedance ratings across channels can overload the amplifier, especially when multiple speakers are connected in parallel. Use wire staples or clips to secure cables along joists, avoiding sharp bends or pinching.
- Use stranded copper CL2 or CL3 rated speaker wire for in-wall/in-ceiling installations to meet fire safety codes and reduce signal loss.
- Match the total impedance load of connected speakers to the amplifier's specifications—ideally staying within the 4–8 ohm range per channel.
- Label both ends of each speaker wire during installation to simplify connection to the receiver and avoid channel confusion.
Securing Secure and Clean Connections
A reliable electrical connection between the speaker wire and terminal ensures consistent signal transfer and reduces the risk of audio dropouts or distortion. Begin by stripping about 1/2 inch of insulation from the wire ends and twist the strands tightly.
If your in-ceiling speakers have spring clips, firmly press the release mechanism and insert the wire fully. For models with binding posts, loosen the terminal, insert the wire, and tighten securely. Avoid letting stray copper strands touch both terminals, as this can cause a short circuit. After connecting, gently tug on the wire to verify it's firmly seated.
- Use banana plugs or spade connectors with binding post terminals for a more secure and easily detachable connection, especially in tight ceiling spaces.
- Double-check polarity by matching the positive (+) terminal on the amplifier to the corresponding terminal on each speaker to maintain phase coherence.
- Conceal wire ends not currently used with wire nuts and electrical tape to prevent accidental contact and potential shorting during future maintenance.
How to connect and play music through ceiling speakers?

To connect and play music through ceiling speakers, you need to properly set up your audio equipment, match the speaker impedance with your amplifier or receiver, and run speaker wires from the source to the speakers. First, ensure your ceiling speakers are installed correctly in the desired rooms.
Then, connect them to an AV receiver or amplifier that supports the speaker configuration (such as stereo or multi-zone). Use appropriate gauge speaker wire (typically 16 or 14 AWG) and run it from the receiver's speaker terminals to each ceiling speaker.
Secure connections using wire stripping and proper terminal connections (such as banana plugs or bare wire to spring clips or binding posts). Finally, connect a music source—such as a smartphone, streaming device, or smart speaker—to the receiver via Bluetooth, AUX, HDMI, or Wi-Fi, and play your audio. Make sure volume levels are balanced and phase is correctly aligned across speakers.
Choosing the Right Amplifier or Receiver
- Select an amplifier or AV receiver that matches your ceiling speakers’ impedance (usually 4 to 8 ohms) and power handling (watts RMS). Mismatched power can damage the speakers or result in poor sound quality.
- Determine how many zones you want to support. For multiple rooms with ceiling speakers, a multi-zone receiver allows you to play different music in different areas or the same audio throughout.
- Ensure the amplifier has input options that match your music sources, such as Bluetooth, optical input, or Wi-Fi streaming via apps like Spotify Connect or Apple AirPlay.
Wiring and Connecting Ceiling Speakers
- Run speaker wire from your amplifier or receiver to each ceiling speaker location while the power is off. Use in-wall rated speaker wire (CL2 or CL3) for safety and code compliance.
- Strip about half an inch of insulation from the ends of the wire and connect the positive (red or marked) terminal on the amplifier to the positive terminal on the speaker, and the negative (black or unmarked) to negative.
- Secure connections either by inserting bare wire into spring clips, using banana plugs, or tightening under binding posts. Avoid loose wires to prevent signal loss or short circuits.
Integrating Music Sources with Your Speaker System
- Pair a Bluetooth transmitter to your amplifier if it doesn’t have built-in Bluetooth. This allows wireless streaming from smartphones, tablets, or laptops.
- Use auxiliary (AUX) or RCA cables to connect devices like MP3 players, TVs, or turntables directly to available input ports on the receiver.
- For whole-home audio, integrate a streaming audio receiver or a Sonos Amp that supports multi-room Wi-Fi control, enabling app-based music selection and volume adjustment by room.
Frequently Asked Questions
How do I connect ceiling speakers to my amplifier or receiver?
Connect ceiling speakers to your amplifier or receiver using speaker wire rated for in-wall use (typically 14-16 gauge). Match the positive (+) and negative (-) terminals on the speaker to the corresponding terminals on the amplifier. Strip about 1/2 inch of insulation from the wire ends, insert them securely into the terminals, and tighten. Ensure the amplifier impedance matches the speaker load (usually 4-8 ohms) to prevent damage.
Can I wire multiple ceiling speakers to one audio source?
Yes, you can wire multiple ceiling speakers to one audio source by connecting them in parallel or series, depending on impedance. Parallel wiring keeps impedance low and is common for 8-ohm speakers, but check your amplifier’s minimum impedance rating. Series wiring increases impedance and may reduce volume. Use a speaker selector switch for safe, efficient control of multiple speakers while protecting your amplifier from overload.
Do I need an amplifier for ceiling speakers?
Yes, ceiling speakers require an amplifier or AV receiver to function, as they are typically passive and don’t have built-in power. The amplifier sends audio signals through speaker wires to drive the sound. Choose an amplifier compatible with the speaker’s impedance (usually 4-8 ohms) and power handling (wattage) to ensure clear sound and prevent damage. Active ceiling speakers with built-in amps are also available.
What type of wire should I use for ceiling speakers?
Use CL2 or CL3-rated speaker wire for ceiling speakers, as it’s designed for in-wall and in-ceiling use and meets fire safety codes. A 14-gauge wire is ideal for runs up to 50 feet, while 16-gauge works for shorter distances. Ensure the wire has oxygen-free copper for better conductivity. Always match wire length and gauge to your system’s power and impedance requirements.
Leave a Reply