
How To Connect To Ceiling Speakers

Connecting ceiling speakers properly enhances audio quality and ensures a seamless listening experience throughout your home.
Whether you're upgrading your entertainment system or installing speakers for the first time, understanding the basics of wiring, placement, and amplifier compatibility is essential. This guide walks you through each step, from selecting the right speaker type to safely managing electrical connections and impedance matching.
With clear instructions and safety tips, you'll learn how to mount speakers, run cables efficiently, and connect them to your audio source without complications. Proper setup not only improves sound distribution but also preserves equipment longevity. Follow this comprehensive approach to achieve optimal performance from your ceiling speaker system.
 How To Connect Pyle Bluetooth Speakers
How To Connect To Ceiling Speakers
Connecting ceiling speakers involves both electrical and audio wiring knowledge to ensure high-quality sound and safe installation.
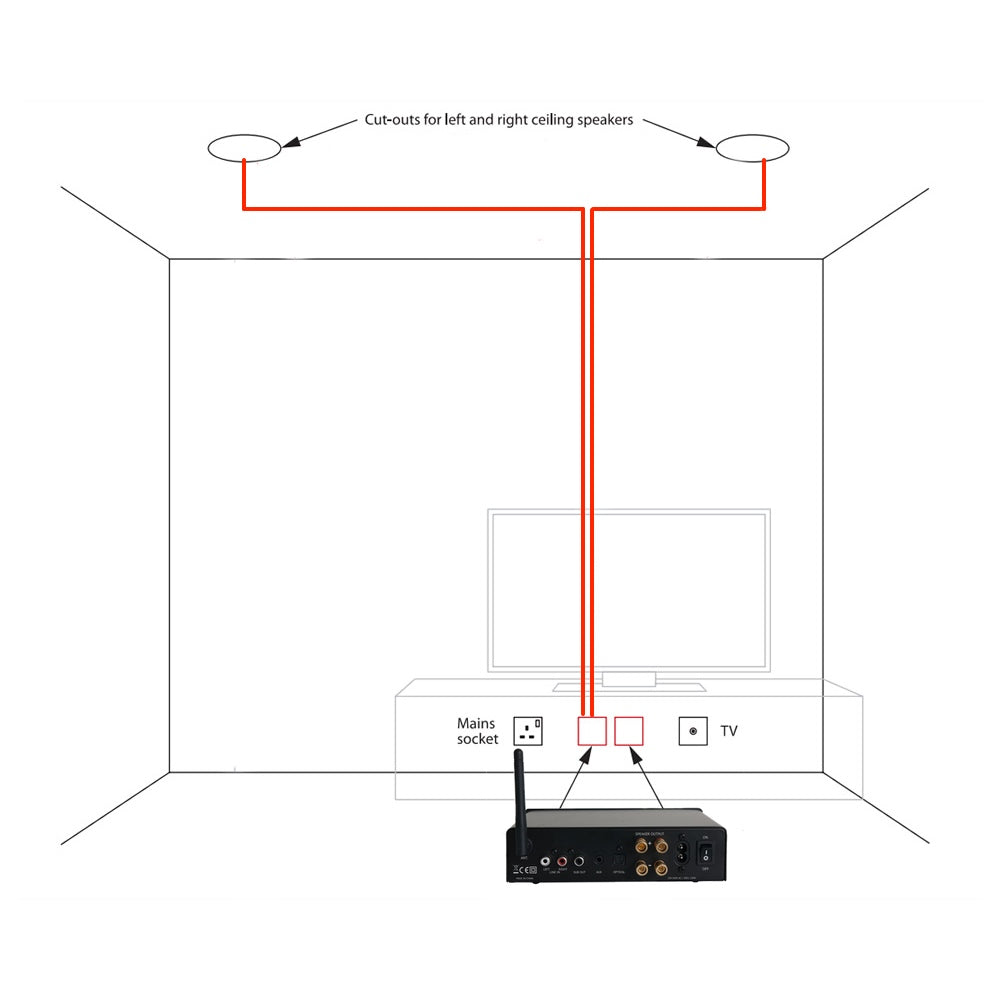
Proper setup begins with choosing the right speaker type and amplifier or receiver, followed by planning speaker placement based on room acoustics and the layout of your home audio system. Most ceiling speakers are 8-ohm models designed for use with standard AV receivers or dedicated amplifier systems.
You'll need to run speaker wire (typically 16-gauge or 14-gauge, depending on distance) from the audio source to each speaker location, ensuring polarity is maintained (positive to positive, negative to negative). If you're integrating the speakers into a surround sound system, correct channel assignment and impedance matching are essential.
For wireless options, some modern ceiling speakers support Bluetooth or Wi-Fi connectivity, though most installations still rely on physical wiring for reliability and audio fidelity. Always turn off power when working near electrical wiring and consider hiring a professional if you're uncertain about in-wall cabling or compliance with local building codes.
 How To Connect Receiver To Speakers
Choosing the Right Speaker Wire and Tools
Selecting the correct speaker wire is critical for maintaining audio quality and avoiding signal loss, especially over longer distances.
For most home installations up to 50 feet, 16-gauge wire is sufficient, but for runs beyond that or for higher-power systems, 14-gauge wire is recommended to reduce resistance. Look for CL2 or CL3-rated cables if running wires inside walls or ceilings, as these are fire-resistant and approved for in-wall use.
Essential tools include a drywall saw for cutting speaker openings, a stud finder to avoid structural beams, wire strippers, and banana plugs or spade connectors for secure connections at the amplifier and speaker ends. Using a fish tape can greatly simplify pulling wires through tight ceiling spaces. Proper tools and materials ensure a clean, safe installation and minimize the risk of damage to wires or drywall during setup.
Understanding Speaker Impedance and Amplifier Compatibility
Matching your ceiling speakers’ impedance (measured in ohms) with your amplifier or receiver is essential to prevent damage and ensure optimal performance. Most ceiling speakers are 8-ohm models, which are compatible with standard home AV receivers.
 How To Connect Samsung Rear Speakers To Soundbar Wireless
If you wire multiple speakers in parallel, the total impedance load decreases, potentially overloading your amplifier if it’s not designed to handle lower impedances like 4 ohms. To avoid this, consider using an impedance-matching volume control or wiring speakers in series when necessary, though this reduces overall volume.
Some multi-room audio systems use distributors or speaker selectors with built-in impedance protection to allow safe connection of multiple zones. Always consult your amplifier’s manual for its minimum impedance rating and recommended speaker configurations to keep your system stable and sound clear.
Wiring and Connecting Speakers to an AV Receiver or Amplifier
Once wires are run from the ceiling speaker locations to your AV receiver or amplifier, making secure and correct connections is crucial.
Strip about half an inch of insulation from the ends and attach them to the speaker terminals, matching positive (+) and negative (-) connections on both the receiver and speaker ends—reversing polarity can cause phase issues and weakened bass response. Most speakers use spring clips or binding posts; for a more secure connection, use banana plugs, especially if you plan to disconnect speakers frequently.
 How To Connect Sonos To Speakers
If your setup includes multiple rooms or zones, label each wire pair during installation to avoid confusion. After connecting, perform a speaker test using the receiver’s built-in calibration system (like Audyssey or YPAO) to verify that each speaker is functioning and properly configured within the audio system.
| Component | Recommended Option | Notes |
|---|---|---|
| Speaker Wire Gauge | 16 or 14 AWG | Use 14-gauge for long runs or high-power systems |
| Cable Rating | CL2 or CL3 | Required for in-wall/ceiling installation and safety compliance |
| Speaker Impedance | 8 ohms | Ensure your amplifier supports 8-ohm loads |
| Connection Type | Banana plugs or bare wire | Banana plugs offer better contact and easier maintenance |
| Tools Needed | Stud finder, drywall saw, fish tape | Essential for precise cutting and wire routing |
How to Connect Ceiling Speakers: A Step-by-Step Installation Guide
How to wire ceiling speakers properly for optimal sound output?
Selecting the Right Gauge Wire and Materials
Choosing the appropriate speaker wire gauge is crucial for maintaining signal integrity and achieving optimal sound quality. Using a wire that's too thin can result in resistance buildup, especially over longer distances, which diminishes audio performance and can strain your amplifier.
For most ceiling speaker installations covering runs under 50 feet, 16-gauge wire is sufficient. However, for longer runs or higher-powered systems, upgrading to 14-gauge wire is recommended to reduce resistance.
 How To Connect Speakers To Laptop
Additionally, ensure the wire is CL2 or CL3 rated, which indicates it is suitable for in-wall and in-ceiling use and meets safety standards for fire resistance. Always include a moisture-resistant and low-smoke cable, especially in damp areas like bathrooms or outdoor ceilings.
- Use 16-gauge wire for runs under 50 feet in standard installations.
- Upgrade to 14-gauge wire for longer distances or high-power audio systems.
- Choose CL2 or CL3-rated cables to comply with building codes and ensure safe in-wall installation.
Proper Wiring Techniques and Polarity Consistency
Correct wiring techniques directly influence speaker performance and stereo imaging. Before running wires through walls or ceilings, strip about half an inch of insulation from each end of the wire using a proper wire stripper to avoid damaging the copper strands. A
lways maintain polarity across all speakers: connect the positive terminal on the amplifier to the positive terminal on the speaker, and the same for the negative terminals.
Inconsistent polarity causes phase issues, resulting in weak bass and a disjointed soundstage. Label each wire at both ends during installation to avoid confusion, especially when dealing with multiple speakers. Also, leave at least 2–3 feet of extra wire at both the amplifier and speaker ends to allow for adjustments and future maintenance.
 How To Connect Speakers To LG TV
- Strip wire ends carefully to prevent copper strand damage and ensure good connectivity.
- Match positive to positive and negative to negative terminals to maintain proper phase alignment.
- Label wires and leave excess length at both ends to simplify setup and future troubleshooting.
Optimizing Speaker Placement and Impedance Matching
Strategic speaker placement and correct impedance management are vital for balanced sound distribution. Ceiling speakers should be installed symmetrically, typically at least 6–8 feet apart, and angled slightly toward the primary listening area to enhance directionality and clarity.
Avoid placing speakers too close to walls or corners to minimize bass buildup and distortion. When connecting multiple speakers to a single amplifier channel, pay attention to impedance.
Wiring speakers in parallel lowers the total impedance, so two 8-ohm speakers in parallel present a 4-ohm load. Ensure your amplifier is rated to handle the final impedance to prevent overheating or damage. Consider using impedance-matching volume controls or a distributed speaker system for larger setups.
- Position speakers at even intervals and angle them toward the listening zone for optimal coverage.
- Avoid mounting too close to walls to reduce sound coloration and bass resonance.
- Verify amplifier compatibility with total speaker impedance, especially in multi-speaker configurations.
How to Connect and Play Music Through Ceiling Speakers

Choosing the Right Audio Source for Ceiling Speakers
- Select a compatible audio source such as a smartphone, tablet, laptop, AV receiver, or dedicated streaming device. Ensure the source has an audio output option that matches your amplifier or receiver’s input requirements, like RCA, optical, or Bluetooth.
- If using wireless technology, confirm that your amplifier or receiver supports Bluetooth, Wi-Fi, or AirPlay. This allows direct streaming from mobile devices or voice-controlled speakers like Amazon Echo or Google Home.
- For multi-room audio setups, consider a whole-home audio system such as Sonos, Denon HEOS, or Yamaha MusicCast. These systems provide centralized control and seamless integration with ceiling speakers throughout different rooms.
Wiring and Connecting Ceiling Speakers to an Amplifier
- Run speaker wire from the amplifier or receiver to each ceiling speaker location. Use CL3/FT4-rated cable for in-wall and in-ceiling installations to meet safety and building code standards.
- Strip approximately half an inch of insulation from each end of the speaker wire and attach the positive (usually red or marked with a stripe) and negative (copper or marked with a minus) wires to the corresponding terminals on both the amplifier and speaker.
- Use a multimeter or continuity tester to verify correct polarity and avoid phase issues. Secure all connections tightly and use wire connectors or terminal blocks where necessary to prevent loose wires.
Configuring and Testing the Audio Output
- Power on the amplifier or receiver and select the correct input source that corresponds to your connected audio device. Adjust the volume to a moderate level before playback begins.
- Play a test track with clear vocals and stereo separation to evaluate sound distribution. Walk around the room to identify any imbalance, distortion, or weak coverage areas.
- Use the amplifier’s equalizer settings, if available, to fine-tune bass, treble, and balance. For advanced systems, run an automatic room calibration using built-in microphone systems like Audyssey or Yamaha YPAO.
How to properly wire and connect ceiling speakers for optimal sound performance

Selecting the Right Speaker and Wiring Gauge
Choosing appropriate ceiling speakers and the correct gauge of speaker wire is crucial for achieving optimal audio performance and preventing signal loss.
Low-gauge wires (such as 14 or 16 AWG) are thicker and offer less resistance, making them ideal for longer wire runs and higher power systems. For short to moderate distances (up to 50 feet), 16-gauge wire is typically sufficient.
However, for longer distances or multi-room audio setups, 14-gauge or even 12-gauge wire is recommended to maintain signal integrity. Additionally, ensure that the speakers are rated for in-ceiling installation and possess a suitable frequency response and power handling that aligns with your audio system.
- Determine the distance from your amplifier or receiver to each speaker location to decide the appropriate wire gauge.
- Use CL2 or CL3-rated speaker wire, which is certified for in-wall installation and meets fire safety codes.
- Match the speaker’s impedance (usually 4, 6, or 8 ohms) with your amplifier’s output specifications to avoid overloading the receiver.
Planning and Running the Wiring
Proper planning of wire paths ensures a clean installation and minimizes signal interference. Before cutting drywall or running wires through joists, create a layout diagram showing speaker locations, amplifier placement, and the most efficient routing path.
Avoid running speaker wires parallel to electrical cables, as this can cause electromagnetic interference that degrades audio quality. If crossing electrical lines is unavoidable, do so at a perpendicular angle. To protect the wire and simplify future upgrades, use low-voltage conduit or fish tape when installing through walls or ceilings, especially in finished rooms.
- Use a stud finder and voltage detector to safely mark ceiling joists and avoid drilling into existing plumbing or electrical lines.
- Label both ends of each wire run (e.g., “Front Left,” “Rear Right”) to ensure correct connections during speaker installation.
- Leave at least 2 feet of extra wire at both ends (amplifier and speaker) to allow for adjustments and re-terminations.
Connecting and Mounting Ceiling Speakers
Secure and accurate wiring connections are critical to ensure reliable performance and prevent short circuits.
Strip approximately half an inch of insulation from each wire end using a proper wire stripper to expose clean copper. Connect the positive (usually red or marked with a stripe) terminal on the speaker to the positive output on the amplifier, and do the same for the negative terminals.
Many in-ceiling speakers have spring clips or binding posts—ensure wires are firmly inserted and locked. After wiring, carefully insert the speaker into the ceiling cutout and tighten the mounting clamps to secure it flush against the ceiling surface without over-tightening, which could damage the frame.
- Double-check polarity consistency across all speakers to maintain proper phase alignment, which enhances stereo imaging and bass response.
- Use wire connectors or crimp sleeves if splicing wires to prevent loose strands from causing shorts.
- Test each speaker with a multimeter before final installation to confirm continuity and correct wiring.
Frequently Asked Questions
How do I connect ceiling speakers to my amplifier or receiver?
Connect ceiling speakers to your amplifier or receiver using speaker wire run from the output terminals on the device to each speaker. Strip about half an inch of insulation from each wire end, then secure the positive (+) and negative (–) wires to corresponding terminals on both the receiver and speaker. Ensure the wire gauge matches your speaker’s requirements and keep wire runs as short as possible to reduce signal loss and interference.
What type of wire should I use for ceiling speakers?
Use CL2 or CL3-rated speaker wire for in-wall and in-ceiling installations, as these are fire-resistant and approved for such use. Choose 14-gauge wire for long runs or high-power systems, and 16-gauge for shorter distances. Make sure the insulation is intact and always match impedance between speakers and the amplifier. Avoid using regular electrical wire, as it is not designed for audio signals and may pose safety risks.
Can I install ceiling speakers without professional help?
Yes, many people install ceiling speakers without professional help if they have basic tools and electrical knowledge. Carefully follow the manufacturer’s instructions, turn off power in the work area, and use a stud finder to avoid structural damage. Test each speaker before final installation. If running wires through walls or ceilings seems complex, or involves electrical work near mains power, it's best to hire a professional installer.
How do I test ceiling speakers after connecting them?
After connecting, use your receiver’s built-in test tone or play audio to check each speaker. Many AV receivers have an auto-calibration feature with a setup microphone that tests output and balance. Manually verify by listening for clear, balanced sound from each speaker. If one speaker doesn’t work, recheck wire connections, polarity, and ensure the receiver is configured correctly for that speaker zone.
Leave a Reply