
Ceiling Speakers How To Connect

Connecting ceiling speakers properly ensures optimal sound quality and system performance. Whether you're upgrading your home audio or installing a new setup, understanding the basics of wiring and compatibility is essential. This guide walks you through the step-by-step process of connecting ceiling speakers, from selecting the right cables and amplifier to matching impedance and polarity.
Safety tips, tools needed, and common mistakes to avoid are also covered. With clear instructions and practical advice, you’ll be able to integrate ceiling speakers seamlessly into your audio environment, achieving a clean, immersive listening experience throughout your space.
How to Connect Ceiling Speakers: A Step-by-Step Guide
Connecting ceiling speakers properly ensures optimal sound quality and system performance. Whether you're setting up a home theater, multi-room audio, or background music system, understanding the correct wiring, impedance matching, and amplifier compatibility is essential.
 Club Car Onward Bluetooth Speakers How To Connect
This guide walks you through the key steps—from choosing the right cables to making secure connections—so you can install your ceiling speakers with confidence and achieve a clean, professional result.
Selecting the Right Speaker Wire and Gauge
Choosing the correct speaker wire and gauge (thickness) is crucial to maintain audio signal integrity and prevent power loss. For most residential ceiling speaker installations, 16-gauge wire is sufficient for runs up to 50 feet, while longer distances may require 14-gauge wire to minimize resistance.
Always use stranded copper wire designed for in-wall use, typically labeled CL2 or CL3 for fire safety compliance. Avoid using standard electrical wire, as it’s not rated for audio signals or safe in-wall installation. Proper wire selection ensures clarity, reduces distortion, and supports speaker performance across your audio system.
Matching Impedance with Your Amplifier or Receiver
Matching speaker impedance (measured in ohms) with your amplifier or receiver is vital for system stability and longevity. Most ceiling speakers have a 4-ohm or 8-ohm impedance, and connecting mismatched loads can cause overheating or equipment failure.
 Coby Speakers How To Connect
If using multiple speakers, calculate the total impedance—wiring in parallel reduces impedance, while series wiring increases it. Modern AV receivers often support 4-ohm loads, but verify specifications before connecting. Using an impedance-matching volume knob or multi-zone speaker selector can help manage multiple speakers safely and maintain amplifier compatibility.
Proper Wiring and Connection Techniques
Secure and clean wiring ensures consistent sound and long-term reliability. Begin by cutting speaker wire with about 12 inches of slack at both the amplifier and speaker ends. Strip about 1/2 inch of insulation and twist the strands before inserting into spring clips or binding posts.
Ensure polarity is consistent—positive (+) to positive, negative (–) to negative—to prevent phase issues. Use in-wall wire connectors or insulation caps if splicing, and label wires for easy identification. Test connections with a multimeter before powering the system. Neat routing and secure terminations reduce interference, noise, and connection failures.
| Factor | Recommendation | Notes |
|---|---|---|
| Wire Gauge | 16-gauge (up to 50 ft); 14-gauge (longer runs) | Thicker wire reduces signal loss over distance |
| Wire Type | CL2 or CL3 rated stranded copper | Mandatory for in-wall safety and durability |
| Impedance | Match 4-ohm or 8-ohm speakers with compatible amp | Avoid overloading amplifier with low impedance |
| Connection Polarity | Positive to positive, negative to negative | Ensures proper speaker phase and sound quality |
| Tools Needed | Wire stripper, drill, stud finder, multimeter | Ensures precise and safe installation |
How to Connect Ceiling Speakers: A Step-by-Step Installation Guide
How to properly wire and connect ceiling speakers for optimal sound performance

 Creative Bluetooth Speakers How To Connect
Selecting the Right Speaker Wire and Tools
Choosing the proper wiring and tools is crucial to ensure clean signal transmission and minimize resistance, which directly affects sound quality. The gauge of the speaker wire plays a significant role—16-gauge wire is suitable for runs up to 50 feet, while 14-gauge is better for longer distances to reduce signal loss.
Always use CL2 or CL3 rated cables if running through walls or ceilings, as they are fire-resistant and meet safety standards. In addition to the wire, gather essential tools such as a stud finder, drywall saw, fish tape, wire stripper, and a voltage tester to safely identify electrical lines. Preparing these materials beforehand streamlines the installation and ensures a professional setup.
- Use 16-gauge speaker wire for short runs (under 50 feet) and 14-gauge for longer runs to prevent signal degradation.
- Choose CL2 or CL3-rated speaker wire for in-wall/ceiling installations to comply with fire safety codes.
- Equip yourself with a stud finder, fish tape, wire stripper, drywall saw, and voltage tester to ensure safe and accurate installation.
Planning Speaker Placement and Layout
Proper speaker positioning greatly enhances audio immersion and clarity, especially in stereo or surround sound systems. For stereo setups, position the ceiling speakers at a 22 to 30-degree angle relative to the primary listening area, forming an equilateral triangle with the listener at the apex. Avoid placing speakers too close to walls or corners to reduce bass buildup and distortion.
In multi-room installations, maintain consistent spacing—typically 8 to 10 feet apart in rectangular rooms—to deliver even sound coverage. Always consider room dimensions, furniture layout, and ceiling height when planning locations, and use masking tape to mark proposed cutouts for a visual preview before making permanent openings.
 Creative Speakers For PC How To Connect
- Angle stereo ceiling speakers between 22 to 30 degrees from the listening position to create an optimal soundstage.
- Keep speakers at least 1.5 to 2 feet away from walls and corners to prevent audio distortion and bass resonance.
- Space speakers 8 to 10 feet apart in multi-room or larger areas to ensure balanced sound distribution.
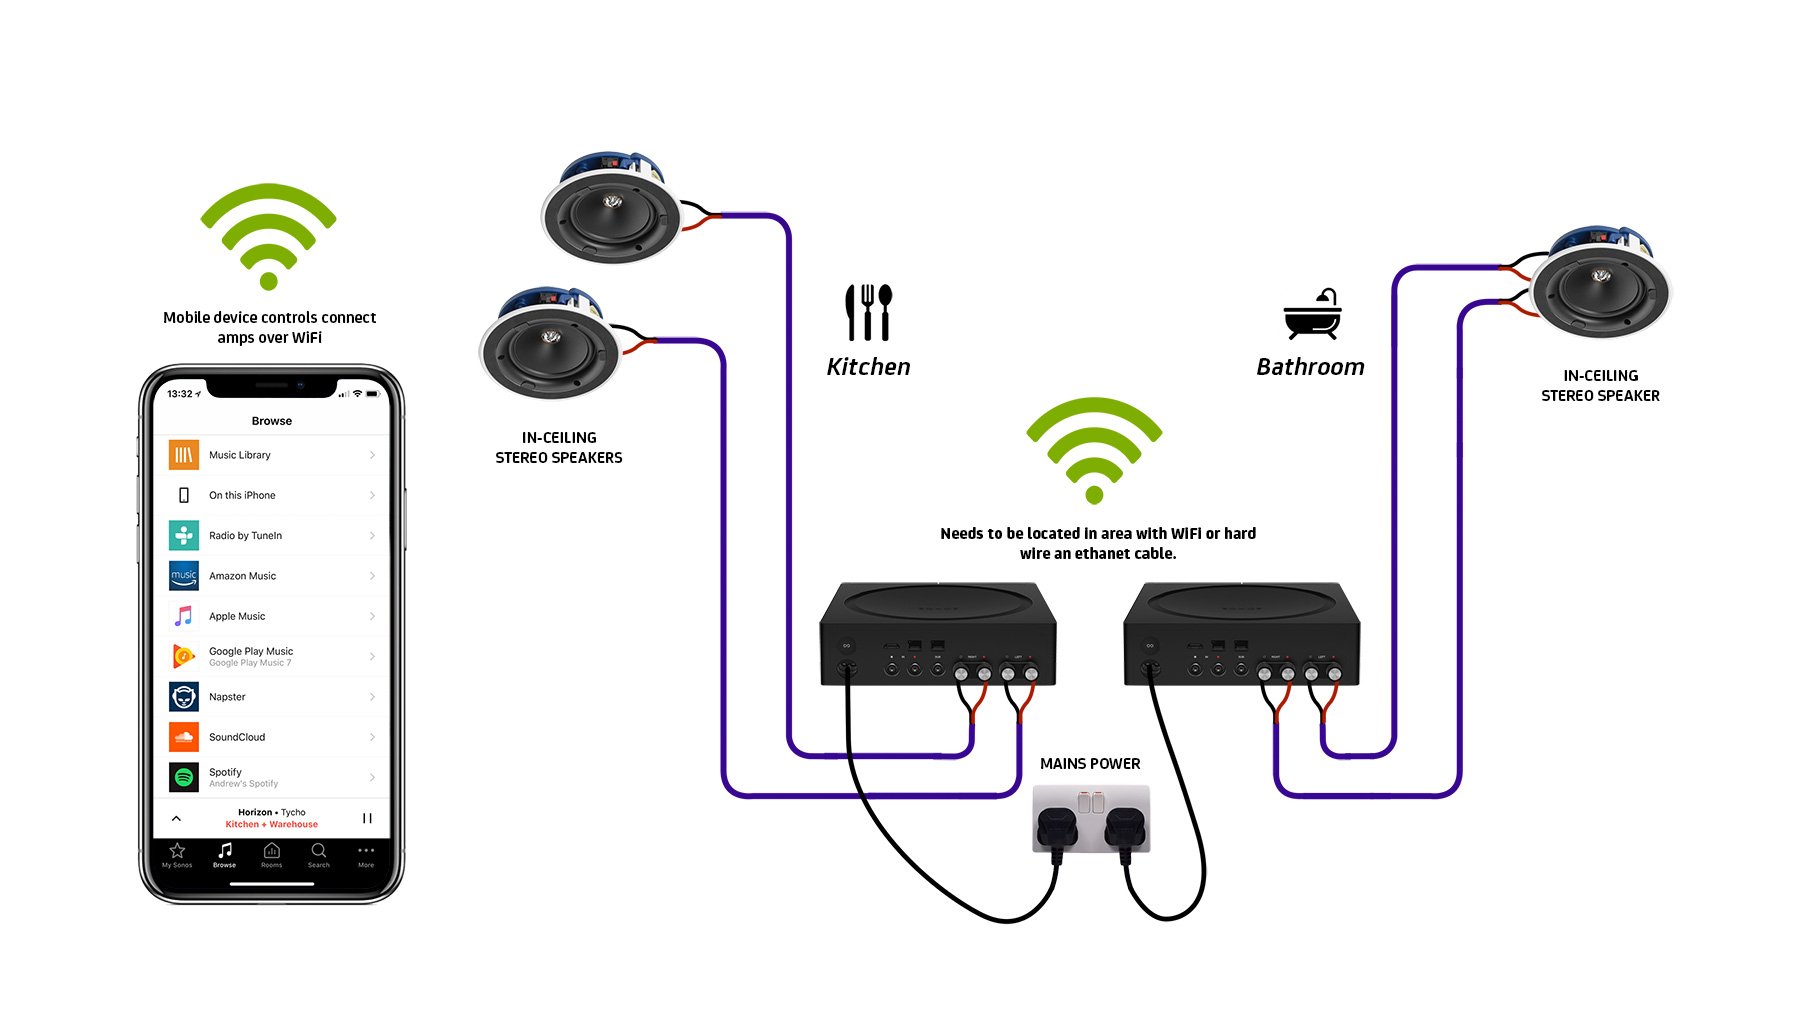
Wiring and Connecting to the Audio Source
Correctly connecting ceiling speakers to the amplifier or receiver ensures impedance matching and prevents damage to equipment.
Begin by running the speaker wire from the amplifier location to each speaker cutout using fish tape, leaving about 18 inches of excess wire at both ends. Strip approximately half an inch of insulation from each wire end and attach them to the speaker terminals—red (positive) to red, black (negative) to black.
At the amplifier, connect the other end to the corresponding channel using binding posts or spring clips, ensuring polarity consistency across all speakers. For multi-zone setups, use a speaker selector switch with impedance protection to safely manage multiple pairs without overloading the amplifier.
- Run CL-rated speaker wire from the amplifier to each speaker location, using fish tape and leaving ample slack for connections.
- Connect wires to speaker terminals with correct polarity: positive (red) to positive, negative (black) to negative.
- Use a speaker selector with impedance matching for multi-room systems to avoid overloading the amplifier.
What equipment is required to connect and power ceiling speakers?

 Creative Speakers How To Connect
Audio Source and Amplification Equipment
To connect and power ceiling speakers, the primary equipment needed includes an audio source and a capable amplifier or receiver. The audio source can be any device that produces sound, such as a smartphone, TV, streaming device, or media player.
However, since ceiling speakers typically require more power than portable devices can provide, they need to be connected to an external amplifier or AV receiver. This amplifier boosts the audio signal to a level that can effectively drive the speakers. It is important to match the impedance and power output of the amplifier with the specifications of the ceiling speakers to ensure optimal performance and prevent damage.
- An audio source such as a smartphone, television, or streaming box provides the initial signal.
- An AV receiver or stereo amplifier processes and amplifies the audio signal for speaker output.
- Impedance compatibility between the amplifier and speakers (commonly 4 to 8 ohms) ensures reliable operation.
Speaker Wiring and Connection Components
Proper wiring is essential to transmit the amplified audio signal from the receiver to the ceiling speakers. The standard wire used is speaker wire, typically in 14 or 16-gauge thickness, depending on the distance and power requirements.
Longer runs benefit from thicker (lower gauge) wire to reduce signal loss. Along with the wire, you may need connectors such as banana plugs, spade terminals, or pin connectors for secure attachment to both the amplifier and speaker terminals. In-wall rated speaker wire (CL2 or CL3) is required if the wiring is concealed within walls or ceilings to meet fire safety codes.
 Edifier Bluetooth Speakers How To Connect
- Use in-wall rated CL2 or CL3 speaker wire for safe and code-compliant installations.
- Select the appropriate wire gauge—14-gauge for long runs or high-power setups, 16-gauge for shorter distances.
- Connectors like banana plugs or stripped wire ends ensure firm connections at both amplifier and speaker terminals.
Mounting Hardware and Speaker Accessories
In addition to electronic components, physical installation requires specific mounting hardware tailored to ceiling speakers. Most ceiling speakers come with built-in clamping mechanisms or dog-leg brackets that secure the speaker to the ceiling's structural material. Tools such as a drywall saw or hole saw are necessary to cut precise openings based on the speaker's size.
It is also beneficial to use backer brackets or mounting braces, especially when installing in areas without direct joist support, to provide stability and prevent the speaker from falling. Acoustic sealant or foam gaskets may be used to isolate vibrations and improve sound quality by reducing sound leakage into adjacent spaces.
- Utilize adjustable mounting clips or backer brackets for secure installation in various ceiling types.
- Cut accurate openings with a hole saw or drywall cutter, guided by the speaker’s template.
- Apply acoustic sealant or insulation caps to minimize sound leakage and enhance audio performance.
How to Wire Ceiling Speakers Without an Amplifier: Step-by-Step Guide
To wire ceiling speakers without an amplifier, you can connect them directly to a source that has a built-in amplifier. Most modern audio devices such as smartphones, TVs, or soundbars lack sufficient power to drive passive ceiling speakers effectively. However, using a powered audio source such as a receiver with a built-in amplifier, a smart speaker with line-out capability, or an audio interface with amplification allows you to bypass the need for a separate amplifier.
The wiring process involves selecting the right speaker wire, running it from the audio source to the ceiling speaker locations, making secure connections using terminal or spring clips, and ensuring proper polarity for optimal sound. It's crucial to check whether your ceiling speakers are passive or active.
If they are active (powered), they require a power outlet and can be connected directly to an audio source via an auxiliary or digital connection. If they’re passive, they must be connected to a powered source that can provide sufficient wattage. Always turn off power during installation and follow safety protocols to prevent electric shock or damage to equipment.
Selecting the Right Audio Source with Built-In Amplification
- Identify whether your ceiling speakers are passive or active. Passive speakers require an external power source through a built-in amplifier in the audio device, while active speakers have internal amplifiers and only need a direct audio signal and power connection.
- Choose an audio source such as a stereo receiver, home theater receiver, or an audio interface that includes amplification. Many smart TVs, media streamers, or Bluetooth receivers offer audio output but do not provide enough power, so verify the device’s output specifications to ensure compatibility.
- Use a device with a preamp output or powered speaker output terminals. For example, a multi-room audio system controller or a receiver with zone outputs can power passive ceiling speakers without requiring an additional amplifier. Match the speaker impedance (usually 4–8 ohms) with the output specifications of the audio source to avoid overloading the system.
Running and Connecting Speaker Wire Properly
- Measure the distance from your audio source to each ceiling speaker location to determine the length of speaker wire needed. Use at least 16-gauge wire for runs up to 50 feet to minimize resistance; for longer distances, consider 14-gauge wire to maintain audio quality.
- Run the wire through walls or ceilings using fish tape or a drill to create access points. Avoid running speaker cables near electrical wiring to prevent interference. Secure the wire with staples or clips, ensuring it’s not stretched too tightly or damaged during installation.
- Strip about half an inch of insulation from the ends of the wire and connect them to the speaker terminals, matching positive (+) to positive and negative (-) to negative. Use banana plugs, spade connectors, or bare wire depending on your speaker’s connection type, ensuring a firm and stable connection to prevent signal loss.
Testing and Optimizing Audio Output
- Once the wiring is complete, connect the other end of the speaker wire to the audio source’s speaker output terminals. Make sure to match the polarity on both ends—left front, right front, etc.—to ensure correct stereo imaging and phase alignment.
- Power on the audio source and play a test track with balanced left and right channels. Listen for sound from each speaker to verify that both channels are functioning and balanced. If one speaker is silent or distorted, recheck connections and polarity.
- Adjust the audio source’s speaker settings if available, such as distance, level, or equalization. For systems with multiple zones, set the correct zone to active. Perform a final check at various volume levels to ensure there is no humming, distortion, or dropouts, indicating a solid and effective setup.
Frequently Asked Questions
How do I connect ceiling speakers to my audio receiver?
Connect ceiling speakers to your audio receiver using speaker wire rated for in-wall use, typically 16 or 14 gauge. Run the wire from the receiver to each speaker location, matching positive (+) and negative (-) terminals. Strip the wire ends, insert them into the corresponding terminals on the receiver and speakers, and tighten securely. Ensure your receiver supports the speaker impedance (usually 8 ohms) to prevent damage and ensure optimal performance.
What type of wire should I use for ceiling speakers?
Use CL2 or CL3-rated speaker wire for ceiling speakers, as these are designed for in-wall and in-ceiling installations and meet fire safety standards. A 16-gauge wire is sufficient for runs under 50 feet, while 14-gauge is better for longer distances to reduce resistance. Make sure the wire is oxygen-free copper (OFC) for better conductivity. Avoid using standard zip cord, as it’s not safe or efficient for permanent installations.
Can I install ceiling speakers without professional help?
Yes, you can install ceiling speakers without professional help if you have basic tools and knowledge of wiring. Use a stud finder and voltage detector to locate safe drilling spots. Cut holes using a template, run wires carefully, and connect them properly. However, if you're working with high-voltage wiring, integrating with a complex audio system, or unsure about electrical safety, hiring a professional ensures proper and safe installation.
Do ceiling speakers need an amplifier to work?
Yes, ceiling speakers typically need an amplifier or AV receiver to work, as they are passive and require external power. The amplifier sends audio signals and provides the necessary power to produce sound. Some models are powered (active) and have built-in amplifiers, but most in-ceiling speakers are passive and must be connected to a separate amplifier or receiver for operation and volume control.
Leave a Reply