
How To Connect Amp To Car Speakers
Connecting an amplifier to car speakers significantly enhances audio quality, delivering clearer highs, deeper bass, and a more immersive listening experience.
Proper installation ensures optimal performance and protects both the amplifier and speakers from damage. The process involves identifying the correct wiring, establishing secure power and ground connections, linking the amplifier to the head unit, and connecting speaker wires accurately.
Understanding basic electrical principles and using the right tools are essential for a successful setup. This guide walks you through each step carefully, helping you achieve powerful, distortion-free sound in your vehicle without requiring professional assistance.
 Altec Lansing Computer Speakers How To Connect
How To Connect Amp To Car Speakers: A Step-by-Step Guide
Connecting an amplifier to your car speakers significantly enhances audio quality, delivering more power and clarity to your music.
Whether you’re upgrading from a factory stereo system or installing a new aftermarket setup, properly connecting your amplifier ensures optimal performance and prevents damage to your components. This process involves wiring the amp to your car battery for power, grounding it securely, connecting it to the head unit for audio signal, and finally linking it to your speakers.
With the right tools, cables, and understanding of the electrical system, even someone with basic automotive knowledge can complete the installation successfully. Following safety protocols and double-checking connections is essential to avoid short circuits or overheating.
Understanding Amplifier and Speaker Impedance Compatibility
Before connecting your amplifier to car speakers, it's critical to match the amplifier's output impedance with the speakers’ rated impedance, typically measured in ohms.
 Amplifier How To Connect Speakers To TV
Mismatched impedance can lead to poor sound quality, amplifier overheating, or even permanent damage. Most car speakers are either 4-ohm or 2-ohm, and many amplifiers are designed to handle both, especially when wired in parallel or series configurations.
Always check the specifications of both your amp and speakers to ensure compatibility. Matching impedance correctly maximizes power transfer and ensures stable operation. For example, a two-channel amp running in stereo mode should deliver power suited to each speaker’s impedance, while a mono subwoofer amp must match the total load presented by the sub(s) wired together.
| Speaker Configuration | Total Impedance (Ohms) | Recommended Amp Type |
|---|---|---|
| Two 4-Ohm Speakers (Parallel) | 2 Ohms | 2-Ohm Stable Stereo Amp |
| Single 4-Ohm Subwoofer | 4 Ohms | Single-Channel Mono Amp |
| Four 2-Ohm Speakers (Series-Parallel) | 2 Ohms | Multi-Channel 2-Ohm Stable Amp |
Essential Wiring and Tools for Amp Installation
To successfully connect an amplifier to your car speakers, you'll need a complete wiring kit that includes power and ground cables, RCA audio cables, remote turn-on wire, and speaker wires.
The power cable should be thick enough (measured by gauge) to handle the amp's current draw—usually 4-gauge for most mid-power amps and 0-gauge for high-power systems. The ground wire must be connected to a clean, unpainted metal point on the car chassis, ensuring a solid electrical connection that prevents noise and voltage drops.
 AmpMe How To Connect Multiple Speakers
RCA cables transfer the audio signal from the head unit to the amp, while the remote turn-on wire enables the amp to power on automatically when the stereo is turned on. Using wire crimpers, heat shrink tubing, and a multimeter helps ensure clean, safe, and durable connections throughout the installation.
Connecting the Amplifier to Speakers: Series vs. Parallel
Once the amplifier is powered and grounded, the next step is connecting it to the speakers using either a series or parallel wiring configuration, depending on the number of speakers and desired impedance load.
In series wiring, the positive terminal of the amp connects to the positive of the first speaker, then the negative of that speaker connects to the positive of the next, and so on—the final speaker’s negative attaches back to the amp. This increases total impedance.
In contrast, parallel wiring connects all positive speaker terminals together and to the amp's positive output, and all negative terminals together to the amp’s negative—this reduces impedance. Choosing the correct wiring method ensures your amplifier operates within its stable range. Always verify the final impedance with a multimeter before powering the system to prevent overloading the amplifier.
 How To Connect 2 JBL Speakers To One Phone
How to Connect an Amplifier to Car Speakers: Step-by-Step Guide
How to properly wire car speakers to an amplifier for optimal sound performance
Choosing the Right Gauge Wiring for Your Setup
Selecting the correct wire gauge is crucial to ensure your car audio system delivers clean power without voltage drops or overheating.
Using wire that is too thin can restrict current flow, leading to poor performance and potential amplifier damage. To determine the appropriate gauge, consider both the amplifier’s power output and the length of the run from the battery to the amplifier. Thicker wires (lower gauge numbers) are better suited for high-power systems and longer cable runs.
For example, a 1000-watt amplifier located in the trunk may require 4-gauge power wire, while a smaller 200-watt amp might only need 10-gauge. Always consult the amplifier’s manual for manufacturer recommendations and match the ground wire gauge to the power wire for safety and balance.
- Assess your amplifier's total power output (usually labeled as RMS) to determine power wire gauge.
- Measure the distance from the car battery to the amplifier location to account for voltage drop over distance.
- Use an automotive wire gauge chart to match power, distance, and wire thickness for optimal performance.
Proper Audio Signal and RCA Cable Routing
The path of your RCA cables significantly affects sound quality by influencing susceptibility to electromagnetic interference. If route improperly—such as running near power wires or factory harnesses—RCA cables can pick up noise, causing hums or buzzing in the speakers.
 How To Connect 2 LG XBoom Speakers
Always run signal cables on the opposite side of the vehicle from power cables, especially the main power wire from the battery. If crossing power and RCA cables is unavoidable, do so at a 90-degree angle to minimize interference. Additionally, use high-quality shielded RCA cables to further protect signal integrity and ensure clean audio transmission from the head unit to the amplifier.
- Separate RCA signal cables from power and speaker wires to reduce interference and electrical noise.
- When crossover with power cables is necessary, ensure it occurs at a perpendicular (90-degree) angle.
- Invest in well-shielded, low-capacitance RCA cables to maintain high-fidelity signal transfer.
Correct Speaker Wiring and Phase Alignment
Connecting speakers to the amplifier with correct polarity and phase ensures balanced, full-range sound and prevents audio cancellation. Always match the positive terminal on the amplifier to the positive terminal on the speaker (typically marked with a + or red color), and do the same for the negative terminals.
If one speaker is out of phase, the sound waves from the speakers interfere destructively, especially in the low end, making bass response weak and unfocused. Use consistent wire colors or markings throughout your system to maintain uniform polarity. After installation, test each speaker using test tones to verify that all drivers push and pull air in sync.
- Match positive (+) amplifier outputs to positive (+) speaker terminals and repeat for negative terminals to maintain proper polarity.
- Use color-coded or labeled speaker wire to avoid confusion during installation and future upgrades.
- Perform a phase test using an audio test tone or phase-check app to confirm all speakers are operating in unison.
How to Properly Match and Connect an Amplifier to Car Speakers
 How To Connect 2Boom Speakers
Selecting the Right Amplifier for Your Car Speakers
Choosing an amplifier that matches your car speakers is crucial for optimal sound quality and preventing damage to your audio components. Begin by checking the impedance (measured in ohms) and power handling capacity (measured in watts RMS) of your speakers.
The amplifier should be able to deliver power within the recommended range of your speakers at the same impedance. For example, if your speakers are rated at 4 ohms and can handle 50 watts RMS each, the amplifier should provide around 50 watts RMS per channel at 4 ohms.
It is also important to consider the number of channels on the amplifier—two-channel amps are ideal for driving two separate speakers, while four-channel amps can power a full set of front and rear speakers. If you are adding a subwoofer, a dedicated mono or two-channel amp might be necessary. Always match RMS ratings rather than peak power, as RMS reflects real, continuous power output.
- Determine the impedance and RMS power rating of your car speakers.
- Choose an amplifier that provides similar power output at the same impedance.
- Ensure the amplifier has the correct number of channels to support your speaker setup.
- Use RMS specifications, not peak power, when comparing amplifier and speaker ratings.
- Consider a separate amplifier for subwoofers to maintain clarity and power distribution.
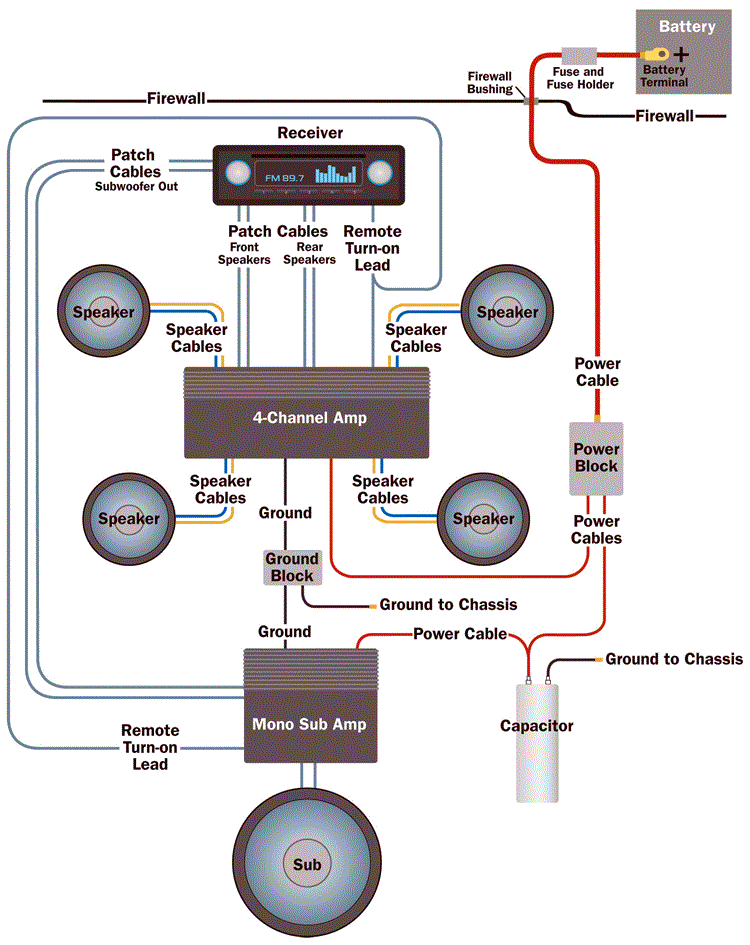
Wiring the Amplifier to the Car's Power Source and Head Unit
Proper wiring ensures safe and efficient operation of your amplifier. Start by connecting the amplifier to the car’s power source using a fused power wire, typically run from the positive terminal of the battery through the firewall into the cabin, where the amplifier is mounted.
Always install an in-line fuse within 18 inches of the battery to protect against electrical fires. The ground wire should be connected to a clean, unpainted metal point on the car’s chassis, ideally close to the amplifier. The remote turn-on wire (usually blue or blue/white) connects to the head unit’s amplifier turn-on output so the amplifier powers on with the stereo.
RCA cables carry the audio signal from the head unit to the amplifier inputs. Use high-quality shielded RCA cables to minimize interference. Finally, the amplifier’s input sensitivity (gain) should be properly adjusted to match the head unit’s output to avoid distortion.
- Run a fused power wire from the battery’s positive terminal to the amplifier, using the correct gauge for the amp’s power draw.
- Connect the amplifier’s ground wire to a bare metal section of the car chassis near the amp.
- Attach the remote turn-on wire to the head unit’s remote output terminal.
- Use shielded RCA cables to connect the audio output of the head unit to the amplifier inputs.
- Adjust the amplifier’s gain control after installation to match the input signal and prevent clipping.
Connecting the Amplifier to the Car Speakers
Once the amplifier has a stable power and signal connection, it’s time to connect the speakers. Use speaker wire of adequate gauge (typically 16–12 AWG depending on power and distance) to connect the amplifier’s output terminals to the corresponding speaker terminals.
Match the positive (+) terminal on the amplifier to the positive on the speaker, and the same for the negative (-), ensuring correct polarity to maintain phase alignment.
If using a multi-channel amplifier, pair front and rear speakers appropriately, or bridge channels if the amplifier supports it and you're running fewer speakers. For subs, ensure the subwoofer’s impedance matches the amp’s stability—some amplifiers can handle 2-ohm or even 1-ohm loads when bridged or in parallel. Always double-check wiring before powering on the system to prevent short circuits or component damage.
- Use properly sized speaker wire to connect the amplifier outputs to each speaker.
- Observe correct polarity by matching positive to positive and negative to negative terminals.
- Connect multiple speakers per channel only if the total impedance remains within the amplifier’s safe range.
- Bridge amplifier channels if needed, following the manufacturer’s wiring diagram.
- Verify all connections are secure and free from contact with metal or other wires before powering on.
What type of cable is needed to connect an amplifier to car speakers?
To connect an amplifier to car speakers, you typically need speaker wire, which is a type of stranded copper cable designed to carry amplified audio signals from the amplifier's output to the speaker terminals. The appropriate gauge (thickness) of the wire depends on the power output of the amplifier and the length of the cable run.
For most car audio applications, 16-gauge to 12-gauge wire is sufficient. Lower gauge numbers indicate thicker wires capable of handling higher power with less resistance. Ensuring high-quality insulation and oxygen-free copper (OFC) helps maintain signal integrity and prevent electrical loss or interference.
Choosing the Right Gauge of Speaker Wire
- The gauge of speaker wire determines its ability to carry electrical current efficiently over a distance. For short runs (less than 10 feet) and lower power systems (under 50 watts RMS per channel), 16-gauge wire is usually adequate.
- For higher power output (50–100 watts RMS) or longer cable lengths, 14-gauge or 12-gauge wire is recommended to minimize resistance and power loss, ensuring the speakers receive the full audio signal without degradation.
- Using wire that is too thin for the amplifier’s power output can lead to voltage drop, overheating, and even potential damage to the amplifier or speakers over time, so matching the wire gauge to the system’s specifications is essential.
Types of Speaker Wire Materials and Their Impact
- Oxygen-free copper (OFC) is commonly used in quality speaker wire because it provides excellent conductivity and reduces signal loss due to impurities in the metal, making it ideal for clear, high-fidelity audio reproduction.
- Copper-clad aluminum (CCA) wire is a less expensive alternative but has higher resistance than pure copper, which can diminish performance, especially in high-power systems. It's suitable for budget setups with lower power demands.
- High-end options may include silver-plated copper or stranded designs with enhanced insulation, which help reduce skin effect and interference, delivering better clarity and consistency, particularly in premium audio installations.
Proper Installation and Connection Techniques
- To ensure a secure and low-resistance connection, it's important to strip the insulation carefully—typically about 1/2 inch—without damaging the internal strands, and to twist the wire tightly before inserting it into the amplifier and speaker terminals.
- Always route speaker wires away from power cables and signal cables (such as RCA cables) to avoid electromagnetic interference, which can introduce hum or noise into the audio signal; crossing cables at 90-degree angles minimizes this risk.
- Using wire connectors like spade or pin terminals can improve connection stability and make installation cleaner, especially when connecting to screw terminals on amplifiers and speakers, while also reducing oxidation over time.
Frequently Asked Questions
How do I connect an amplifier to my car speakers?
To connect an amplifier to your car speakers, run speaker wires from the amplifier’s output terminals to each speaker, matching positive and negative leads. Ensure the amplifier is powered by connecting it to the car battery (via a fuse), a ground wire, and the remote turn-on wire. Use a line output converter if tapping factory speaker wires. Always disconnect the battery before wiring and double-check connections to prevent shorts or damage.
Can I install a car amplifier without a professional?
Yes, you can install a car amplifier without professional help if you have basic wiring knowledge and the right tools. Follow a wiring kit guide and double-check connections for power, ground, and audio signals. Ensure all wires are secured and insulated. While DIY installation saves money, mistakes can cause electrical issues or damage components, so proceed carefully or consult tutorials if unsure about any step.
What wires do I need to hook up an amp to car speakers?
You need several wires: power wire (from battery to amp), ground wire (to chassis), remote turn-on wire (from stereo), and RCA cables (from head unit to amp). Speaker wires connect the amp outputs to each speaker. Use appropriate gauge wires based on amplifier power. Include an in-line fuse near the battery for safety. Proper insulation and secure routing prevent shorts and ensure reliable performance.
Do I need a line output converter (LOC) when adding an amp?
Yes, you may need a line output converter if your car has a factory stereo without RCA outputs. An LOC converts high-level speaker signals into low-level signals the amplifier can accept. This ensures compatibility and improves sound quality. Choose a high-quality LOC with built-in amplification for better performance. Always match the LOC’s input rating to your factory system’s output to avoid distortion or signal loss.
Leave a Reply