
How To Connect Ceiling Speakers To Receiver

Connecting ceiling speakers to a receiver can significantly enhance your home audio experience, delivering immersive sound without the clutter of floor-standing or wall-mounted systems.
Proper setup ensures optimal performance and clarity, whether for music, movies, or gaming. This guide walks you through the essential steps, from choosing the right speaker and receiver models to running speaker wire safely through walls or ceilings.
You'll learn about impedance matching, correct polarity, and using appropriate connectors to maintain signal integrity. With careful planning and attention to wiring standards, you can achieve a seamless, professionally installed look and superior audio performance throughout your space.
 How To Connect Multiple Speakers On Spotify
How To Connect Ceiling Speakers To Receiver: Step-by-Step Guide
Connecting ceiling speakers to a receiver properly enhances your home audio experience by delivering immersive sound throughout a room. To begin, ensure your receiver supports the number of speakers you're installing and that the impedance (measured in ohms) of the ceiling speakers matches your receiver’s output specifications—most receivers work optimally with 6-ohm to 8-ohm speakers.
Start by turning off all devices to prevent electrical surges or damage. Run speaker wire from the receiver location to each ceiling speaker location, leaving about 12–18 inches of extra wire at both ends for ease of connection.
At the receiver, strip about half an inch of insulation from the ends of each wire, identifying positive (+) and negative (-) leads (usually marked with a stripe or color). Connect the positive wire to the corresponding positive terminal on the receiver and the negative to the negative terminal, typically using spring clips, binding posts, or banana plugs.
Repeat this process for each speaker, maintaining consistent polarity across all connections. Once connected, double-check wire security and configure your receiver’s speaker settings through its setup menu—selecting speaker size, distance, and audio calibration using a built-in test tone or an external microphone. This ensures balanced volume and clarity throughout your audio system.
 How To Connect Multiple Speakers To Bluetooth
Choosing the Right Speaker Wire Gauge
Selecting the correct speaker wire gauge is crucial to maintain audio quality and prevent signal loss over long distances. The gauge refers to the thickness of the wire—lower gauge numbers indicate thicker wires that can carry audio signals more efficiently. For most ceiling speaker installations, especially those with runs under 50 feet, a 16-gauge wire is sufficient.
However, for longer distances or high-power systems, 14-gauge wire is recommended to reduce resistance. Always use stranded copper wire with CL2 or CL3 rating, which is designed for in-wall and in-ceiling use and meets fire safety standards. Using the wrong wire gauge can lead to weak sound output, distortion, or even damage to your receiver due to excessive impedance.
Matching Speaker Impedance With Receiver Output
Proper impedance matching between your ceiling speakers and AV receiver prevents overloading and ensures optimal performance.
Most ceiling speakers have an impedance of 6 ohms or 8 ohms, while receivers list compatible impedance ranges—commonly 6–8 ohms. Connecting speakers with an impedance lower than the receiver's minimum rating may cause overheating or shutdown. When wiring multiple speakers in parallel, the total impedance decreases, so it’s essential to calculate the combined load.
 Rocker Gaming Chair With Speakers How To Connect
For example, two 8-ohm speakers in parallel yield a 4-ohm load, which some receivers may not support. To avoid issues, use impedance-matching volume controls or wire speakers in series when necessary, or verify your receiver supports low-impedance loads or has multiple speaker impedance settings.
Using Banana Plugs or Bare Wire for Connections
The method of connecting speaker wire to your receiver—whether via banana plugs or bare wire—affects both convenience and connection quality.
Bare wire connections involve stripping the insulation and inserting the copper strands directly into spring clips or binding posts; they’re cost-effective but can loosen over time and are less clean in appearance. Banana plugs, on the other hand, provide a secure, consistent connection, reduce the risk of stray strands causing short circuits, and make installations and future maintenance easier.
Most modern receivers support banana plug inputs, especially on binding post terminals. If you choose banana plugs, ensure they are compatible with your receiver’s terminal size and use oxygen-free copper (OFC) plugs for better conductivity. While banana plugs require an initial investment, they enhance reliability and professional look of your audio setup.
 Recoton Wireless Speakers How To Connect
| Factor | Recommendation | Purpose |
|---|---|---|
| Wire Gauge | 16-gauge (up to 50 ft), 14-gauge (longer runs) | Minimize resistance and signal loss |
| Wire Rating | CL2 or CL3 (in-wall rated) | Safety compliance and durability |
| Impedance | 6–8 ohms (match with receiver specs) | Prevent receiver overload and distortion |
| Connection Type | Banana plugs or bare wire | Ensure secure and clean electrical contact |
| Polarity | Match + and − on both ends | Maintain phase coherence and sound clarity |
How to Connect Ceiling Speakers to a Receiver: Step-by-Step Guide
How to wire ceiling speakers to a receiver?
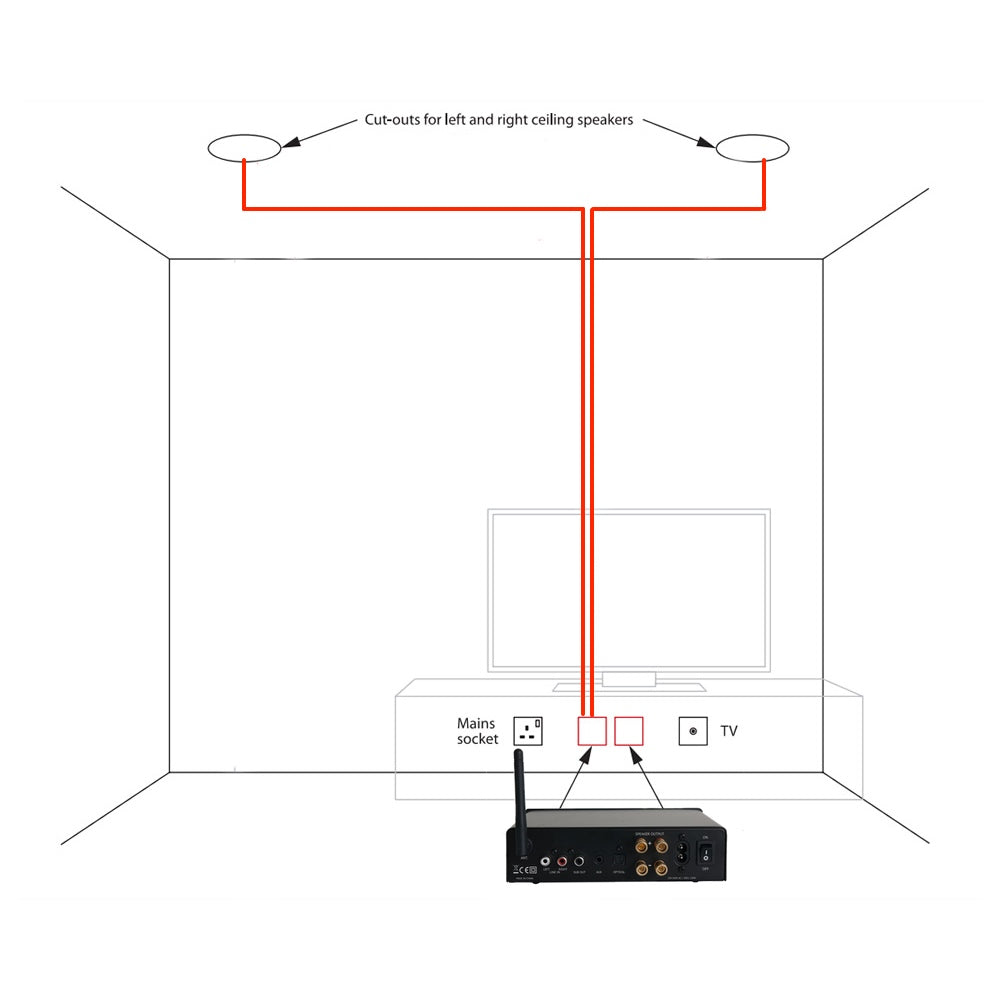
Planning and Preparing the Ceiling Speaker Installation
- Begin by measuring the room dimensions and determining the optimal placement of the ceiling speakers to achieve balanced sound distribution. A common layout for stereo audio is placing speakers equidistant from the primary listening area, typically forming an equilateral triangle with the listener's position.
- Select speaker wire appropriate for in-wall or in-ceiling use, such as CL2 or CL3-rated cable, which meets fire safety standards for running through walls and ceilings. Choose 16-gauge wire for runs under 50 feet and 14-gauge for longer distances to minimize signal loss.
- Ensure the ceiling structure can support the speakers and mark drilling locations using a stud finder to avoid joists or electrical wiring. Cut holes following the speaker manufacturer’s specifications using a drywall saw or hole-cutting tool.
Running Speaker Wire from Receiver to Ceiling Locations
- Turn off power to the room at the circuit breaker and locate access points—above ceilings (attic), below (crawlspace), or through walls—based on receiver and speaker positions. Use fish tape or a flexible rod to route wires through the ceiling cavity.
- Run the wire from the AV receiver location to each ceiling speaker location, leaving an extra 2 to 3 feet of slack at both ends for connections. Secure the wire loosely with staples if running along joists, ensuring not to pinch or damage the insulation.
- If no attic access is available, drill through top plates or baseboards to feed wire discreetly into walls and up into the ceiling, using wall plates or trim to conceal entry points. Label both ends of each wire run for easy identification during connection.
Connecting Ceiling Speakers to the AV Receiver
- Strip approximately half an inch of insulation from both ends of each speaker wire using a wire stripper. Match polarity by identifying the positive (+) and negative (–) terminals—most wires have a stripe or texture on the positive side.
- Attach the stripped ends of the wires to the binding posts or spring clips on the back of each ceiling speaker, ensuring tight, secure connections. Insert the positive wire to the positive terminal and the negative to the negative to maintain correct phase alignment.
- At the AV receiver, connect the other ends of the wires to the corresponding speaker output terminals (e.g., front left, front right) using the same polarity. Tighten binding posts or insert wires fully into spring clips, then power on the system and test each speaker using the receiver’s calibration or test tone function.
Can ceiling speakers be connected directly to a receiver for optimal audio performance?
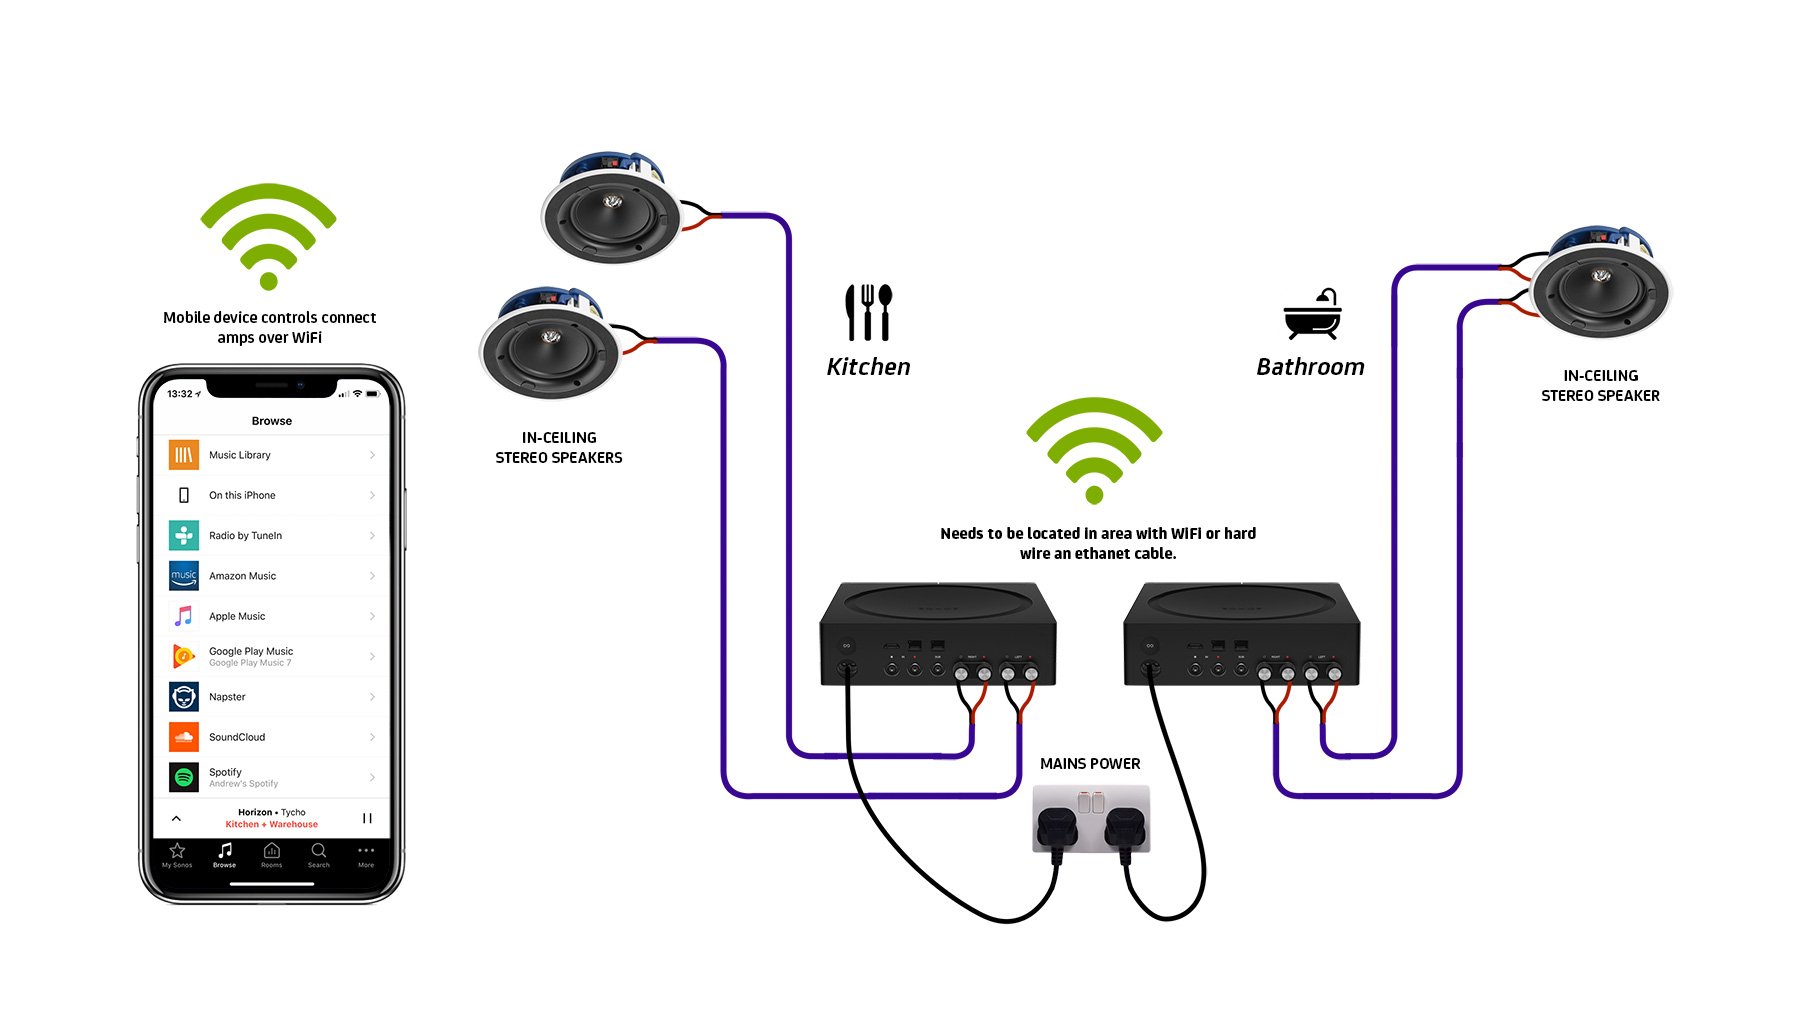
Yes, ceiling speakers can be connected directly to a receiver for optimal audio performance, provided that the receiver is compatible with the speakers' impedance and power handling specifications.
Most modern AV receivers are designed to power passive ceiling speakers without the need for external amplification. By connecting ceiling speakers directly to a receiver, you simplify the audio setup, reduce the number of components, and minimize signal loss that can occur with additional amplification stages.
 QTX Speakers Bluetooth How To Connect
It is essential to match the speaker's impedance (typically 4 to 8 ohms) with the receiver's output specifications and ensure that the receiver can handle the total load when multiple speakers are connected. Additionally, using appropriately rated speaker wire (such as 14 or 16-gauge) helps maintain signal integrity and ensures safe operation.
1. Compatibility Between Receiver and Ceiling Speakers
- Matching impedance is critical—most ceiling speakers operate at 6 to 8 ohms, which aligns with standard AV receivers that support 6-ohm or higher loads per channel.
- Ensure the receiver's continuous power output (measured in watts RMS) falls within the power range the ceiling speakers can handle, typically between 25 and 100 watts per speaker.
- Check the receiver's number of available amplifier channels to confirm it can support all connected ceiling speakers, especially in multi-room or surround sound setups.
2. Proper Wiring and Signal Integrity
- Use stranded copper speaker wire with proper gauge: 14-gauge for runs over 50 feet and 16-gauge for shorter distances to minimize resistance and maintain audio quality.
- Keep speaker wires away from electrical cables and power sources to avoid electromagnetic interference that could introduce hum or noise into the audio signal.
- Strip wire ends cleanly and connect them securely to both the receiver’s binding posts and the speaker terminals to ensure a solid connection and prevent signal dropouts.
3. Configuration and Calibration for Best Results
- Access the receiver’s setup menu to configure speaker size, distance, and output levels—identify ceiling speakers as “small” or “large” based on their frequency response and crossover settings.
- Run the receiver’s built-in auto-calibration system (such as Audyssey, YPAO, or AccuEQ) to optimize volume levels, time delays, and frequency response based on room acoustics.
- Set proper crossover frequencies (usually 80 Hz) to redirect low-frequency signals to a subwoofer if the ceiling speakers are not designed to handle deep bass, improving clarity and system balance.
How to Connect Ceiling Speakers to a Receiver Without an Amplifier?

Understanding the Role of a Receiver and Ceiling Speaker Compatibility
- Most modern AV receivers have built-in amplifiers that allow them to power passive ceiling speakers directly, which eliminates the need for an external amplifier. Before connecting, verify that your receiver is rated to handle the impedance (measured in ohms) and power requirements (watts per channel) of your ceiling speakers. Typical ceiling speakers are 6 to 8 ohms and require 25 to 100 watts, which most mid-range receivers can support.
- Ensure that your ceiling speakers are passive, meaning they do not have their own power source and rely on the receiver for amplification. Active or powered ceiling speakers, on the other hand, have built-in amplifiers and are not suitable for direct connection unless the receiver’s pre-out or line-out terminals are used, which is a different setup.
- Check the receiver’s speaker A/B or multi-zone terminals if you plan on using multiple pairs of ceiling speakers. Some receivers feature A/B speaker terminals, allowing simultaneous connection to two sets of speakers. If the receiver supports zones, you may route audio to ceiling speakers in another room via the Zone 2 or Zone 3 outputs.
Proper Wiring and Connection Techniques
- Use appropriate speaker wire, typically 14 or 16-gauge, depending on the distance between the receiver and the ceiling speakers. Longer runs (over 50 feet) benefit from thicker 14-gauge wire to reduce resistance and signal loss. Run the wires through walls or ceilings carefully, avoiding sharp bends and potential interference from electrical lines.
- Connect the positive terminal (usually red or marked with a “+”) on the receiver to the corresponding positive terminal on the speaker. Do the same with the negative terminals (black or “-”). Inconsistent polarity across speakers can result in phase issues, leading to poor sound quality and weak bass response.
- Strip about half an inch of insulation from each end of the wire using a wire stripper. Insert the bare wire into the binding posts on the receiver and speakers, then tighten the knobs or screws to secure the connection. For spring clip terminals, press the clip down and insert the wire fully to ensure a stable contact.
Configuring Receiver Settings for Ceiling Speakers
- Access the receiver’s setup menu using the remote control or front panel display. Navigate to the speaker configuration section and designate the channels connected to ceiling speakers. This might be labeled as “Surround Back,” “Height Speakers,” or “Zone 2,” depending on your system and layout.
- Run the receiver’s automatic room calibration system (such as Audyssey, YPAO, or MCACC) if available. These systems use a microphone to analyze speaker output and adjust volume levels, distances, and equalization to optimize sound across all speakers, including the ceiling pair.
- Adjust crossover settings so that low-frequency sounds are properly directed to a subwoofer instead of the ceiling speakers, which often struggle with bass. Setting the crossover around 80 Hz for smaller ceiling speakers ensures clearer audio and prevents strain on both the speakers and receiver.
Frequently Asked Questions
How do I connect ceiling speakers to a receiver?
Connect ceiling speakers to your receiver by running speaker wire from the receiver’s output terminals to each speaker. Strip the wire ends, match positive and negative polarities, and secure them to the corresponding terminals on both the receiver and speakers. Use compatible gauge wire (usually 16- or 14-gauge) for best results. Test the connection by playing audio to ensure proper setup and sound quality.
What type of wire should I use for ceiling speakers?
Use 16-gauge or 14-gauge speaker wire for ceiling speakers, depending on distance and power needs. For shorter runs (under 50 feet), 16-gauge wire is sufficient. For longer distances or higher power systems, use 14-gauge to reduce resistance. Ensure the wire is CL2 or CL3 rated for in-wall installation, providing safety and compliance with building codes. Always match wire quality to your system’s performance for best audio results.
 Pyle Speakers How To Connect
Do I need an amplifier for ceiling speakers?
If your ceiling speakers are passive, you need a receiver with a built-in amplifier to power them. Most home theater receivers can drive ceiling speakers as part of a surround sound setup. Active (powered) ceiling speakers have built-in amplifiers and may connect directly to a source or require a preamp output from the receiver. Always check speaker impedance and receiver compatibility to avoid damage and ensure optimal performance.
Can I connect multiple ceiling speakers to one receiver?
Yes, you can connect multiple ceiling speakers to one receiver if it has enough channels and supports the speaker load. Match the total impedance to the receiver’s specifications (typically 4-8 ohms). Use parallel or series wiring carefully to maintain proper impedance levels. Many receivers support multi-room or surround sound setups, allowing up to 5–7 speakers. Always consult your receiver’s manual for correct configuration and power limits.
Leave a Reply